

Question: If necessary, create a new project named ModifyThis19 Project and save it in the Cpp8Chap12 folder. Enter the C++ instructions shown earlier in Figure 12-10
If necessary, create a new project named ModifyThis19 Project and save it in the Cpp8\Chap12 folder. Enter the C++ instructions shown earlier in Figure 12-10 into a new source file named ModifyThis19.cpp. Change the filename in the first comment. Save and then run the program. Test the program using the following two pay codes: 6 and 5. Enter –1 to stop the program. Add a new pay code and pay rate to the array. The new pay code is 11, and its corresponding pay rate is $23. Make the appropriate modifications to the code. Save and then run the program. Test the program using the following three pay codes: 6, 5, and 11. Enter –1 to stop the program.
![1 //Wilson Company.cpp - displays the pay rate 2 //corresponding to the pay code entered by the user 3 //Created/revised by on 4 5 #include 6 using namespace std; 7 8 int main() 9 { 10 //declare array and variables 11 int codesAndRates[4][2] = {{3, 8}, {6,](https://dsd5zvtm8ll6.cloudfront.net/si.question.images/images/question_images/1598/0/0/1/6475f3f91efc123b1598001640949.jpg)
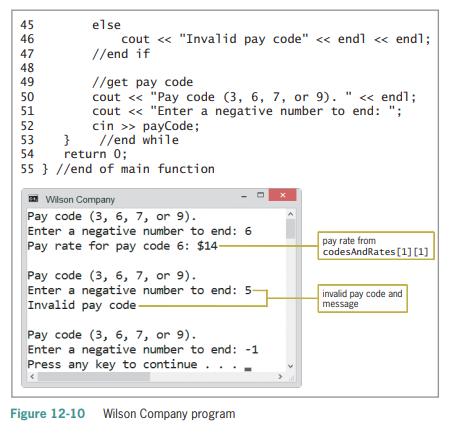
1 //Wilson Company.cpp - displays the pay rate 2 //corresponding to the pay code entered by the user 3 //Created/revised by on 4 5 #include 6 using namespace std; 7 8 int main() 9 { 10 //declare array and variables 11 int codesAndRates[4][2] = {{3, 8}, {6, 14}, {7, 18}, {9, 20}}; 12 13 14 int payCode = 0; int row = 0; 15 16 17 //get pay code cout payCode; 18 19 20 21 22 while (payCode >= 0) { //search each row in the array, looking //for the pay code in the first column //continue the search while there are //array elements to search and the pay //code has not been found row = 0; while (row
Step by Step Solution
3.34 Rating (160 Votes )
There are 3 Steps involved in it
Below is a corrected code I did not include the comments from the image due to the l... View full answer

Get step-by-step solutions from verified subject matter experts