

Question: 1. The Lab 1 Setup 1.1 Get the Lab 1 Download Click here Lab1.zip to download this lab's zip file Save Lab1.zip to your C:CppDevSp17
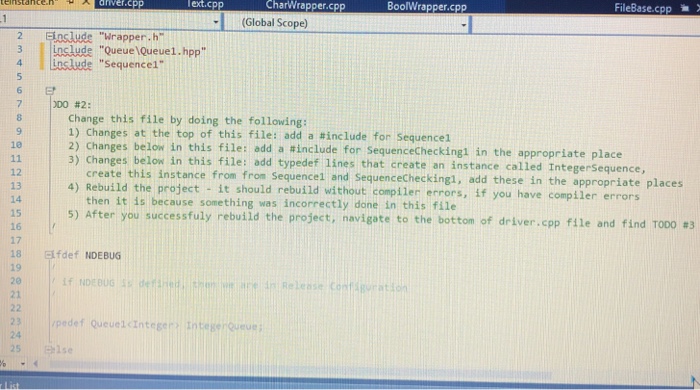
CharWrapper.cpp BoolWrapper.cpp FileBase.cpp driver.cpP (Global Scope) 2 Eoslude "Wrapper.h 3 nslude "Queue lQueue1.hpp" 4 Baslude "Sequence 00 #2: Change this file by doing the following: 1) Changes at the top of this file add a #include for sequence 1 2) Changes below in this file: add a #include for SequenceCheckingl in the appropriate place 3) Changes below in this file: add typedef lines that create an instance called IntegerSequence, 10 create this instance from from Sequence1 and SequenceCheckingl, add these in the appropriate places 12 13 14 15 16 17 18 fdef NDEBUG 4) Rebuild the project it should rebuild without compiler errors, if y then it is because something was incorrectly done in this file 5) Afte r you successfuly rebuild the project, navigate to the bottom of driver.cpp file and find TOOO.3 20 24 5lse CharWrapper.cpp BoolWrapper.cpp FileBase.cpp driver.cpP (Global Scope) 2 Eoslude "Wrapper.h 3 nslude "Queue lQueue1.hpp" 4 Baslude "Sequence 00 #2: Change this file by doing the following: 1) Changes at the top of this file add a #include for sequence 1 2) Changes below in this file: add a #include for SequenceCheckingl in the appropriate place 3) Changes below in this file: add typedef lines that create an instance called IntegerSequence, 10 create this instance from from Sequence1 and SequenceCheckingl, add these in the appropriate places 12 13 14 15 16 17 18 fdef NDEBUG 4) Rebuild the project it should rebuild without compiler errors, if y then it is because something was incorrectly done in this file 5) Afte r you successfuly rebuild the project, navigate to the bottom of driver.cpp file and find TOOO.3 20 24 5lse
Step by Step Solution
There are 3 Steps involved in it

Get step-by-step solutions from verified subject matter experts