

Question: A Notebook Computer Assembly Line, A manufacturing engineering section manager is examining the prototype assembly process sheet (shown in Exhibit 6.8) for his companys newest
A Notebook Computer Assembly Line,
A manufacturing engineering section manager is examining the prototype assembly process sheet (shown in Exhibit 6.8) for his companys newest subnotebook computer model. With every new model introduced, management felt that the assembly line had to increase productivity and lower costs, usually resulting in changes to the assembly process. When a new model is designed, considerable attention is directed toward reducing the number of components and simplifying parts production and assembly requirements. This new computer was a marvel of high-tech, low-cost innovation and should give the company an advantage during the upcoming fall/winter selling season.Production of the subnotebook is scheduled to begin in 10 days. Initial production for the new model is to be 150 units per day, increasing to 250 units per day the following week (management thought that eventually production would reach 300 units per day). Assembly lines at the plant normally are staffed by 10 operators who work at a 14.4-meter-long assembly line. The line is organized in a straight line with workers shoulder to shoulder on one side. The line can accommodate up to 12 operators if there is a need. The line normally operates for 7.5 hours a day (employees work from 8:15 A.M. to 5:00 P.M. and regular hours include one hour of unpaid lunch and 15 minutes of scheduled breaks). It is possible to run one, two, or three hours of overtime, but employees need at least three days notice for planning purposes.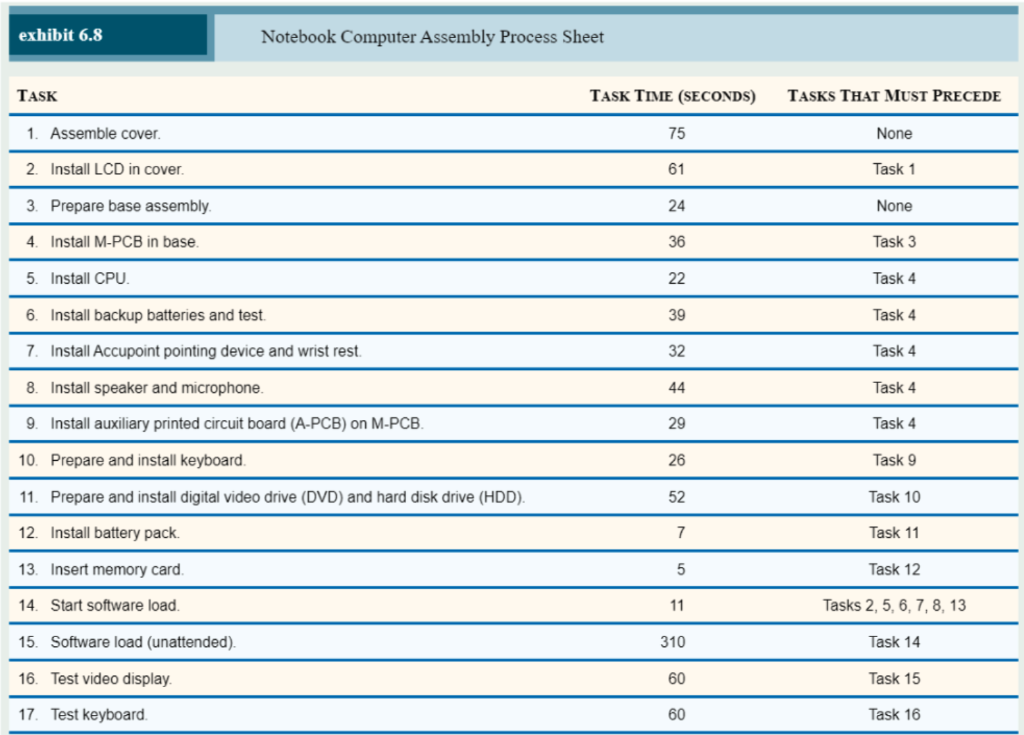
The Assembly Line,
At the head of the assembly line, a computer displays the daily production schedule, consisting of a list of model types and corresponding lot sizes scheduled to be assembled on the line. The models are simple variations of hard disk size, memory, and battery power. A typical production schedule includes seven or eight model types in lot sizes varying from 10 to 100 units. The models are assembled sequentially: All the units of the first model are assembled, followed by all the units of the second, and so on. This computer screen also indicates how far along the assembly line is in completing its daily schedule, which serves as a guide for the material handlers who supply parts to the assembly lines.The daily schedules are shared with the nearby Parts Collection and Distribution Center (PCDC). Parts are brought from the PCDC to the plant within two hours of when they are needed. The material supply system is very tightly coordinated and works well.The assembly line consists of a 14.4-meter conveyor belt that carries the computers, separated at 1.2-meter intervals by white stripes on the belt. Workers stand shoulder to shoulder on one side of the conveyor and work on the units as they move by. In addition to the assembly workers, a highly skilled worker, called a supporter, is assigned to each line. The supporter moves along the line, assisting workers who are falling behind and replacing workers who need to take a break. Supporters also make decisions about what to do when problems are encountered during the assembly process (such as a defective part). The line speed and the number of workers vary from day to day, depending on production demand and the workers skills and availability. Although the assembly line has 12 positions, often they are not all used.Exhibit 6.9 provides details of how the engineers who designed the new subnotebook computer felt that the new line should be organized. These engineers designed the line assuming that one notebook would be assembled every two minutes by six line workers.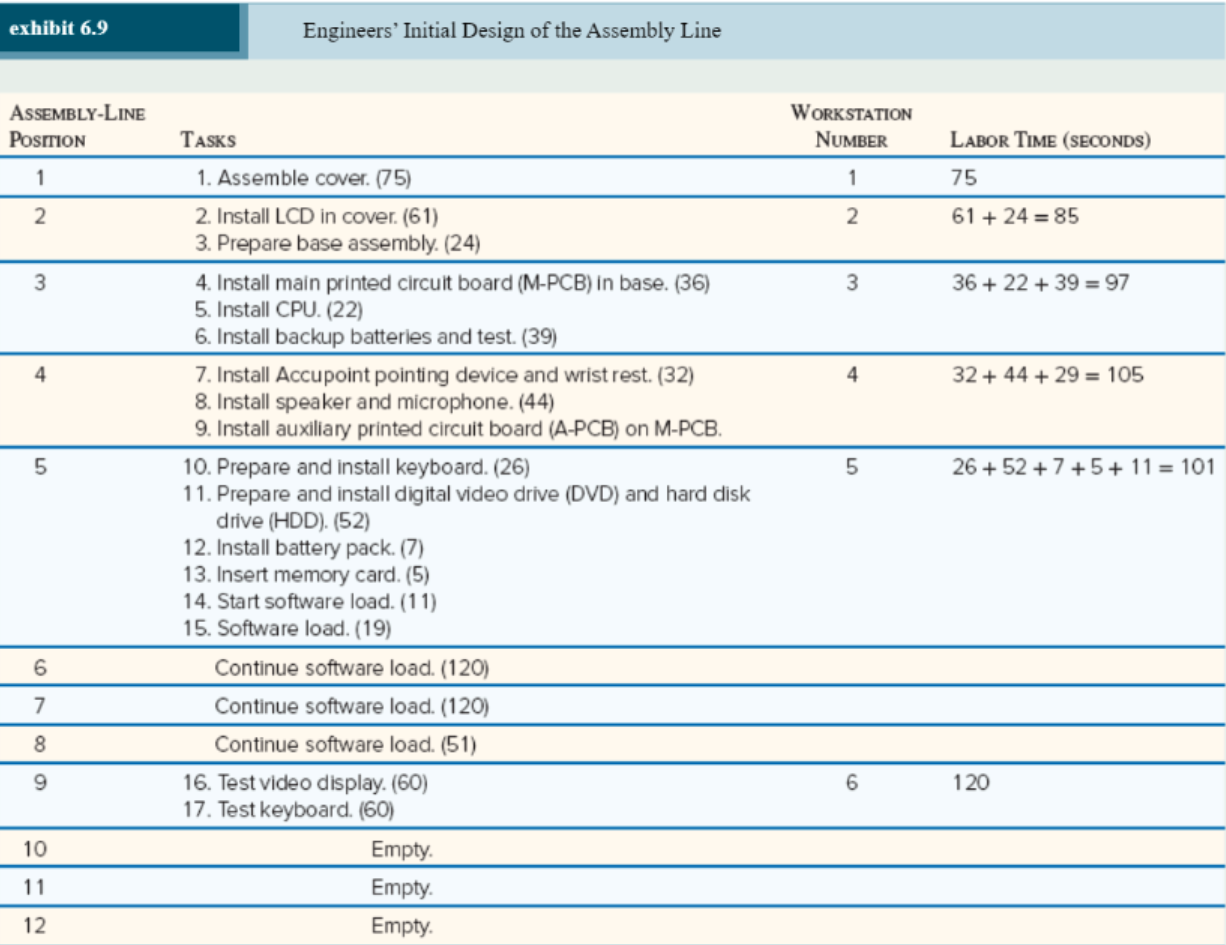 Workstation 1: The first operator lays out the major components of a computer between two white lines on the conveyor. The operator then prepares the cover for accepting the LCD screen by installing fasteners and securing a cable.
Workstation 2: The second operator performs two different tasks. First, the LCD screen is installed in the cover. This task needs to be done after the cover is assembled (task 1). A second independent task done by the operator is the preparation of the base so that the main printed circuit board (M-PCB) can be installed.
Workstation 3: Here the M-PCB is installed in the base. After this is done, the central processing unit (CPU) and backup batteries are installed and tested.
Workstation 4: The Accupoint pointing device (touchpad) and wrist rest are installed, the speaker and microphone are installed, and the auxiliary printed circuit board (A-PCB) is installed. These are all independent tasks that can be done after the M-PCB is installed.
Workstation 5: Here, tasks are performed in a sequence. First, the keyboard is installed, followed by the DVD and hard disk drive (HDD). The battery pack is then installed, followed by the memory card. The computer is then powered up and a program started that loads software that can be used to test the computer. Actually loading the software takes 310 seconds, and this is done while the computer travels through positions 6, 7, and 8 on the assembly line. Computers that do not work are sent to a rework area where they are fixed. Only about 1 percent of the computers fail to start, and these are usually quickly repaired by the supporter.
Workstation 6: The video display and keyboard are tested in this workstation.
After assembly, the computers are moved to a separate burn-in area that is separate from the assembly line. Here, computers are put in racks for a 24-hour, 25C burn-in of the circuit components. After burn-in, the computers are tested again, software is installed, and the finished notebook computers are packaged and placed on pallets for shipment to Toshiba distribution centers around the world.
Tweaking the Initial Assembly-Line Design
From past experience, the engineering manager has found that the initial assembly-line design supplied by the engineers often needs to be tweaked. Consider the following questions that the manager is considering:
1. What is the daily capacity of the assembly line designed by the engineers? Assume that the assembly line has a computer at every position when it is started at the beginning of the day.
2. When the assembly line designed by the engineers is running at maximum capacity, what is the efficiency of the line relative to its use of labor? Assume that the supporter is not included in efficiency calculations.
3. How should the line be redesigned to operate at the initial 250 units per day target, assuming that no overtime will be used? What is the efficiency of your new design?
4. What about running the line at 300 units per day? If overtime were used with the engineers initial design, how much time would the line need to be run each day?
5. Design a new assembly line that can produce 300 units per day without using overtime.
6. What other issues might the manager consider when bringing the new assembly line up to speed?
exhibit 6.8 Notebook Computer Assembly Process Sheet TASK TASK TIME (SECONDS) TASKS THAT MUST PRECEDE 1. Assemble cover. 75 None 2. Install LCD in cover. 61 Task 1 3. Prepare base assembly 24 None 4. Install M-PCB in base. 36 Task 3 5. Install CPU. 22 Task 4 6. Install backup batteries and test. 39 Task 4 7. Install Accupoint pointing device and wrist rest. 32 Task 4 8. Install speaker and microphone. 44 Task 4 9. Install auxiliary printed circuit board (A-PCB) on M-PCB. 29 Task 4 10. Prepare and install keyboard 26 Task 9 11. Prepare and install digital video drive (DVD) and hard disk drive (HDD). 52 Task 10 12. Install battery pack. 7 Task 11 13. Insert memory card 5 Task 12 14. Start software load. 11 Tasks 2, 5, 6, 7, 8, 13 15. Software load (unattended) 310 Task 14 16. Test video display 60 Task 15 17. Test keyboard 60 Task 16 exhibit 6.9 Engineers Initial Design of the Assembly Line ASSEMBLY-LINE POSITION WORKSTATION NUMBER TASKS LABOR TIME (SECONDS) 1 1 75 2 2 61 + 24 = 85 3 3 36 + 22 + 39 = 97 4 4. 32 + 44 + 29 = 105 5 5 26 +52 + 7 + 5 + 11 = 101 1. Assemble cover. (75) 2. Install LCD in cover. (61) 3. Prepare base assembly. (24) 4. Install main printed circuit board (M-PCB) in base. (36) 5. Install CPU. (22) 6. Install backup batteries and test. (39) 7. Install Accupoint pointing device and wrist rest. (32) 8. Install speaker and microphone. (44) 9. Install auxiliary printed circuit board (A-PCB) on M-PCB. 10. Prepare and install keyboard. (26) 11. Prepare and install digital video drive (DVD) and hard disk drive (HDD) (52) 12. Install battery pack. (7) 13. Insert memory card. (5) 14. Start software load. (11) 15. Software load. (19) Continue software load. (120) Continue software load. (120) Continue software load. (51) 16. Test video display. (60) 17. Test keyboard. (60) Empty Empty Empty 6 7 8 9 6 120 10 11 12Step by Step Solution
There are 3 Steps involved in it

Get step-by-step solutions from verified subject matter experts