

Question: At the bottom their are 3 tasks to do. 1 Setup the project environment You will be using Mininet to develop and test your Video
At the bottom their are 3 tasks to do.
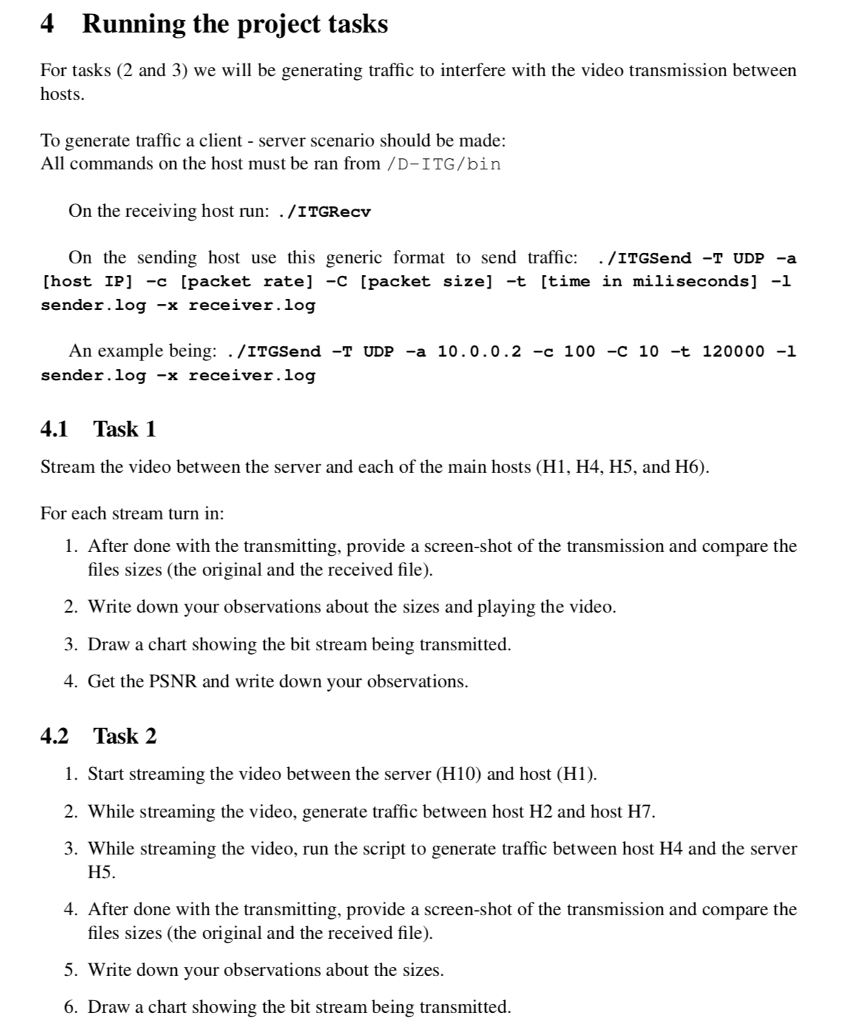
1 Setup the project environment You will be using Mininet to develop and test your Video Streaming application In this project, we will be using a pre-setup 64-bit Linux Virtual Machine along with a VirtualBox, which is a free and open-source hypervisor You need to: Download and setup Virtualbox. . Download our MininetVM and import it to your Virtualbox. You can follow the step here to upload the image to your Virtualbox. When you boot up the VM, you'll have to log in using Mininet5590 and mininet5590 as username and password After uploading our VM to your virtualbox you can complete the Mininet Walthrough (Section 1.1) to learn how to use Mininet. Please note that if you are familiar with Mininet you can skip this walkthrough 1.1 Mininet Walkthrough Once you have a Mininet VM, you should complete the following sections of the standard Mininet walkthrough: All of Part 1, except the section "Start Wireshark" . The first four sections of Part 2 "Run a Regression Test", "Changing Topology Size and Type", "Link variations", and "Adjustable Verbosity" All of Part 3 You do not need to submit anything for this part of the project. 2 Preparing the files and running the stream Please note that to run the project, you need to run all the command from ffmpeg-tools/bin folder mininet@mininet-vm: s cd ffmpeg-tools/birn 1 Setup the project environment You will be using Mininet to develop and test your Video Streaming application In this project, we will be using a pre-setup 64-bit Linux Virtual Machine along with a VirtualBox, which is a free and open-source hypervisor You need to: Download and setup Virtualbox. . Download our MininetVM and import it to your Virtualbox. You can follow the step here to upload the image to your Virtualbox. When you boot up the VM, you'll have to log in using Mininet5590 and mininet5590 as username and password After uploading our VM to your virtualbox you can complete the Mininet Walthrough (Section 1.1) to learn how to use Mininet. Please note that if you are familiar with Mininet you can skip this walkthrough 1.1 Mininet Walkthrough Once you have a Mininet VM, you should complete the following sections of the standard Mininet walkthrough: All of Part 1, except the section "Start Wireshark" . The first four sections of Part 2 "Run a Regression Test", "Changing Topology Size and Type", "Link variations", and "Adjustable Verbosity" All of Part 3 You do not need to submit anything for this part of the project. 2 Preparing the files and running the stream Please note that to run the project, you need to run all the command from ffmpeg-tools/bin folder mininet@mininet-vm: s cd ffmpeg-tools/birn
Step by Step Solution
There are 3 Steps involved in it

Get step-by-step solutions from verified subject matter experts