

Question: ATA: Table 1: Include on the chart whether each well was positive(+) or negative(-) for agglutination. and the questions Before determining the Blood type, click
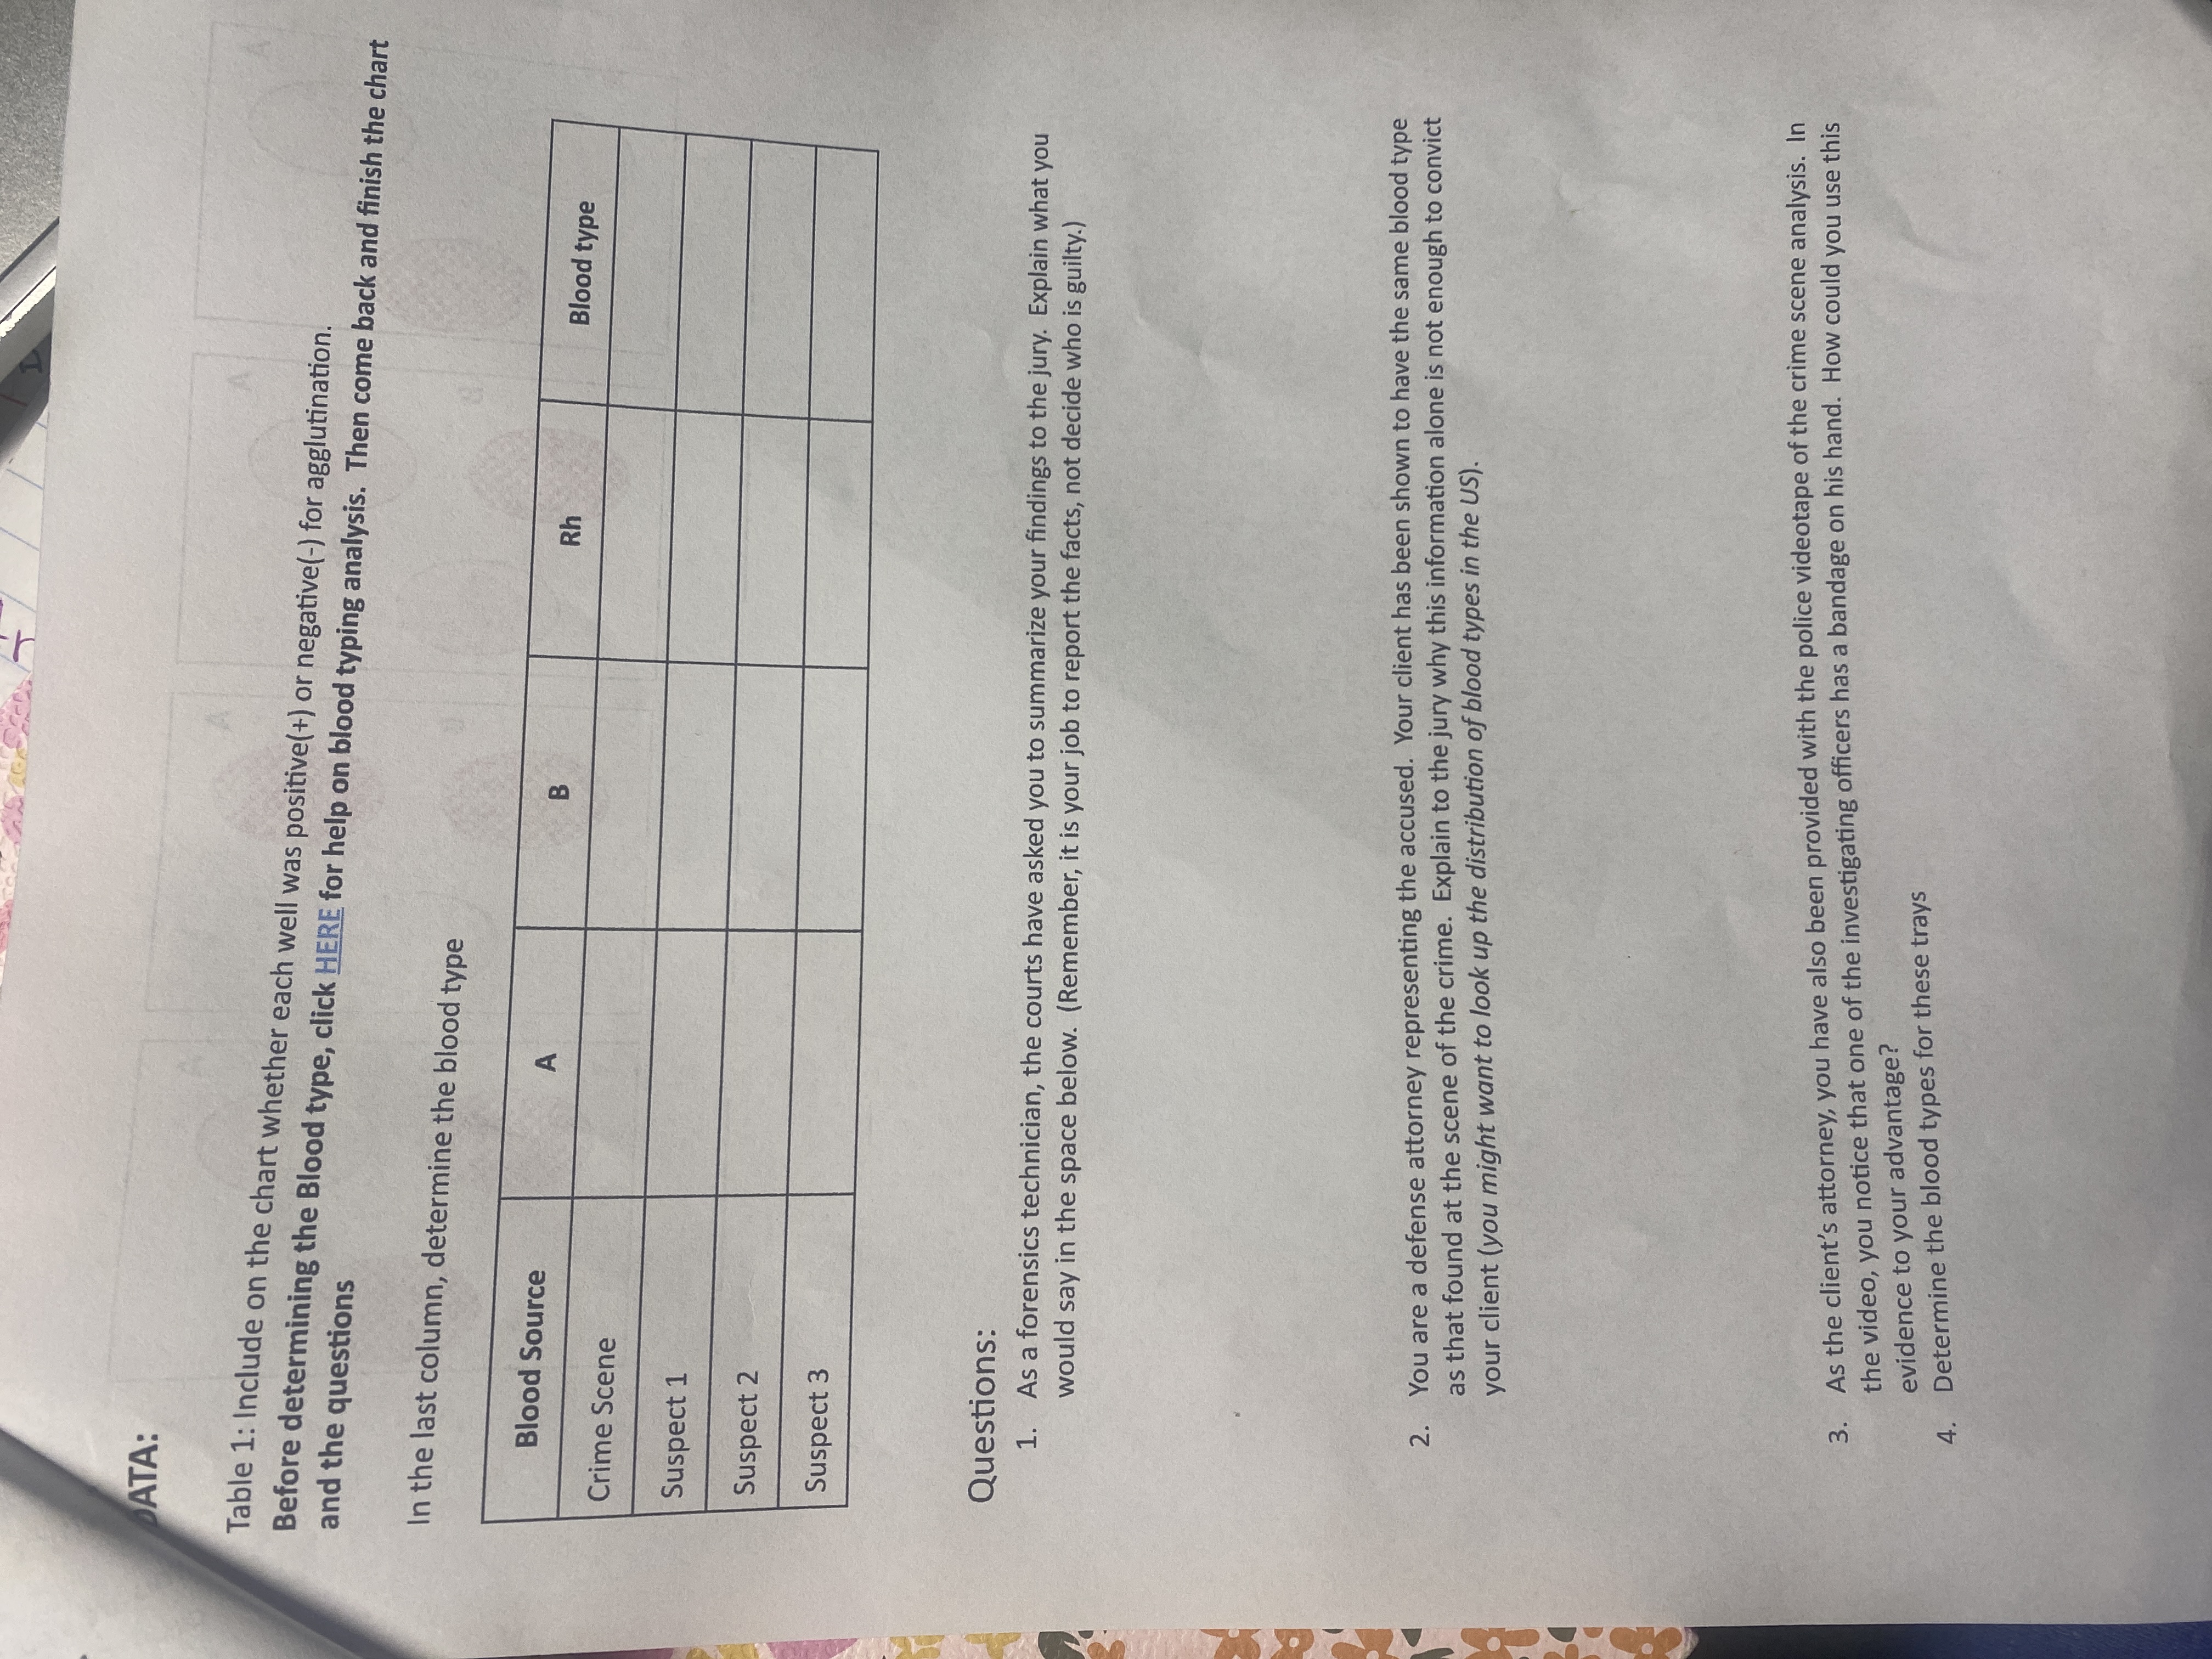
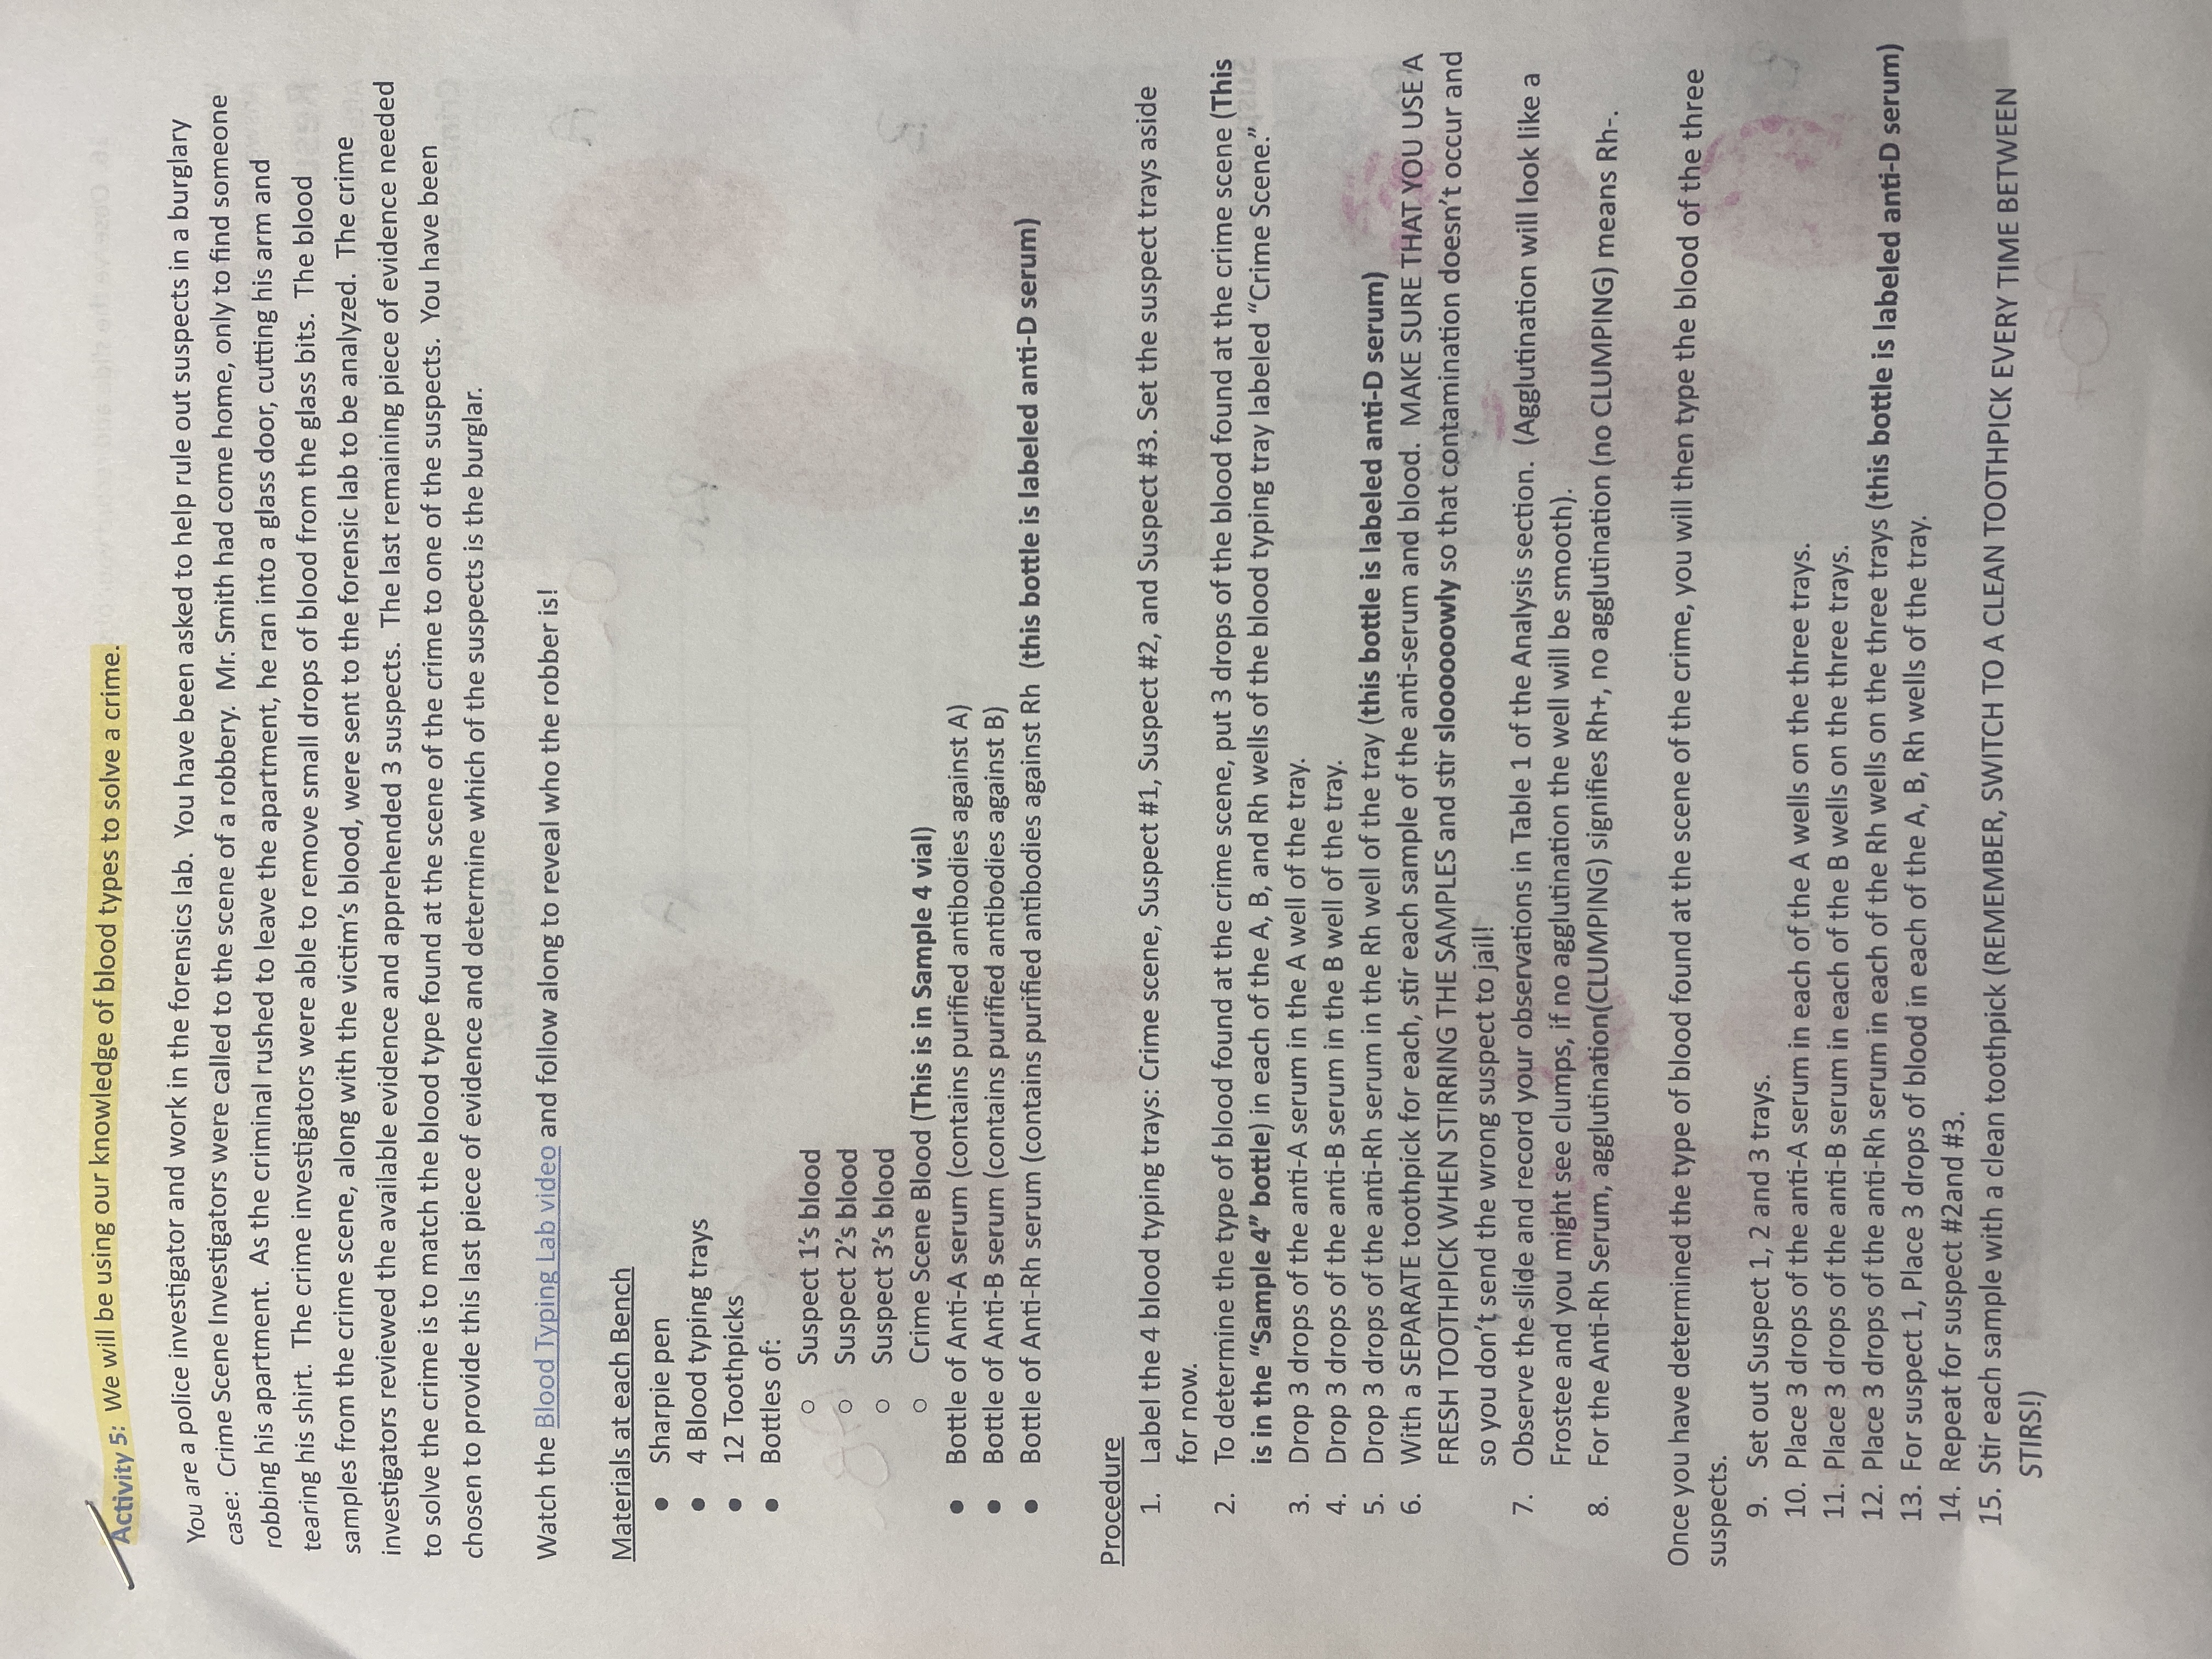
ATA: Table 1: Include on the chart whether each well was positive(+) or negative(-) for agglutination. and the questions Before determining the Blood type, click HERE for help on blood typing analysis. Then come back and finish the chart In the last column, determine the blood type Blood Source A B Rh Blood type Crime Scene Suspect 1 Suspect 2 Suspect 3 Questions: 1. As a forensics technician, the courts have asked you to summarize your findings to the jury. Explain what you would say in the space below. (Remember, it is your job to report the facts, not decide who is guilty.) 2. You are a defense attorney representing the accused. Your client has been shown to have the same blood type as that found at the scene of the crime. Explain to the jury why this information alone is not enough to convict your client (you might want to look up the distribution of blood types in the US). As the client's attorney, you have also been provided with the police videotape of the crime scene analysis. In 3. the video, you notice that one of the investigating officers has a bandage on his hand. How could you use this evidence to your advantage? Determine the blood types for these trays 4.Activity 5: We will be using our knowledge of blood types to solve a crime. you are a police investigator and work in the forensics lab. You have been asked to help rule out suspects in a burglary case: Crime Scene Investigators were called to the scene of a robbery. Mr. Smith had come home, only to find someone robbing his apartment. As the criminal rushed to leave the apartment, he ran into a glass door, cutting his arm and tearing his shirt. The crime investigators were able to remove small drops of blood from the glass bits. The blood samples from the crime scene, along with the victim's blood, were sent to the forensic lab to be analyzed. The crime investigators reviewed the available evidence and apprehended 3 suspects. The last remaining piece of evidence needed to solve the crime is to match the blood type found at the scene of the crime to one of the suspects. You have been chosen to provide this last piece of evidence and determine which of the suspects is the burglar. Watch the Blood Typing Lab video and follow along to reveal who the robber is! Materials at each Bench Sharpie pen 4 Blood typing trays 12 Toothpicks Bottles of: Suspect 1's blood O Suspect 2's blood O Suspect 3's blood Crime Scene Blood (This is in Sample 4 vial) Bottle of Anti-A serum (contains purified antibodies against A) Bottle of Anti-B serum (contains purified antibodies against B) . . Bottle of Anti-Rh serum (contains purified antibodies against Rh (this bottle is labeled anti-D serum) Procedure 1. Label the 4 blood typing trays: Crime scene, Suspect #1, Suspect #2, and Suspect #3. Set the suspect trays aside for now. 2. To determine the type of blood found at the crime scene, put 3 drops of the blood found at the crime scene (This is in the "Sample 4" bottle) in each of the A, B, and Rh wells of the blood typing tray labeled "Crime Scene." 3. Drop 3 drops of the anti-A serum in the A well of the tray. 4. Drop 3 drops of the anti-B serum in the B well of the tray. 5. Drop 3 drops of the anti-Rh serum in the Rh well of the tray (this bottle is labeled anti-D serum) 6. With a SEPARATE toothpick for each, stir each sample of the anti-serum and blood. MAKE SURE THAT YOU USE A FRESH TOOTHPICK WHEN STIRRING THE SAMPLES and stir sloooooowly so that contamination doesn't occur and so you don't send the wrong suspect to jail! 7. Observe the slide and record your observations in Table 1 of the Analysis section. (Agglutination will look like a Frostee and you might see clumps, if no agglutination the well will be smooth). 8. For the Anti-Rh Serum, agglutination(CLUMPING) signifies Rh+, no agglutination (no CLUMPING) means Rh-. Once you have determined the type of blood found at the scene of the crime, you will then type the blood of the three suspects. 9. Set out Suspect 1, 2 and 3 trays. 10. Place 3 drops of the anti-A serum in each of the A wells on the three trays. 11. Place 3 drops of the anti-B serum in each of the B wells on the three trays. 12. Place 3 drops of the anti-Rh serum in each of the Rh wells on the three trays (this bottle is labeled anti-D serum) 13. For suspect 1, Place 3 drops of blood in each of the A, B, Rh wells of the tray. 14. Repeat for suspect #2and #3. 15. Stir each sample with a clean toothpick (REMEMBER, SWITCH TO A CLEAN TOOTHPICK EVERY TIME BETWEEN STIRS!)
Step by Step Solution
There are 3 Steps involved in it

Get step-by-step solutions from verified subject matter experts