

Question: ( Can someone explain to me whats being asked here, like what am i supposed to do in this assignment ) Open the following part
Can someone explain to me whats being asked here, like what am i supposed to do in this assignment
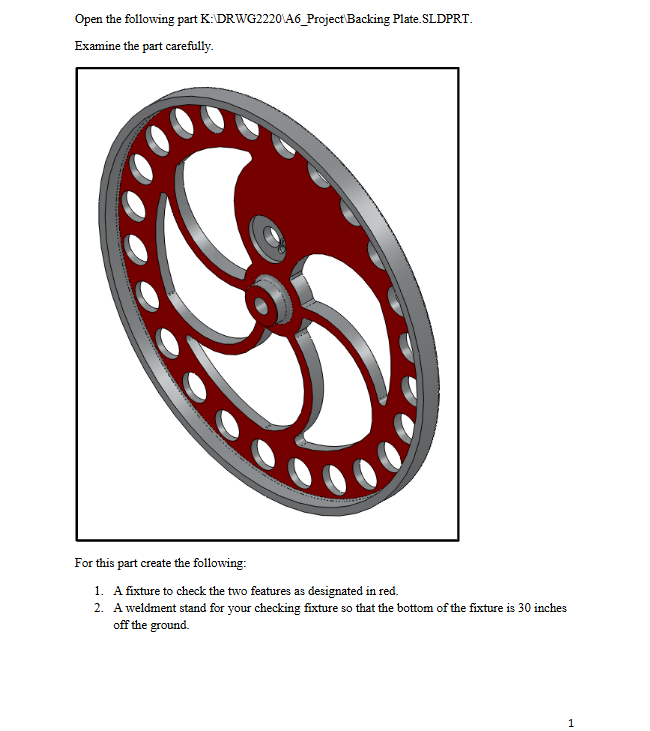
Open the following part K:DRWGAProject Backing Plate.SLDPRT
Examine the part carefully.
For this part create the following:
A fixture to check the two features as designated in red.
A weldment stand for your checking fixture so that the bottom of the fixture is inches off the ground.
Part The Checking Fixture
This fixture MUST be created as a TOP DOWN design, using the "Hole Series" and standard
inch sizes whenever possible. It will check the distances of the features shown in red. Refer to
the "Mouse Checking Fixture" also found on the scratch drive as a Solid Works Epart file as a
sample checking fixture. Feel free to use D Content Central for standard parts. Minus if the
fixture is not complete.
The following features must be present in your checking fixture:
gauges to check the two feature sizes
A way to "fool proof" the fixture so the part can only go in one way
A way to raise and lower the part or the gauges so the features can be checked
All nonstandard parts must be able to be machined using standard milling and turning
techniques.
Part The Weldment
The weldment is a stand for your checking fixture and must include the following features:
The bottom of your checking fixture must be off of the floor
The checking fixture must not be able to be pushed off of the weldment IE it must be
lifted in and out of the weldment
There must be a foot on each leg with a means to allow the stand to be leveled
It must have a spot for at least one supported shelf in the legs off of the floor
All horizontal members must have a gusset supporting them
No marks will be given if this is not created as a weldment
A weldment drawing must be created on a B size sheets
A final assembly must be created with the fixture and the stand.
Part Feature Possible Marks Actual Mark All sketches are fully defined. All parts created by the student can be machined using standard milling and turning techniques. Two gauges are employed. They can easily be read by the user. The gauges are held securely in the fixture in a manner that will not impede their function.
Part can only be placed on the fixture in the correct position IE the fixture is fool proof There are no redundant locators.
The part or the gauges easily move to make contact with each other, allowing for accurate and repeatable part measurement. All assemblies are configured for both the exploded and collapsed states.
Assembly is constrained so that the checking fixture can only move as the actual one would. All subassemblies are flexible there must be at least one subassembly
Standard inch sizes are used where appropriate and the fixture can be leveled.
Bonus The dial on the indicator moves accurately with the plunger.
Bonus
Part Feature Possible Marks Actual Mark The bottom of the checking fixture will be off of the floor. The checking fixture cannot be accidentally pushed off of the stand The feet allow for leveling of the part. The shelf is off of the floor All horizontal members have a gusset or sit on top of another structural member. All joints have the appropriate welding symbol as required by your instructor.
All sketches are fully defined. The stand does not interfere with the checking fixture.
Orthographic projections are printed on an appropriate size paper, include the Cut List with the columns as required by your instructor, and each item has a balloon attached, welding symbols are included Enough views are included so that the weldment can be made from the print.
Additional Marks will be deducted for the following for each item:
Drawings not folded correctly
Your name, part name, material and mass properties not appearing in the drawing
template as a linked property
All components must have a material assigned
Drawing sheets not in one sheet set for the entire project
The stand interferes with the use of the checking fixture
Step by Step Solution
There are 3 Steps involved in it
1 Expert Approved Answer
Step: 1 Unlock

Question Has Been Solved by an Expert!
Get step-by-step solutions from verified subject matter experts
Step: 2 Unlock
Step: 3 Unlock