

Question: Centos Experiment report 5.. #linux Experiment 5(user, group and privilege management) #task 1: create users and grant access privilege. 1. groupadd [root@localhost -]# groupadd user_group
Centos Experiment report 5..
![1: create users and grant access privilege. 1. groupadd [root@localhost -]# groupadd](https://dsd5zvtm8ll6.cloudfront.net/si.experts.images/questions/2024/09/66f4667645238_04566f46675af82f.jpg)
![user_group 2. useradd |[root@localhost ~]# useradd -d /userl - user_group userl [root@localhost](https://dsd5zvtm8ll6.cloudfront.net/si.experts.images/questions/2024/09/66f466770e4f7_04666f46676749c2.jpg)
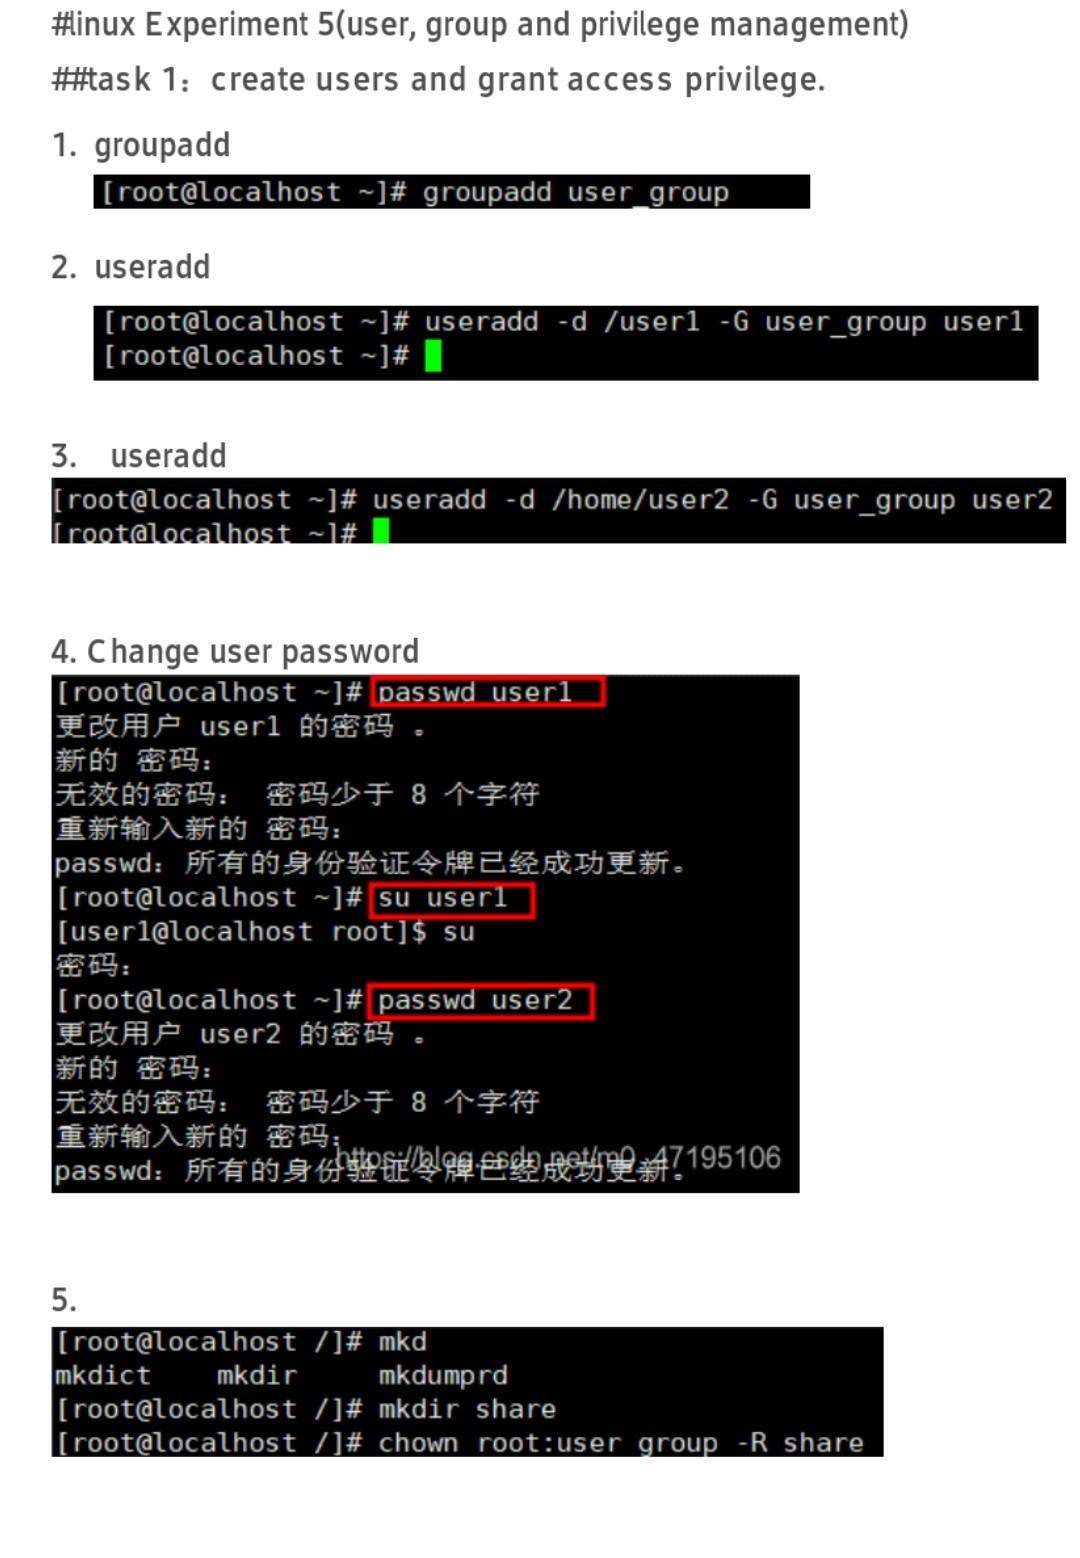
#linux Experiment 5(user, group and privilege management) #task 1: create users and grant access privilege. 1. groupadd [root@localhost -]# groupadd user_group 2. useradd |[root@localhost ~]# useradd -d /userl - user_group userl [root@localhost ~]#1 3. Useradd [root@localhost ~]# useradd -d /home/user2 -6 user_group user2 [root@localhost - # 4. Change user password |[root@localhost ~]# passwd userl userl : ,8 : passwd: |[root@localhost ~]# su userl | [userl@localhost root]$ su : [root@localhost -]# passwd user2 user2 : ,8 ; passwd:195106 5. [root@localhost /]# mkd mkdict mkdir mkdumprd [root@localhost /]# mkdir share [[root@localhost ]# chown root:user group -R share 6. Set privilege [root@localhost ~]# chmod 774 -R /share [root@localhost ~]# #task 2: create users via edit configure file 1. Edit passwd file to add user3 named:x:25:25: Named:/varar userl:x: 1000:1001::/user1:// user2:x:1001:1002::/home/use user3:x:1002: 1003::/home/use 2. Edit shadow file to set user3's password as 123 user1: $6$aKZGKHHP $A90CyF1K7/73 user2: $6$p VzrHLMG$COKsatycezg user3$6$pVzrHLMG$qCOKsatycezg INSERT 3. Edit group file to change group to user_group user_group:x: 1000:useri,user2,user3 user1:x:1001: user2:x:1002: user3:x:1003: 4. Copy and check user envioronment configure file (/etc/skel) and set privilege [root@localhost home]# mkdir user3 [root@localhost home]# ls user2 user3 [root@localhost home ]# cd /etc/skel [root@localhost skel]# ls [root@localhost skel]# ls -a .bash_logout bash profile .bashrc [root@localhost skel]# cp.* /home/user3 cp: BER"." cp: TER".." [root@localhost skel]# cd /home/user3 [root@localhost user3]# ls -al 5 12 drwxr-xr-x 2 root root 62 5$ 21 16:19 drwxr-xr-x. 4 root root 32 5 21 16:18 -rw-r--r-- 1 root root 18 5 21 16:19 .bash_logout -rw-r--r-- 1 root root 193 5. 21 16:19 .bash_profile -rw-r--r-. 1 root root 231 5 21 16:19 .bashrc [root@localhost user3]# cd [root@localhost home]# ls -al drwxr-xr-x. 4 root root 32 5s 21 16:18 dr-xr-xr-x. 20 root root 269 5 21 15:56 .. drwx------ 2 user2 user2 62 55 21 15:17 user2 drwxr-xr-x 2 root root 62 5 21 16:19 user3 [root@localhost home]# chown user3:user3 -R user3 [root@localhost home]# ls -1 drwx--- 2 user user2 62 5$ 21 15:17 user2 drwxr-xr-x 2 user3 user3 62 5. 21 16:19 user3 [root@localhost home]# chmod 700 -R user3 [root@localhost home]# ls -1 0 drwx-... 2 user2 user2 62 59 21 15:17 user2 drwx------ 2 user3 user3 62 5. 21 16:19 user3 [root@localhost home]# https://blog.csdn.net/mo_47195106 5. Sign in as user3 root@localhost home]# su user3 user3@localhost home ] $
Step by Step Solution
There are 3 Steps involved in it

Get step-by-step solutions from verified subject matter experts