

Question: Create drawing in model and layout per instructions below. Submit dwg and pdf files. Instructions: Download and open Template A in AutoCad. 8 . 5
Create drawing in model and layout per instructions below. Submit dwg and pdf files.
Instructions:
Download and open Template A in AutoCad. xTBdwg Download xTBdwgChange Units to decimals.
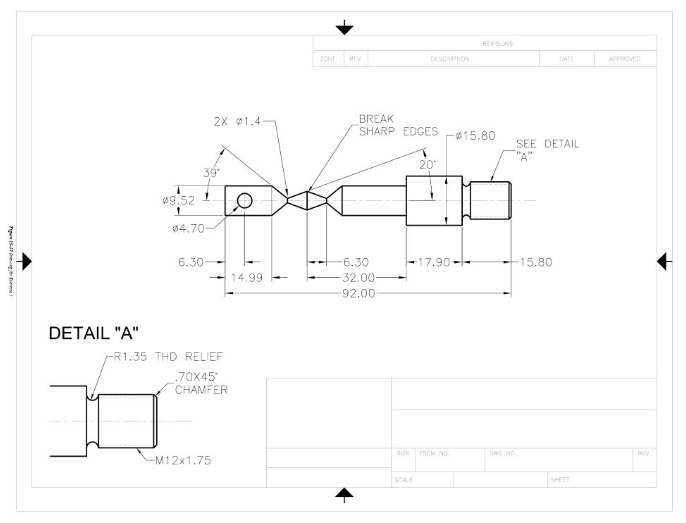
Create a drawing of complete part in Model space. Don't place dimensions in the Model space. You will put them later in layout. Use different layers for visible lines, center lines and hidden lines.
Open Layout. Fill out title block with your information. Delete existing viewport.
Place first single viewport showing complete model located as shown on assignment. On the status bar bottom right corner change scale to : Leave space on the bottom left corner for second viewport for Detail A
Use Dimension Style Manager DDIM command to create a new dimension style from Annotative Select Annotative and click on New button Give name for new style "Layout Dim". Set precision to decimal points. Set "Layout Dim" style as current.
Create new layer "Dim VP for dimensions, set it current and place all dimensions as shown on the image.
Use LAYER command and freeze "Dim VP layer in "New VP Freese" column.
Place second single viewport for detail A on the bottom left corner. Use scale :Dim VP layer should not appear because it is frozen for new viewports
Create new layer "Dim VP from "Dim VPSelect "Dim VP layer from the list and click Create New Layer button Make "Dim VP layer Current.
Place dimensions as shown on Detail AYou can use DIM, LEADER, MLEADER commands as needed to place notes
Place text for DETAIL A label. Add note with scale for each viewport on paper space.
Change "Layout name to "Week Right click on Layout and choose Rename
Plot drawing in pdf Select DWG to PDF printer. Use Extents, center plot, plot scale: : plot style: monochrome
Step by Step Solution
There are 3 Steps involved in it
1 Expert Approved Answer
Step: 1 Unlock

Question Has Been Solved by an Expert!
Get step-by-step solutions from verified subject matter experts
Step: 2 Unlock
Step: 3 Unlock