

Question: Files Lab2.java x + 1 /* Main.java 2 3 */ Lab2.java M+ README.md TestWindow.java Put your comments here 4 import javax.swing.*; 5 import java.awt.Color;
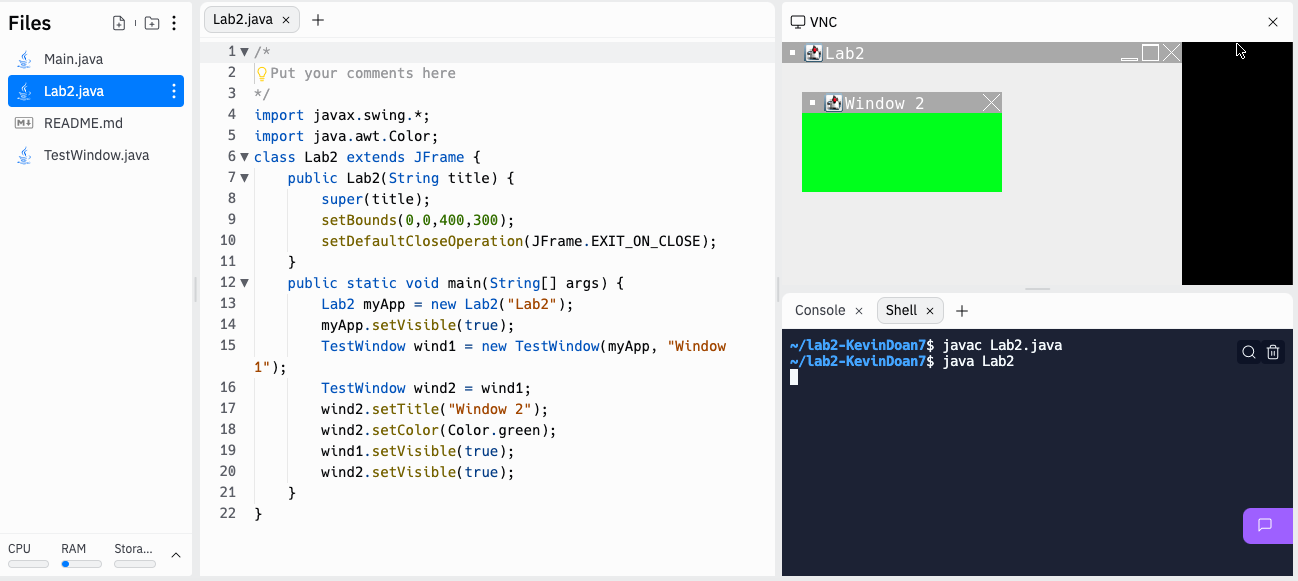
Files Lab2.java x + 1 /* Main.java 2 3 */ Lab2.java M+ README.md TestWindow.java Put your comments here 4 import javax.swing.*; 5 import java.awt.Color; 6 class Lab2 extends JFrame { 7 8 9 public Lab2(String title) { super(title); setBounds(0,0,400,300); setDefaultCloseOperation (JFrame.EXIT_ON_CLOSE); public static void main(String[] args) { 10 11 } 12 13 14 15 1"); 16 17 18 19 20 Lab2 myApp = new Lab2("Lab2"); myApp.setVisible(true); TestWindow wind1 = new TestWindow(myApp, "Window TestWindow wind2 = wind1; wind 2.setTitle("Window 2"); wind 2.setColor(Color.green); wind1.setVisible(true); wind2.setVisible(true); VNC Lab2 Window 2 Consolex Shell x + w/Lab2-KevinDoan7$ javac Lab2.java ~/Lab2-KevinDoan7$ java Lab2 CPU RAM Stora... 21 2 22} } 51. Go to Shell and run **javac Lab2.java** 6 2. Note that only one **TestWindow** object is created. Look at the code for Lab2.java to understand why. 7 3. Modify Lab2.java so that two **TestWindow** objects are created. Make use of the **setLocation()** to make it so that the two **TestWindow** objects don't overlap 8 ## Finishing up 9 - Add a block comment to Lab2.java that explains why the original Lab2.java code only produced on window on top of the main window. 10 - Within that same block comment, explain what you did to get the program to work correctly (i.e. two windows on top of the main window).
Step by Step Solution
3.46 Rating (153 Votes )
There are 3 Steps involved in it
Heres the modified Lab2java file with comments explaining why only one window was initially created ... View full answer

Get step-by-step solutions from verified subject matter experts