Question: I have a zip file to start the assignment with. Please let me know if you decide to help on this in the answer then
I have a zip file to start the assignment with. Please let me know if you decide to help on this in the answer then I'll post the zip file in the comment since I cannot do it here. Thank you.
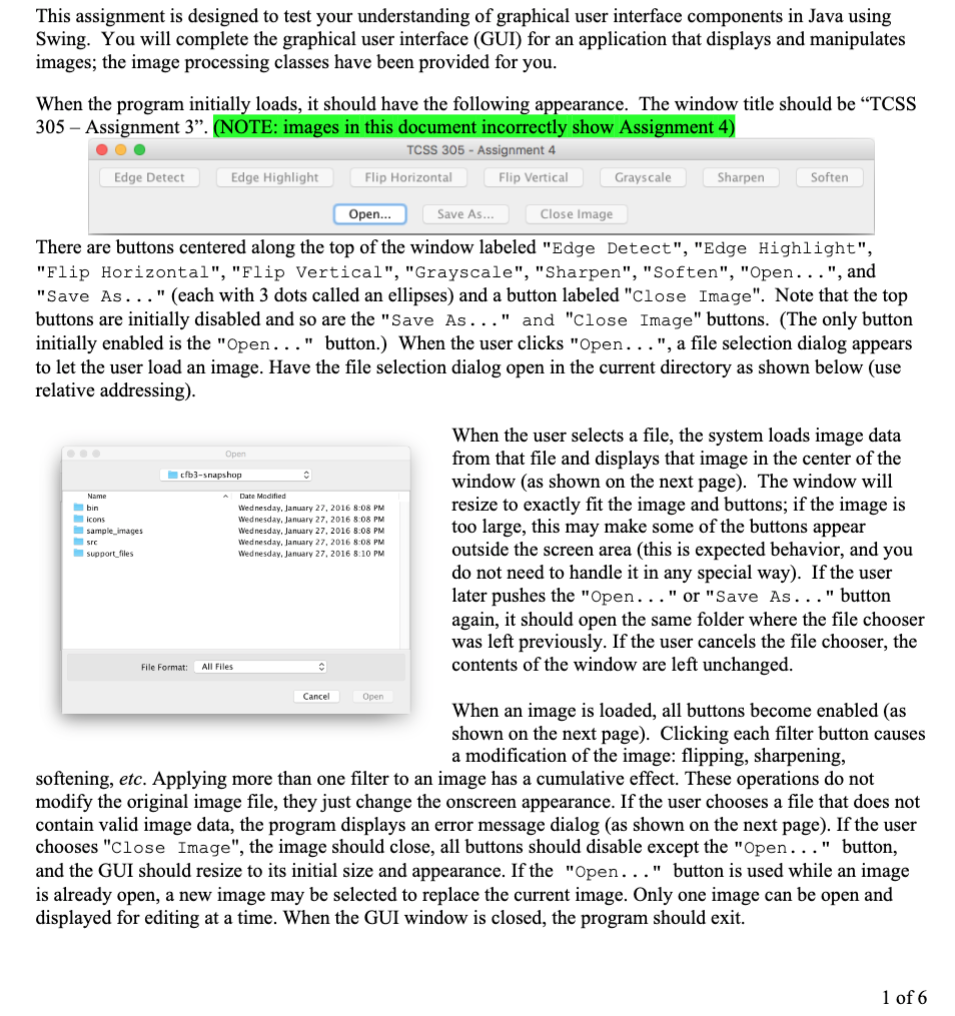
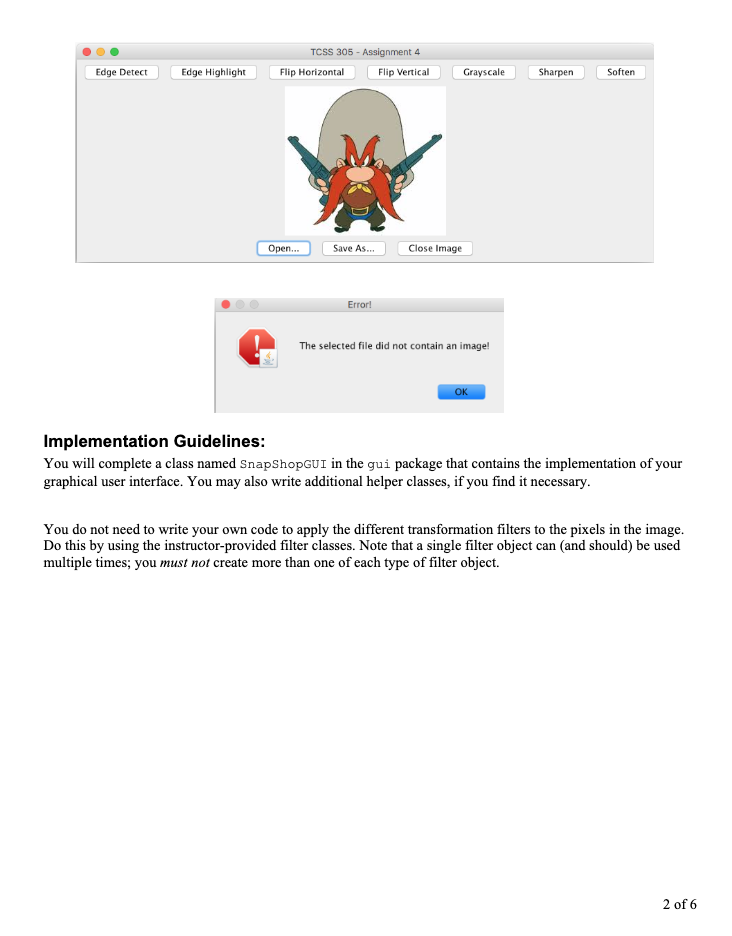
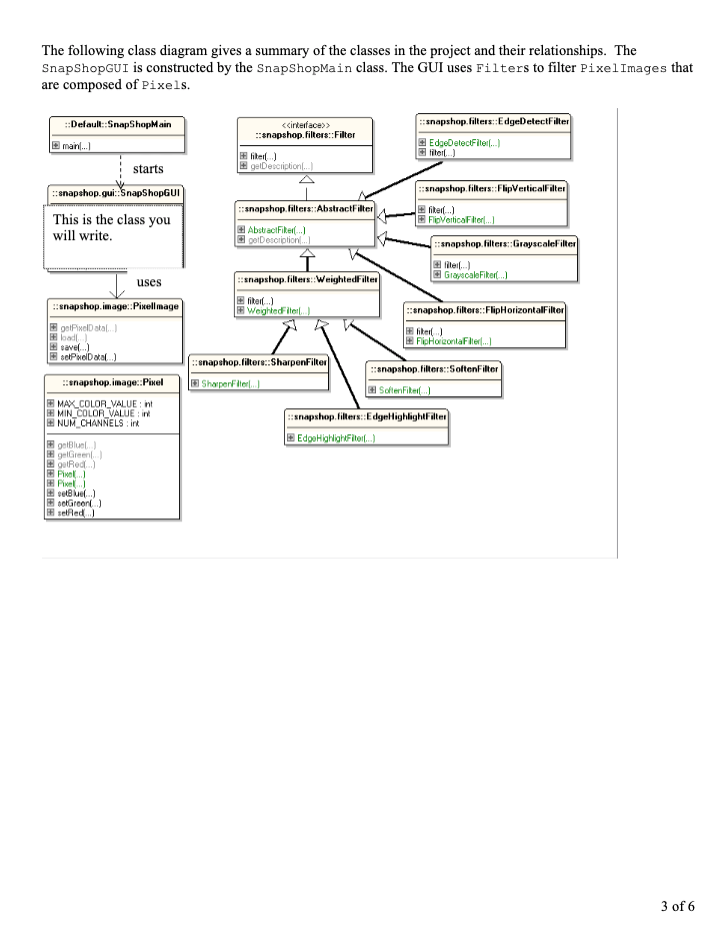
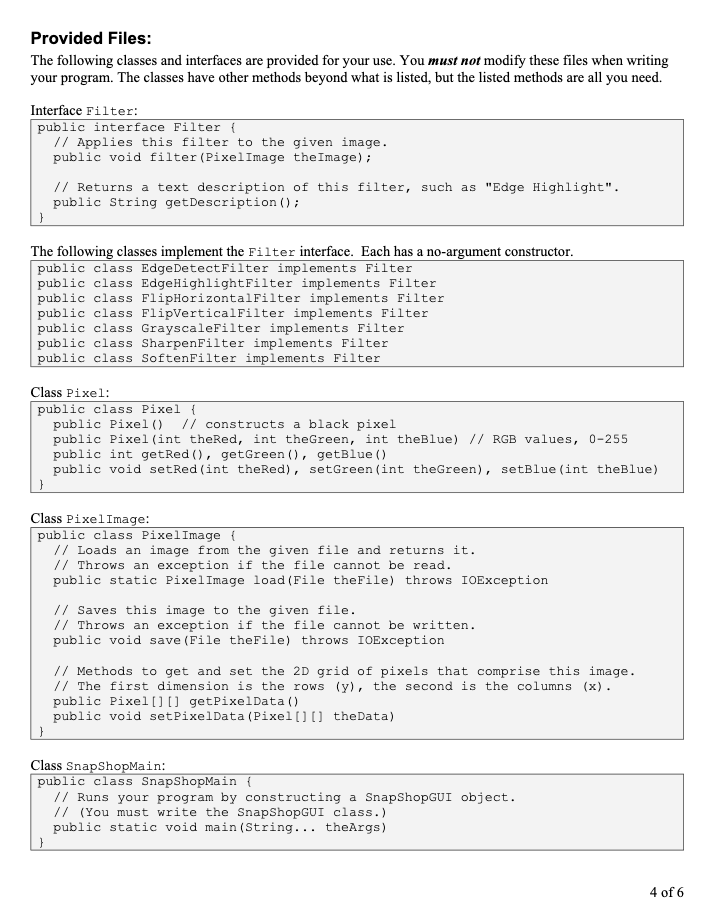
This assignment is designed to test your understanding of graphical user interface components in Java using Swing. You will complete the graphical user interface (GUI) for an application that displays and manipulates images; the image processing classes have been provided for you. When the program initially loads, it should have the following appearance. The window title should be TCSS 305 Assignment 3". (NOTE: images in this document incorrectly show Assignment 4) TCSS 305 - Assignment 4 Edge Detect Edge Highlight Flip Horizontal Flip Vertical Grayscale Soften Sharpen Save As.. Open... Close Image There are buttons centered along the top of the window labeled "Edge Detect", "Edge Highlight", "Flip Horizontal", "Flip Vertical", "Grayscale", "Sharpen", "Soften", "Open...", and "Save As..." (each with 3 dots called an ellipses) and a button labeled "Close Image". Note that the top buttons are initially disabled and so are the "Save As..." and "Close Image" buttons. (The only button initially enabled is the "Open..." button.) When the user clicks "Open...", a file selection dialog appears to let the user load an image. Have the file selection dialog open in the current directory as shown below (use relative addressing). Open cb3-snapshop Name hin Icons sample Images A Date Modified Wednesday, January 27, 2016 8:08 PM Wednesday, January 27, 2016 8:08 PM Wednesday, January 27, 2016 8.08 PM Wednesday, January 27, 2016 8:08 PM Wednesday, January 27, 2016 8:10 PM support files When the user selects a file, the system loads image data from that file and displays that image in the center of the window (as shown on the next page). The window will resize to exactly fit the image and buttons; if the image is too large, this may make some of the buttons appear outside the screen area (this is expected behavior, and you do not need to handle it in any special way). If the user later pushes the "Open..." or "Save As..." button again, it should open the same folder where the file chooser was left previously. If the user cancels the file chooser, the contents of the window are left unchanged. File Format: All Files Cancel Open When an image is loaded, all buttons become enabled (as shown on the next page). Clicking each filter button causes a modification of the image: flipping, sharpening, softening, etc. Applying more than one filter to an image has a cumulative effect. These operations do not modify the original image file, they just change the onscreen appearance. If the user chooses a file that does not contain valid image data, the program displays an error message dialog (as shown on the next page). If the user chooses "close Image", the image should close, all buttons should disable except the "Open..." button, and the GUI should resize to its initial size and appearance. If the "Open..." button is used while an image is already open, a new image may be selected to replace the current image. Only one image can be open and displayed for editing at a time. When the GUI window is closed, the program should exit. 1 of 6 TCSS 305 - Assignment 4 Flip Horizontal Flip Vertical Edge Detect Edge Highlight Grayscale Sharpen Soften Open... Save As... Close Image Error! The selected file did not contain an image! OK Implementation Guidelines: You will complete a class named SnapShopGUI in the gui package that contains the implementation of your graphical user interface. You may also write additional helper classes, if you find it necessary. You do not need to write your own code to apply the different transformation filters to the pixels in the image. Do this by using the instructor-provided filter classes. Note that a single filter object can and should) be used multiple times; you must not create more than one of each type of filter object. 2 of 6 The following class diagram gives a summary of the classes in the project and their relationships. The SnapShopGUI is constructed by the SnapShopMain class. The GUI uses Filters to filter PixelImages that are composed of Pixels. ::Default::SnapShopMain main...) > snapshop.filters::Filter snapshop.filters::EdgeDetectFilter EdgeDetectFiter...) liter) #likel) #getDescription starts snapshop.gui:SnapShopGUI This is the class you will write. snapshop.filters::AbstractFilter snapshop.filter::Flip VerticalFilter liteil.) Et Fivetica Flor Abstract File Description. snapshop.filters::GrayscaleFilter liteil) Grayscale Fiker...) snapshop.filters: WeightedFilter fitor) WeightedFile snapshop.filters::FlipHorizontalFilter uses snapshop.image:Pixellmage PixelData El load) savel) setPwolData) snapshop.image::Pixel Fico contaFler. snapshop.filtere::SharpenFilter snapshop.filter::Softenfilter Sharper le SoftFikel snapshop.filters: EdgeHighlightfilter EEdo HiWiFi MAX_COLOR_VALUE: int MIN_COLOR VALUE NUM_CHANNELS:in Bluel Green) Red) # Fil) tel.) Green) sed) 3 of 6 Provided Files: The following classes and interfaces are provided for your use. You must not modify these files when writing your program. The classes have other methods beyond what is listed, but the listed methods are all you need. Interface Filter: public interface Filter { // Applies this filter to the given image. public void filter (PixelImage the Image); // Returns a text description of this filter, such as "Edge Highlight". public String getDescription(); } The following classes implement the Filter interface. Each has a no-argument constructor. public class EdgeDetect Filter implements Filter public class EdgeHighlightFilter implements Filter public class FlipHorizontalFilter implements Filter public class FlipVerticalFilter implements Filter public class GrayscaleFilter implements Filter public class SharpenFilter implements Filter public class SoftenFilter implements Filter Class Pixel: public class Pixel { public Pixel() // constructs a black pixel public Pixel (int thered, int theGreen, int theBlue) // RGB values, 0-255 public int getRed(), getGreen(), getBlue () public void setRed (int theRed), set Green (int theGreen), setBlue (int theBlue) Class PixelImage: public class PixelImage { // Loads an image from the given file and returns it. // Throws an exception if the file cannot be read. public static PixelImage load (File theFile) throws IOException // Saves this image to the given file. // Throws an exception if the file cannot be written. public void save (File theFile) throws IOException // Methods to get and set the 2D grid of pixels that comprise this image. // The first dimension is the rows (y), the second is the columns (x). public Pixel[] [] getPixelData() public void setPixelData (Pixel[] [] theData) } Class SnapShopMain: public class SnapShopMain { // Runs your program by constructing a SnapShopGUI object. // (You must write the SnapShopGUI class.) public static void main(String... theArgs) 4 of 6 Hints: Display an image on the GUI by setting it to be the icon of an onscreen JLabel. A JLabel's icon is set by calling its setIcon method. The setIcon method accepts an ImageIcon object as a parameter. An ImageIcon object can be constructed by passing a Pixel Image as the parameter. Here is an example that creates a new label and sets its icon (note that you should not create a new label every time you change the image, but instead should change the icon of the label you already have). PixelImage image = PixelImage.load(new File("apple.jpg")); my ImageLabel.setIcon (new ImageIcon(image)); Use a JFileChooser for your file selection dialog. A save dialog can be shown by calling showSaveDialog on a JFileChooser object, and an open dialog can be shown by calling showOpenDialog. You can ask for the file the user selected by calling the getSelectedFile method on the JFileChooser. If image loading fails, catch the IOException and use a JOptionPane to display an error message dialog like the one shown on the page 2 of these instructions. Your program should create only one JFileChooser object and reuse it repeatedly. Included with the project are some image files you can use for testing and some icon files which you could add to the buttons at the bottom of the GUI if you choose. 5 of 6 This assignment is designed to test your understanding of graphical user interface components in Java using Swing. You will complete the graphical user interface (GUI) for an application that displays and manipulates images; the image processing classes have been provided for you. When the program initially loads, it should have the following appearance. The window title should be TCSS 305 Assignment 3". (NOTE: images in this document incorrectly show Assignment 4) TCSS 305 - Assignment 4 Edge Detect Edge Highlight Flip Horizontal Flip Vertical Grayscale Soften Sharpen Save As.. Open... Close Image There are buttons centered along the top of the window labeled "Edge Detect", "Edge Highlight", "Flip Horizontal", "Flip Vertical", "Grayscale", "Sharpen", "Soften", "Open...", and "Save As..." (each with 3 dots called an ellipses) and a button labeled "Close Image". Note that the top buttons are initially disabled and so are the "Save As..." and "Close Image" buttons. (The only button initially enabled is the "Open..." button.) When the user clicks "Open...", a file selection dialog appears to let the user load an image. Have the file selection dialog open in the current directory as shown below (use relative addressing). Open cb3-snapshop Name hin Icons sample Images A Date Modified Wednesday, January 27, 2016 8:08 PM Wednesday, January 27, 2016 8:08 PM Wednesday, January 27, 2016 8.08 PM Wednesday, January 27, 2016 8:08 PM Wednesday, January 27, 2016 8:10 PM support files When the user selects a file, the system loads image data from that file and displays that image in the center of the window (as shown on the next page). The window will resize to exactly fit the image and buttons; if the image is too large, this may make some of the buttons appear outside the screen area (this is expected behavior, and you do not need to handle it in any special way). If the user later pushes the "Open..." or "Save As..." button again, it should open the same folder where the file chooser was left previously. If the user cancels the file chooser, the contents of the window are left unchanged. File Format: All Files Cancel Open When an image is loaded, all buttons become enabled (as shown on the next page). Clicking each filter button causes a modification of the image: flipping, sharpening, softening, etc. Applying more than one filter to an image has a cumulative effect. These operations do not modify the original image file, they just change the onscreen appearance. If the user chooses a file that does not contain valid image data, the program displays an error message dialog (as shown on the next page). If the user chooses "close Image", the image should close, all buttons should disable except the "Open..." button, and the GUI should resize to its initial size and appearance. If the "Open..." button is used while an image is already open, a new image may be selected to replace the current image. Only one image can be open and displayed for editing at a time. When the GUI window is closed, the program should exit. 1 of 6 TCSS 305 - Assignment 4 Flip Horizontal Flip Vertical Edge Detect Edge Highlight Grayscale Sharpen Soften Open... Save As... Close Image Error! The selected file did not contain an image! OK Implementation Guidelines: You will complete a class named SnapShopGUI in the gui package that contains the implementation of your graphical user interface. You may also write additional helper classes, if you find it necessary. You do not need to write your own code to apply the different transformation filters to the pixels in the image. Do this by using the instructor-provided filter classes. Note that a single filter object can and should) be used multiple times; you must not create more than one of each type of filter object. 2 of 6 The following class diagram gives a summary of the classes in the project and their relationships. The SnapShopGUI is constructed by the SnapShopMain class. The GUI uses Filters to filter PixelImages that are composed of Pixels. ::Default::SnapShopMain main...) > snapshop.filters::Filter snapshop.filters::EdgeDetectFilter EdgeDetectFiter...) liter) #likel) #getDescription starts snapshop.gui:SnapShopGUI This is the class you will write. snapshop.filters::AbstractFilter snapshop.filter::Flip VerticalFilter liteil.) Et Fivetica Flor Abstract File Description. snapshop.filters::GrayscaleFilter liteil) Grayscale Fiker...) snapshop.filters: WeightedFilter fitor) WeightedFile snapshop.filters::FlipHorizontalFilter uses snapshop.image:Pixellmage PixelData El load) savel) setPwolData) snapshop.image::Pixel Fico contaFler. snapshop.filtere::SharpenFilter snapshop.filter::Softenfilter Sharper le SoftFikel snapshop.filters: EdgeHighlightfilter EEdo HiWiFi MAX_COLOR_VALUE: int MIN_COLOR VALUE NUM_CHANNELS:in Bluel Green) Red) # Fil) tel.) Green) sed) 3 of 6 Provided Files: The following classes and interfaces are provided for your use. You must not modify these files when writing your program. The classes have other methods beyond what is listed, but the listed methods are all you need. Interface Filter: public interface Filter { // Applies this filter to the given image. public void filter (PixelImage the Image); // Returns a text description of this filter, such as "Edge Highlight". public String getDescription(); } The following classes implement the Filter interface. Each has a no-argument constructor. public class EdgeDetect Filter implements Filter public class EdgeHighlightFilter implements Filter public class FlipHorizontalFilter implements Filter public class FlipVerticalFilter implements Filter public class GrayscaleFilter implements Filter public class SharpenFilter implements Filter public class SoftenFilter implements Filter Class Pixel: public class Pixel { public Pixel() // constructs a black pixel public Pixel (int thered, int theGreen, int theBlue) // RGB values, 0-255 public int getRed(), getGreen(), getBlue () public void setRed (int theRed), set Green (int theGreen), setBlue (int theBlue) Class PixelImage: public class PixelImage { // Loads an image from the given file and returns it. // Throws an exception if the file cannot be read. public static PixelImage load (File theFile) throws IOException // Saves this image to the given file. // Throws an exception if the file cannot be written. public void save (File theFile) throws IOException // Methods to get and set the 2D grid of pixels that comprise this image. // The first dimension is the rows (y), the second is the columns (x). public Pixel[] [] getPixelData() public void setPixelData (Pixel[] [] theData) } Class SnapShopMain: public class SnapShopMain { // Runs your program by constructing a SnapShopGUI object. // (You must write the SnapShopGUI class.) public static void main(String... theArgs) 4 of 6 Hints: Display an image on the GUI by setting it to be the icon of an onscreen JLabel. A JLabel's icon is set by calling its setIcon method. The setIcon method accepts an ImageIcon object as a parameter. An ImageIcon object can be constructed by passing a Pixel Image as the parameter. Here is an example that creates a new label and sets its icon (note that you should not create a new label every time you change the image, but instead should change the icon of the label you already have). PixelImage image = PixelImage.load(new File("apple.jpg")); my ImageLabel.setIcon (new ImageIcon(image)); Use a JFileChooser for your file selection dialog. A save dialog can be shown by calling showSaveDialog on a JFileChooser object, and an open dialog can be shown by calling showOpenDialog. You can ask for the file the user selected by calling the getSelectedFile method on the JFileChooser. If image loading fails, catch the IOException and use a JOptionPane to display an error message dialog like the one shown on the page 2 of these instructions. Your program should create only one JFileChooser object and reuse it repeatedly. Included with the project are some image files you can use for testing and some icon files which you could add to the buttons at the bottom of the GUI if you choose. 5 of 6


