

Question: In Class Assignment: Node Communication Goals Create a new workspace and package. Create two nodes that send and receive messages Create a third node that
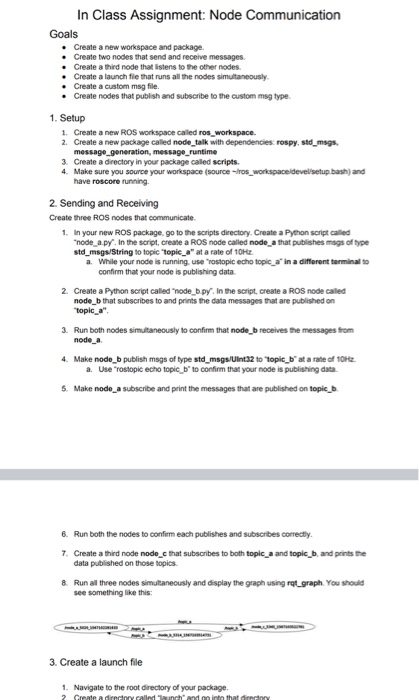
In Class Assignment: Node Communication Goals Create a new workspace and package. Create two nodes that send and receive messages Create a third node that stens to the other nodes. Create a launch file that runs all the nodes simultaneously Create a custom msg file. Create nodes that publish and subscribe to the custom msg type 1. Setup 1. Create a new ROS workspace called ros_workspace. 2. Create a new package called node_talk with dependencies rospy, std_msgs. message_generation, message_runtime 3. Create a directory in your package called scripts. 4. Make sure you source your workspace (source-ros_workspace develsetup bash and have roscore running 2. Sending and Receiving Create three ROS nodes that communicate 1. In your new ROS package, go to the scripts directory. Create a Python script called "node a.py. In the script, create a ROS node called node a that publishes msgs of type std_msgs/String to topic "topic_a" at a rate of 10H a. While your node is running, use rostopic echo topic a' in a different terminato confirm that your node is publishing data 2. Create a Python script called "node boy in the script create a ROS node cailed node_b that subscribes to and prints the data messages that are published on "topic_a". 3. Run both nodes simultaneously to confirm that node_b receives the messages from node_a 4. Make node_b publish msgs of type std_msgs/Uint32 to topic_b at a rate of 10 a. Use "rostopic echo topic b to confirm that your node is publishing data 5. Make node a subscribe and print the messages that are published on topicb 6. Run both the nodes to confirm each publishes and subscribes correctly. 7. Create a third node node_c that subscribes to both topic_a and topic_b. and prints the data published on those topics 8. Run all three nodes simultaneously and display the graph using rat_graph. You should see something like this: 3. Create a launch file 1. Navigate to the root directory of your package. 2 Create a directory called "aunch and into that da y 3. Create a launch file 1. Navigate to the root directory of your package. 2. Create a directory called "launch" and go into that directory. 3. Create a launch file named "myLaunch.launch 4. In mylaunch launch, run the three nodes: node_a, node_b. and node_c. 5 Run the launch file. 6. Verify that all your nodes are running with: a "rosnode list" will display all running nodes b. rostopic list will display all topics nodes are publishing/subscribing to c. Check rat_graph to ensure all the nodes and topics are connected property 4. Create a custom msg type. 1. Navigate to the root directory of your package. 2. Create a directory in that package caled msg 3. In the msg directory, create a custom message type called MyMsg that has the following fields: a id - An integer value b. message. A string value 4. Make the following changes in your ROS package so that your custom msg can be generated a. Open the CMakeLists.txt file in your package. b. Uncomment the call to add_message_files and replace Messageo.msg with your msg name. For example: add_message_files(FILES Mysg.msg) C. Uncomment the call to generate_messages and leave the parameters. For example: generate_messages/DEPENDENCIES std_msgs) d. Compile the workspace:change directory to your ROS workspace parent directory (ros_workspace) and run "catkin make e. Source your workspace: source fros_workspace devel/setup bash 6. Check to see if your message shows up using rosmsg show MyMsg. You may need to source your workspace again source fros_workspace devellisetup.bash 5. Use the custom msg in your ROS nodes 1. In your package, create a new Python ROS node titled "Testing_msgs_a". 2. Import your custom msg MyMsg. 3. The node should publish MyMsg objects on topic "ymsg_a' at a rate of 10Hz 4. Create a second ROS node in your package with Python titled "Testing_msgs_b 5. Import your custom msg MyMsg. 6. The node should subscribe to topic mymsg a 7. In the subscriber callback, print out all fields of the msgs that are published on this topic. Submit your ROS node scripts, launch file, and an image of rat_graph (there is an icon to export the graph near the top right of the window) In Class Assignment: Node Communication Goals Create a new workspace and package. Create two nodes that send and receive messages Create a third node that stens to the other nodes. Create a launch file that runs all the nodes simultaneously Create a custom msg file. Create nodes that publish and subscribe to the custom msg type 1. Setup 1. Create a new ROS workspace called ros_workspace. 2. Create a new package called node_talk with dependencies rospy, std_msgs. message_generation, message_runtime 3. Create a directory in your package called scripts. 4. Make sure you source your workspace (source-ros_workspace develsetup bash and have roscore running 2. Sending and Receiving Create three ROS nodes that communicate 1. In your new ROS package, go to the scripts directory. Create a Python script called "node a.py. In the script, create a ROS node called node a that publishes msgs of type std_msgs/String to topic "topic_a" at a rate of 10H a. While your node is running, use rostopic echo topic a' in a different terminato confirm that your node is publishing data 2. Create a Python script called "node boy in the script create a ROS node cailed node_b that subscribes to and prints the data messages that are published on "topic_a". 3. Run both nodes simultaneously to confirm that node_b receives the messages from node_a 4. Make node_b publish msgs of type std_msgs/Uint32 to topic_b at a rate of 10 a. Use "rostopic echo topic b to confirm that your node is publishing data 5. Make node a subscribe and print the messages that are published on topicb 6. Run both the nodes to confirm each publishes and subscribes correctly. 7. Create a third node node_c that subscribes to both topic_a and topic_b. and prints the data published on those topics 8. Run all three nodes simultaneously and display the graph using rat_graph. You should see something like this: 3. Create a launch file 1. Navigate to the root directory of your package. 2 Create a directory called "aunch and into that da y 3. Create a launch file 1. Navigate to the root directory of your package. 2. Create a directory called "launch" and go into that directory. 3. Create a launch file named "myLaunch.launch 4. In mylaunch launch, run the three nodes: node_a, node_b. and node_c. 5 Run the launch file. 6. Verify that all your nodes are running with: a "rosnode list" will display all running nodes b. rostopic list will display all topics nodes are publishing/subscribing to c. Check rat_graph to ensure all the nodes and topics are connected property 4. Create a custom msg type. 1. Navigate to the root directory of your package. 2. Create a directory in that package caled msg 3. In the msg directory, create a custom message type called MyMsg that has the following fields: a id - An integer value b. message. A string value 4. Make the following changes in your ROS package so that your custom msg can be generated a. Open the CMakeLists.txt file in your package. b. Uncomment the call to add_message_files and replace Messageo.msg with your msg name. For example: add_message_files(FILES Mysg.msg) C. Uncomment the call to generate_messages and leave the parameters. For example: generate_messages/DEPENDENCIES std_msgs) d. Compile the workspace:change directory to your ROS workspace parent directory (ros_workspace) and run "catkin make e. Source your workspace: source fros_workspace devel/setup bash 6. Check to see if your message shows up using rosmsg show MyMsg. You may need to source your workspace again source fros_workspace devellisetup.bash 5. Use the custom msg in your ROS nodes 1. In your package, create a new Python ROS node titled "Testing_msgs_a". 2. Import your custom msg MyMsg. 3. The node should publish MyMsg objects on topic "ymsg_a' at a rate of 10Hz 4. Create a second ROS node in your package with Python titled "Testing_msgs_b 5. Import your custom msg MyMsg. 6. The node should subscribe to topic mymsg a 7. In the subscriber callback, print out all fields of the msgs that are published on this topic. Submit your ROS node scripts, launch file, and an image of rat_graph (there is an icon to export the graph near the top right of the window)
Step by Step Solution
There are 3 Steps involved in it

Get step-by-step solutions from verified subject matter experts