

Question: Lab Activity 01: Write and execute an assembly code on MPLAB to turn on each LEDs one by one connected for 1 seconds, with the
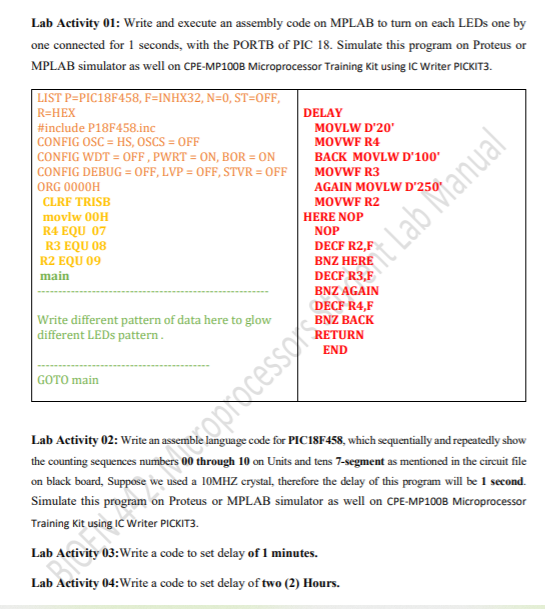
Lab Activity 01: Write and execute an assembly code on MPLAB to turn on each LEDs one by one connected for 1 seconds, with the PORTB of PIC 18. Simulate this program on Proteus or MPLAB simulator as well on CPE-MP100B Microprocessor Training Kit using IC Writer PICKIT3. LIST P=PIC18F458, F=INHX32, N=0, ST=OFF, R=HEX DELAY #include P18F458.inc MOVLW D'20 CONFIG OSC = HS, OSCS=OFF MOVWF R4 CONFIG WDT = OFF, PWRT = ON, BOR = ON BACK MOVLW D'100 CONFIG DEBUG = OFF, LVP = OFF, STVR = OFF MOVWF R3 ORG 0000H AGAIN MOVLW D'250" CLRF TRISB MOVWF R2 movlw OOH HERE NOP R4 EQU 07 R3 EQU 08 DECF R2,F R2 EQU 09 main NOP Write different pattern of data here to glow different LEDs pattern RETURN END The placessSet Lab Manual GOTO main Lab Activity 02: Write an assemble language code for PIC18F458, which sequentially and repeatedly show the counting sequences numbers 00 through 10 on Units and tens 7-segment as mentioned in the circuit file on black board, Suppose we used a 10MHZ crystal, therefore the delay of this program will be 1 second. Simulate this program on Proteus or MPLAB simulator as well on CPE-MP100B Microprocessor Training Kit using IC Writer PICKIT3. Lab Act 03:Write a code to set delay of 1 minutes. Lab Activity 04:Write a code to set delay of two (2) Hours
Step by Step Solution
There are 3 Steps involved in it

Get step-by-step solutions from verified subject matter experts