

Question: need the following coded in a while loop. using c, c++ initialize variables; turn on LED Set Trigger Pulse to High Wait 1ms Compute Duration
need the following coded in a while loop. using c, c++
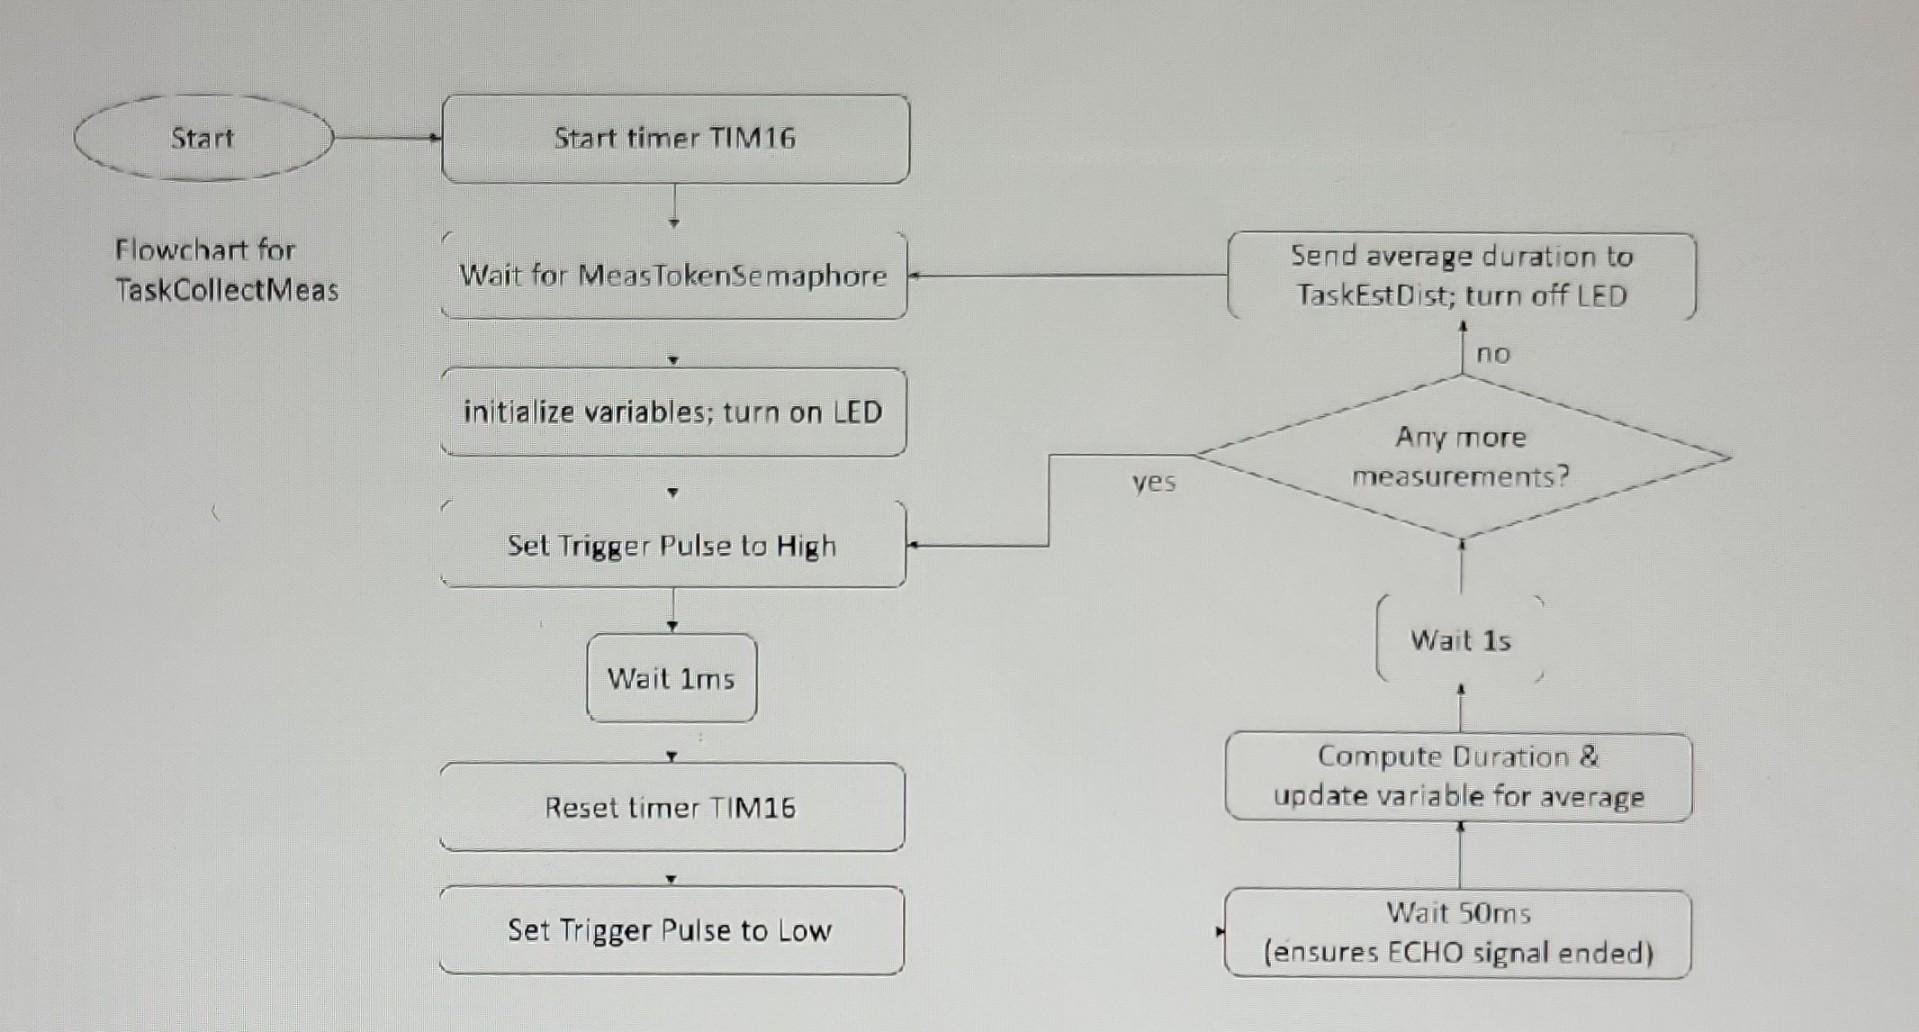
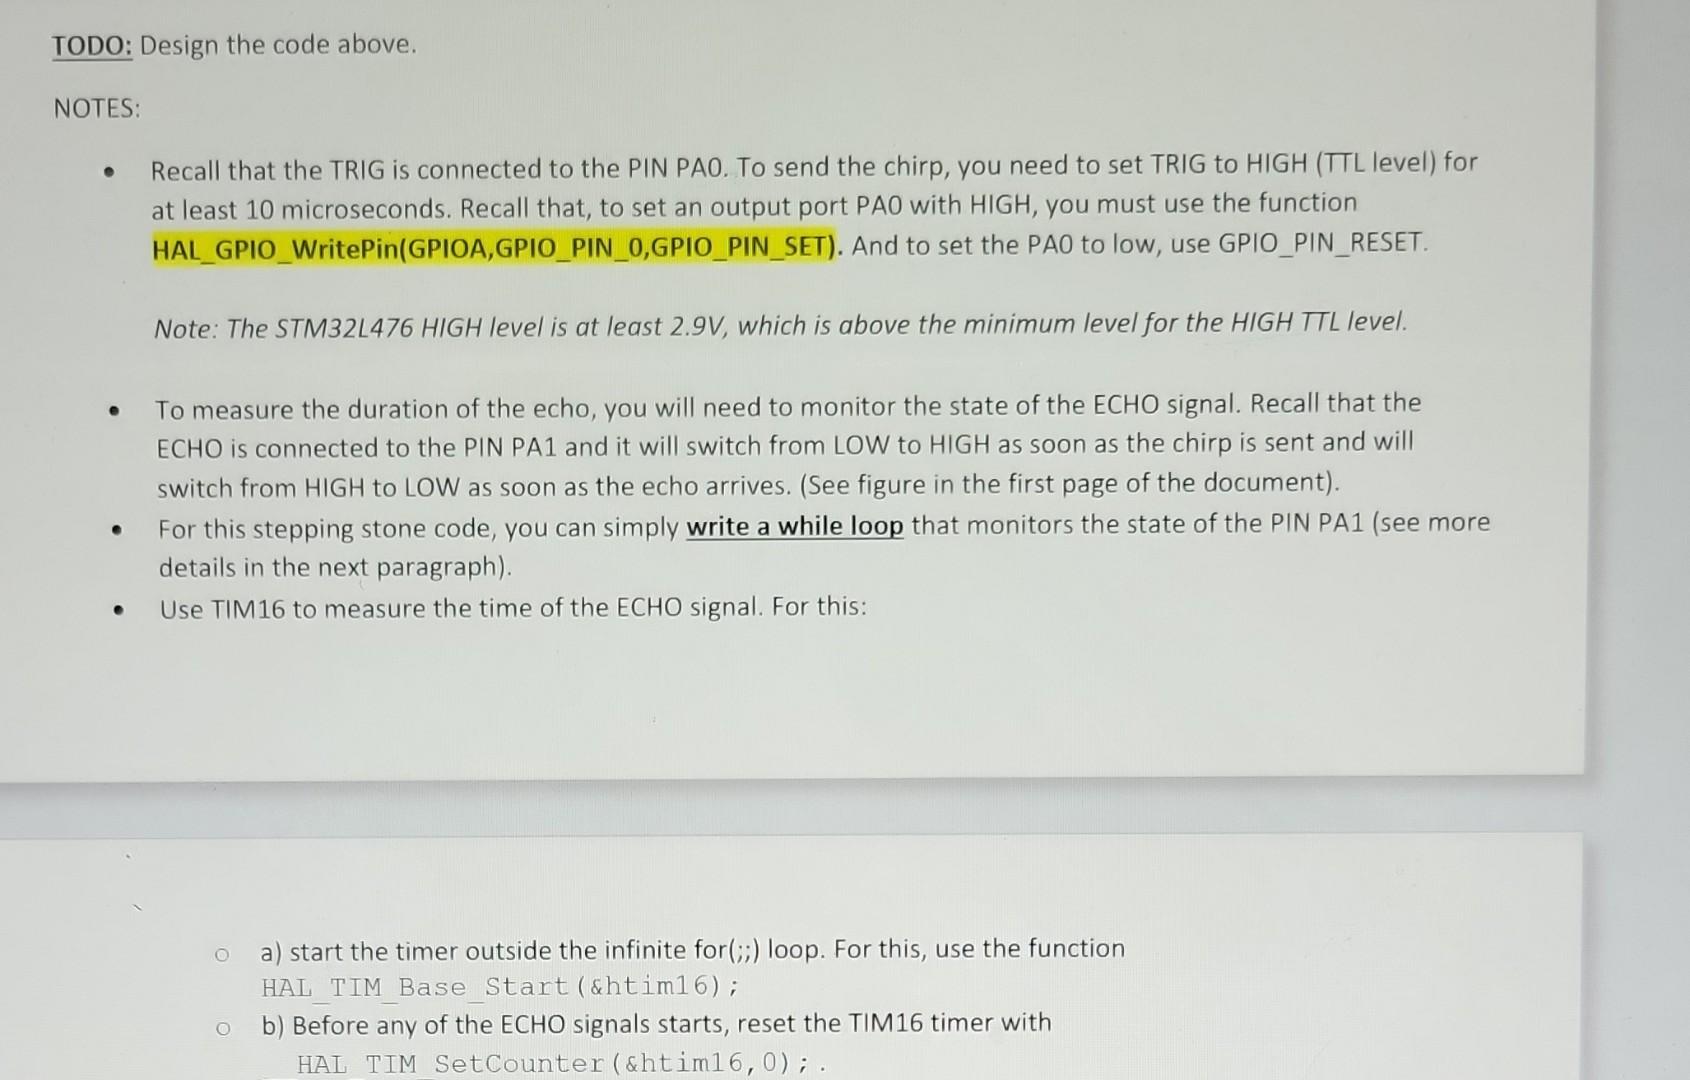
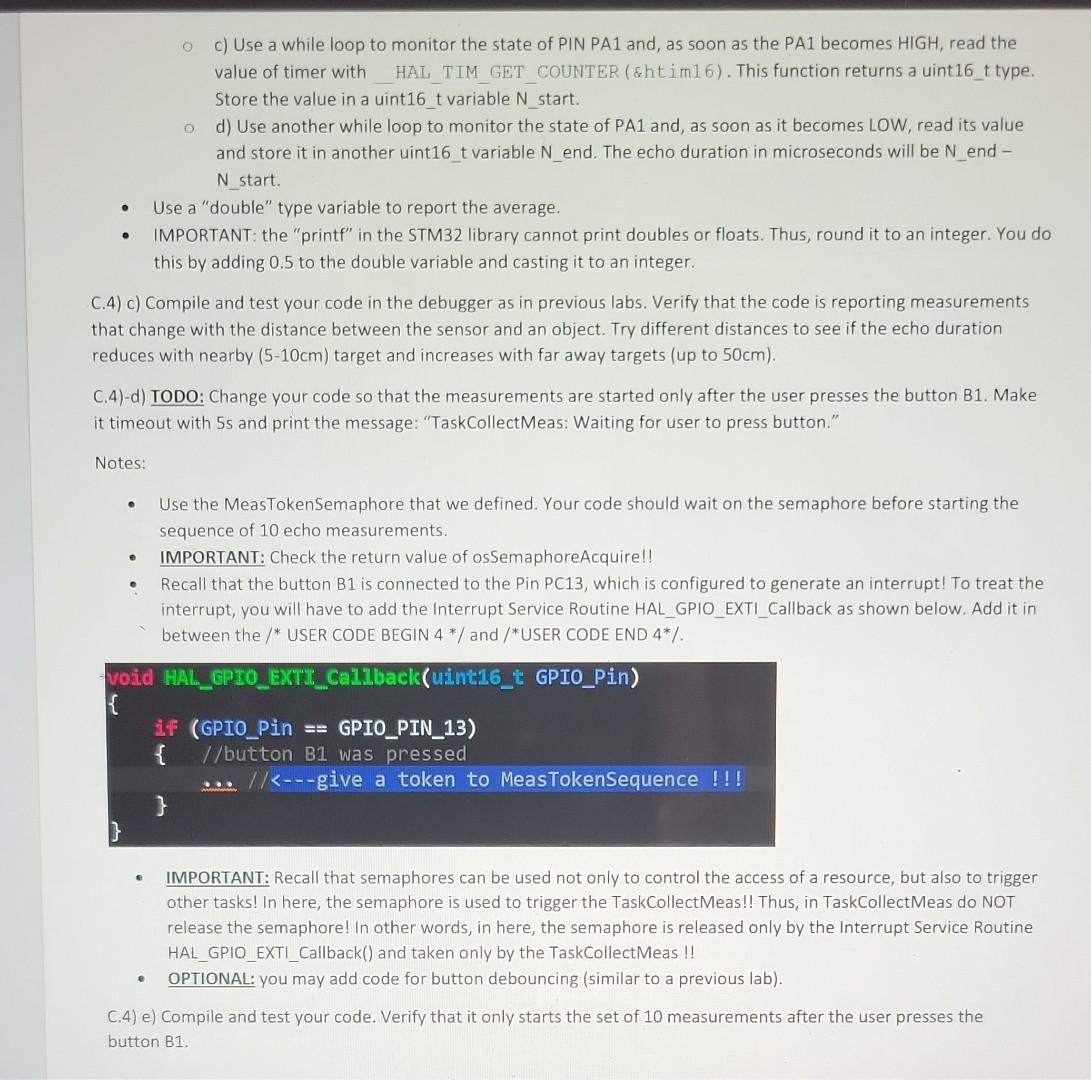
initialize variables; turn on LED Set Trigger Pulse to High Wait 1ms Compute Duration \& update variable for average Set Trigger Pulse to Low Wait 50ms (ensures ECHO signal ended) TODO: Design the code above. NOTES: - Recall that the TRIG is connected to the PIN PAO. To send the chirp, you need to set TRIG to HIGH (TTL level) for at least 10 microseconds. Recall that, to set an output port PAO with HIGH, you must use the function HAL_GPIO_WritePin(GPIOA,GPIO_PIN_0,GPIO_PIN_SET). And to set the PAO to low, use GPIO_PIN_RESET. Note: The STM32L476 HIGH level is at least 2.9V, which is above the minimum level for the HIGH TTL level. - To measure the duration of the echo, you will need to monitor the state of the ECHO signal. Recall that the ECHO is connected to the PIN PA1 and it will switch from LOW to HIGH as soon as the chirp is sent and will switch from HIGH to LOW as soon as the echo arrives. (See figure in the first page of the document). - For this stepping stone code, you can simply write a while loop that monitors the state of the PIN PA1 (see more details in the next paragraph). - Use TIM16 to measure the time of the ECHO signal. For this: a) start the timer outside the infinite for (;;) loop. For this, use the function HAL TIM Base_Start ( \&htim16); b) Before any of the ECHO signals starts, reset the TIM16 timer with HAL TIM SetCounter ( \&tim 16,0); . c) Use a while loop to monitor the state of PIN PA1 and, as soon as the PA1 becomes HIGH, read the value of timer with HAL_TIM_GET_COUNTER ( ghtim16). This function returns a uint16 t type. Store the value in a uint16_t variable N start. d) Use another while loop to monitor the state of PA1 and, as soon as it becomes LOW, read its value and store it in another uint16 t variable N end. The echo duration in microseconds will be N end Nstart. - Use a "double" type variable to report the average. - IMPORTANT: the "printf" in the STM32 library cannot print doubles or floats. Thus, round it to an integer. You do this by adding 0.5 to the double variable and casting it to an integer. C.4) c) Compile and test your code in the debugger as in previous labs. Verify that the code is reporting measurements that change with the distance between the sensor and an object. Try different distances to see if the echo duration reduces with nearby (510cm) target and increases with far away targets (up to 50cm ). C.4)-d) TODO: Change your code so that the measurements are started only after the user presses the button B1. Make it timeout with 5s and print the message: "TaskCollectMeas: Waiting for user to press button." Notes: - Use the MeasTokenSemaphore that we defined. Your code should wait on the semaphore before starting the sequence of 10 echo measurements. - IMPORTANT: Check the return value of osSemaphoreAcquire!! - Recall that the button B1 is connected to the Pin PC13, which is configured to generate an interrupt! To treat the interrupt, you will have to add the Interrupt Service Routine HAL_GPIO_EXTI_Callback as shown below. Add it in between the /* USER CODE BEGIN 4/ and /*USER CODE END 4 - IMPORTANT: Recall that semaphores can be used not only to control the access of a resource, but also to trigger other tasks! In here, the semaphore is used to trigger the TaskCollectMeas!! Thus, in TaskCollectMeas do NOT release the semaphore! In other words, in here, the semaphore is released only by the Interrupt Service Routine HAL_GPIO_EXTI_Callback() and taken only by the TaskCollectMeas !! - OPTIONAL: you may add code for button debouncing (similar to a previous lab). C.4) e) Compile and test your code. Verify that it only starts the set of 10 measurements after the user presses the button B1. initialize variables; turn on LED Set Trigger Pulse to High Wait 1ms Compute Duration \& update variable for average Set Trigger Pulse to Low Wait 50ms (ensures ECHO signal ended) TODO: Design the code above. NOTES: - Recall that the TRIG is connected to the PIN PAO. To send the chirp, you need to set TRIG to HIGH (TTL level) for at least 10 microseconds. Recall that, to set an output port PAO with HIGH, you must use the function HAL_GPIO_WritePin(GPIOA,GPIO_PIN_0,GPIO_PIN_SET). And to set the PAO to low, use GPIO_PIN_RESET. Note: The STM32L476 HIGH level is at least 2.9V, which is above the minimum level for the HIGH TTL level. - To measure the duration of the echo, you will need to monitor the state of the ECHO signal. Recall that the ECHO is connected to the PIN PA1 and it will switch from LOW to HIGH as soon as the chirp is sent and will switch from HIGH to LOW as soon as the echo arrives. (See figure in the first page of the document). - For this stepping stone code, you can simply write a while loop that monitors the state of the PIN PA1 (see more details in the next paragraph). - Use TIM16 to measure the time of the ECHO signal. For this: a) start the timer outside the infinite for (;;) loop. For this, use the function HAL TIM Base_Start ( \&htim16); b) Before any of the ECHO signals starts, reset the TIM16 timer with HAL TIM SetCounter ( \&tim 16,0); . c) Use a while loop to monitor the state of PIN PA1 and, as soon as the PA1 becomes HIGH, read the value of timer with HAL_TIM_GET_COUNTER ( ghtim16). This function returns a uint16 t type. Store the value in a uint16_t variable N start. d) Use another while loop to monitor the state of PA1 and, as soon as it becomes LOW, read its value and store it in another uint16 t variable N end. The echo duration in microseconds will be N end Nstart. - Use a "double" type variable to report the average. - IMPORTANT: the "printf" in the STM32 library cannot print doubles or floats. Thus, round it to an integer. You do this by adding 0.5 to the double variable and casting it to an integer. C.4) c) Compile and test your code in the debugger as in previous labs. Verify that the code is reporting measurements that change with the distance between the sensor and an object. Try different distances to see if the echo duration reduces with nearby (510cm) target and increases with far away targets (up to 50cm ). C.4)-d) TODO: Change your code so that the measurements are started only after the user presses the button B1. Make it timeout with 5s and print the message: "TaskCollectMeas: Waiting for user to press button." Notes: - Use the MeasTokenSemaphore that we defined. Your code should wait on the semaphore before starting the sequence of 10 echo measurements. - IMPORTANT: Check the return value of osSemaphoreAcquire!! - Recall that the button B1 is connected to the Pin PC13, which is configured to generate an interrupt! To treat the interrupt, you will have to add the Interrupt Service Routine HAL_GPIO_EXTI_Callback as shown below. Add it in between the /* USER CODE BEGIN 4/ and /*USER CODE END 4 - IMPORTANT: Recall that semaphores can be used not only to control the access of a resource, but also to trigger other tasks! In here, the semaphore is used to trigger the TaskCollectMeas!! Thus, in TaskCollectMeas do NOT release the semaphore! In other words, in here, the semaphore is released only by the Interrupt Service Routine HAL_GPIO_EXTI_Callback() and taken only by the TaskCollectMeas !! - OPTIONAL: you may add code for button debouncing (similar to a previous lab). C.4) e) Compile and test your code. Verify that it only starts the set of 10 measurements after the user presses the button B1
Step by Step Solution
There are 3 Steps involved in it
To implement the described system using a while loop in CC follow the steps and code snippet below This system is based on capturing echo durations us... View full answer

Get step-by-step solutions from verified subject matter experts