

Question: Open NetBeans Open NetBeans and create a Java project with the following details. For Project Name include Lab12 For the Main Class include lab12.CoffeeMachine In
Open NetBeans
Open NetBeans and create a Java project with the following details.
For Project Name include Lab12
For the Main Class include lab12.CoffeeMachine
In your Code window for this class, shown below, copy the program code shown in Figure 1 below, in the appropriate places, except substitute your own name in place of Sammy Student.
Figure 1 Source Code for the Coffee Machine GUI Program
| import java.awt.*; import java.awt.event.*; import javax.swing.*; //Sammy Student public class CoffeeMachine extends JFrame implements ActionListener { private static final long serialVersionUID = 1L; JLabel l1, l2, l3, l4, l5, l6; JButton b1, b2; JTextField t1, t2, t3; JCheckBox cream, raw, espresso; private JRadioButton small; private JRadioButton large; private ButtonGroup group; CoffeeMachine() { l1 = new JLabel(" Customer Name"); l2 = new JLabel(" amount to pay"); l3 = new JLabel(" "); l4 = new JLabel(" "); l5 = new JLabel(" "); l6 = new JLabel(" "); b1 = new JButton("COMPUTE"); b2 = new JButton("EXIT"); t1 = new JTextField(10); t2 = new JTextField(10); small = new JRadioButton("small", true); large = new JRadioButton("large", false); group = new ButtonGroup(); group.add(small); group.add(large); cream = new JCheckBox("cream", false); raw = new JCheckBox("raw sugar", false); espresso = new JCheckBox("espresso shot", false); add(l1); add(t1); add(small); add(cream); add(large); add(raw); add(l3); add(espresso); add(l2); add(t2); add(l5); add(l6); add(b1); add(b2); b1.addActionListener(this); b2.addActionListener(e -> System.exit(0)); setSize(500,300); setLayout(new GridLayout(7,2)); setTitle("Coffee Machine"); } public void actionPerformed(ActionEvent ae) { float price = 0; String a = "", message = ""; if (cream.isSelected() == true) { // perform a task ... } if (raw.isSelected() == true) { // perform a task ... } if (espresso.isSelected() == true) { // perform a task ... } if (small.isSelected() == true) { System.out.println("small"); // perform a task ... } if (large.isSelected() == true) { System.out.println("large"); // perform a task ... } if(ae.getSource() == b1) { a = t1.getText(); message = "your order: " + a + " $" + price; t2.setText("thank you: " + a ); } JOptionPane.showMessageDialog(null, "Summary: " + message, "Order Summary", JOptionPane.PLAIN_MESSAGE); } public static void main(String args[]) { CoffeeMachine a = new CoffeeMachine(); a.setVisible(true); a.setLocation(200,200); } } |
Modify the Program
With your initial starter program tested and functioning properly, you will now alter the program such that when the user clicks the [ COMPUTE ] button
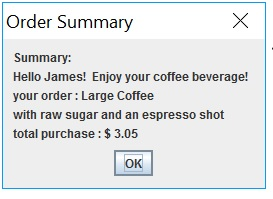
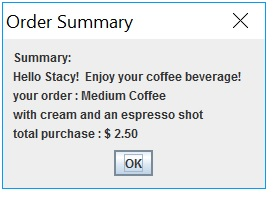
The amount to pay will appear in the output text field and an order summary will appear in the message box, similar to that shown below.
Modify Again the Program
You will now expand your programs layout by including a new row of GUI elements.
To accomplish this, perform these tasks:
Add a new radio button to the Radio Button Group. This button will allow the program user to select a medium coffee beverage. The users may now be able to select from either a small, medium or large cup of coffee.
In the same GUI row, add a label that will be used as a spacer element. Set the text property of the label to an empty string.
Save your program and perform a trial run of it. Test your program with data similar to that shown below.
Supplement the Program with a Menu
Add a JMenuBar() to your application. Your GUI is to appear as shown in this screen snapshot segment, which shows two JMenu() objects namely File and Help. The File menu will allow you to exit the running application and the Help menu will show information About the programmer and the program.

Here are some code statements that you can implement to construct the JMenuBar() . Place these statements in an appropriate area of your class file.
// create the menu bar
JMenuBar menuBar = new JMenuBar();
add(menuBar);
Build the menu with these menu items:
// add the File menu
JMenu mnFile = new JMenu("File");
menuBar.add(mnFile);
// add a File menu item
JMenuItem mntmExit = new JMenuItem("Exit");
mnFile.add(mntmExit);
// add the Help menu
JMenu mnHelp = new JMenu("Help");
menuBar.add(mnHelp);
// add a Help menu item
JMenuItem mntmAbout = new JMenuItem("About");
mnHelp.add(mntmAbout);
// display the menu bar on the frame
setJMenuBar(menuBar);
Add now the listeners which will allow menu items to interact with the program.
// the Exit menu item listener
mntmExit.addActionListener(e -> System.exit(0));
// the Help menu item listener
mntmAbout.addActionListener(new ActionListener() {
public void actionPerformed(ActionEvent arg0)
{
JOptionPane.showMessageDialog(null, "Your Message",
"About", JOptionPane.PLAIN_MESSAGE);
}
});
For your [ Help ] -> [ About ] menu item write a multi - line message which lists you as the programmer and also includes some information about this application.
Extra Credit: Add some exception handling to your code. Error trap any numeric characters input into text field t1 by the user and allow for reinput if that is the case. Also add in an animated gif at the bottom area of your app, perhaps a cup of freshly brewed steaming coffee!
Order Summary Summary: Hello James! Enjoy your coffee beverage! your order: Large Coffee with raw sugar and an espresso shot total purchase: $3.05 OK Order Summary Summary: Hello James! Enjoy your coffee beverage! your order: Large Coffee with raw sugar and an espresso shot total purchase: $3.05 OK
Step by Step Solution
There are 3 Steps involved in it

Get step-by-step solutions from verified subject matter experts