

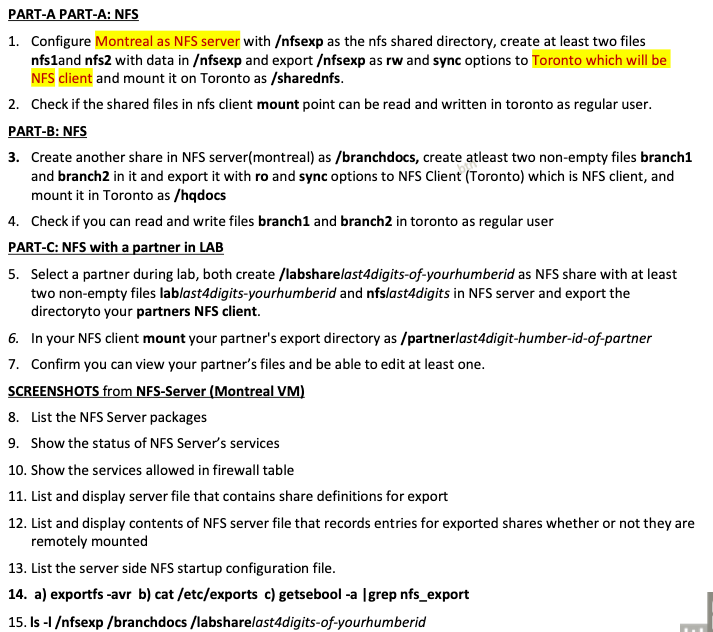
Question: PART - A PART - A: NFS 1 . Configure Montreal as NFS server with / nfsexp as the nfs shared directory, create at least
PARTA PARTA: NFS
Configure Montreal as NFS server with nfsexp as the nfs shared directory, create at least two files
nfs and nfs with data in nfsexp and export nfsexp as rw and sync options to Toronto which will be
NFS client and mount it on Toronto as sharednfs
Check if the shared files in nfs client mount point can be read and written in toronto as regular user.
PARTB: NFS
Create another share in NFS servermontreal as branchdocs create atleast two nonempty files branch
and branch in it and export it with ro and sync options to NFS Client Toronto which is NFS client, and
mount it in Toronto as hqdocs
Check if you can read and write files branch and branch in toronto as regular user
PARTC: NFS with a partner in LAB
Select a partner during lab, both create labsharelastdigitsofyourhumberid as NFS share with at least
two nonempty files lablastdigitsyourhumberid and nfslastdigits in NFS server and export the
directory to your partners NFS client.
In your NFS client mount your partner's export directory as partnerlastdigithumberidofpartner
Confirm you can view your partners files and be able to edit at least one.
SCREENSHOTS from NFSServer Montreal VM
List the NFS Server packages
Show the status of NFS Servers services
Show the services allowed in firewall table
List and display server file that contains share definitions for export
List and display contents of NFS server file that records entries for exported shares whether or not they are
remotely mounted
List the server side NFS startup configuration file.
a exportfs avr b cat etcexports c getsebool a grep nfsexport
LAB
NEST
Page of
the
SCREENSHOTS from NFSClient Toronto VM
List the packages for NFSClient
Show the status of rpcbind service
df Th sharednfs hqdocs partnerlastdigithumberidofpartner
ls l sharednfs hqdocs partnerlastdigithumberidofpartner
View and list the client file that defines settings used at mounting shares
Display and list client file that keeps track of mounted shares and the local file systems
List the client side NFS startup configuration file
PARTD: NFS MONITORING
Display NFS and RPC IO statistics on NFS server SCREENSHOT
Display NFS and RPC IO statistics on NFS client SCREENSHOT
In NFS client, provide rw statistics for each mounted share. SCREENSHOT
PARTE: AUTOFS
Create a new directory autodir in your NFS server montreal and populate it with nonempty files
autodir and autodir and export autodir to NFS client toronto Using autofs direct map mount it in
toronto VM as autodirmnt
Create a new directory autoindir in your NFS server montreal and populate it with nonempty files
autoindir and autoindir and export autoindir to NFS client toronto Using autofs indirect map mount
it in toronto VM as miscautoindirmnt
SCREENSHOTS: MONTREAL a cat etcexports bls l autodir autoindir csudo exportfs avr
TORONTO a df Th autodirmnt miscautoindirmnt b cat etcautodirect ccat etcautomisc
d ls l autodirmnt miscautoindirmnt esystemctl status autofs f cat etcautofsconf grep master
PARTF: CONFIGURE MOUNT POINT TO BE PERSISTENT
Change root password to a password you can remember
In NFS Client, configure sharednfs and branchdocs NFS mount points to be persistent SCREENSHOT cat
etcfstab reboot and confirm that your configuration works. It is highly recommended to have a backup
of etcfstab file before editing it
NOTE : in case system fails to restart after entries in etcfstab
NFS server must be running before starting NFSclient, if not NFS client could go to emergency mode
Due to entries in etcfstab the system may enter into emergency mode or rescue mode due to entries in
etcfstab file.
In the emergency mode, enter root password to log in as root user.
Now edit etcfstab file, correct error in the line you have added, save and reboot OR you can comment
the line you have added by typing # at start of that line to correct it later after succe
Step by Step Solution
There are 3 Steps involved in it
1 Expert Approved Answer
Step: 1 Unlock

Question Has Been Solved by an Expert!
Get step-by-step solutions from verified subject matter experts
Step: 2 Unlock
Step: 3 Unlock