

Question: PLEASE HELP I NEED IT. A. Lab #3 - Using Constraints Overview 1. This lab will introduce you to using constraints within a table. 2.
PLEASE HELP
I NEED IT.
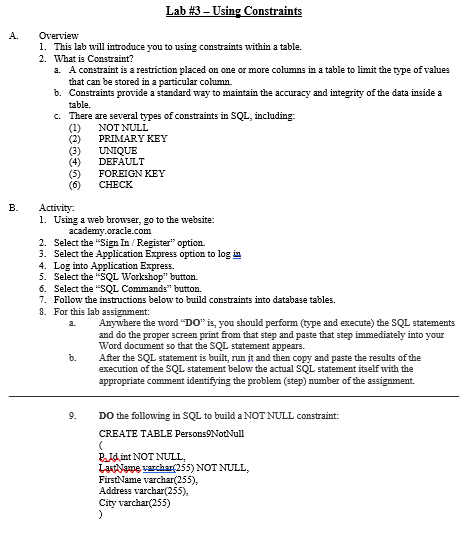
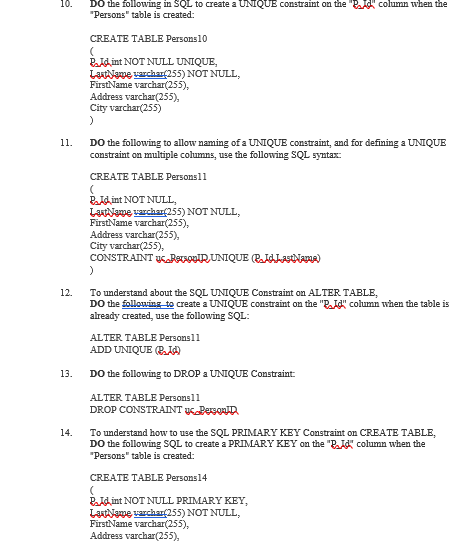
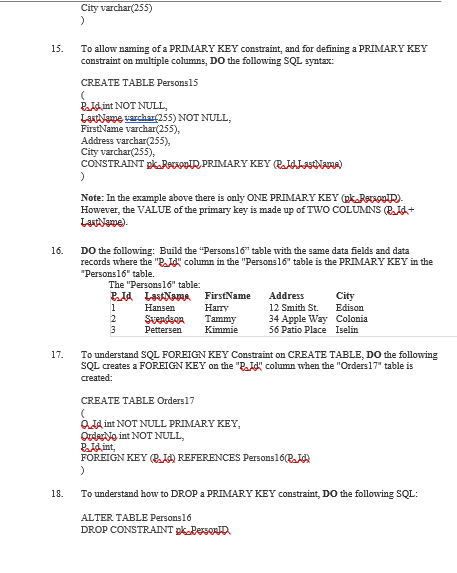
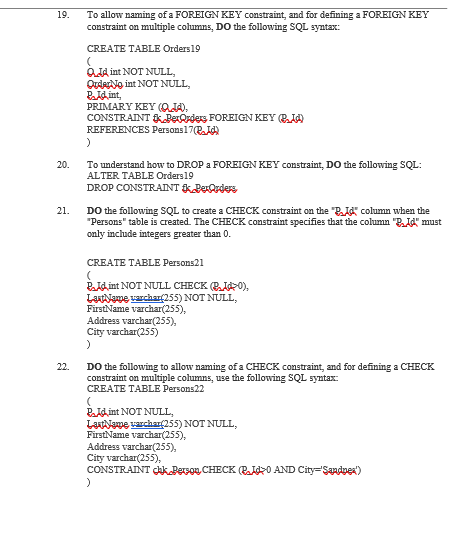
A. Lab #3 - Using Constraints Overview 1. This lab will introduce you to using constraints within a table. 2. What is Constraint? a. A constraint is a restriction placed on one or more columns in a table to limit the type of values that can be stored in a particular column. b. Constraints provide a standard way to maintain the accuracy and integrity of the data inside a table. c. There are several types of constraints in SQL, including: (1) NOT NULL (2) PRIMARY KEY (3) UNIQUE DEFAULT (5) (6) CHECK FOREIGN KEY 00 Activity: 1. Using a web browser, go to the website: academy.oracle.com 2. Select the "Sign In/Register" option. 3. Select the Application Express option to log in 4. Log into Application Express 5. Select the "SQL Workshop" button. 6. Select the "SQL Commands" button. 7. Follow the instructions below to build constraints into database tables. 8. For this lab assignment: Anywhere the word "DO" is, you should perform type and execute) the SQL statements and do the proper screen print from that step and paste that step immediately into your Word document so that the SQL statement appears. b. After the SQL statement is built , run it and then copy and paste the results of the execution of the SQL statement below the actual SQL statement itself with the appropriate comment identifying the problem (step) number of the assignment. 9. DO the following in SQL to build a NOT NULL constraint: CREATE TABLE Persons NotNull ( P.Id int NOT NULL, LastName varchar(255) NOT NULL, FirstName varchar(255), Address varchar(255), City varchar(255) ) 10. DO the following in SQL to create a UNIQUE constraint on the Bid column when the "Persons" table is created: 11. 12. CREATE TABLE Persons 10 Budint NOT NULL UNIQUE, Lantiame wchar(255) NOT NULL, FirstName varchar(255), Address varchar(255), City varchar(255) ) DO the following to allow naming of a UNIQUE constraint, and for defining a UNIQUE constraint on multiple cohmns, use the following SQL syntax: CREATE TABLE Persons 11 Ridint NOT NULL Lattiame warchar(255) NOT NULL, FirstName varchar(255), Address varchar(255), City varchar(255), CONSTRAINT PAUOIR UNIQUE ISLAName) > To understand about the SQL UNIQUE Constraint on ALTER TABLE, DO the following to create a UNIQUE constraint on the "R.Id"column when the table is already created, use the following SQL: ALTER TABLE Persons11 ADD UNIQUE O Do the following to DROP a UNIQUE Constraint: ALTER TABLE Persons 11 DROP CONSTRAINT y Persona To understand how to use the SQL PRIMARY KEY Constraint on CREATE TABLE, DO the following SQL to create a PRIMARY KEY on the "R_id" column when the "Persons" table is created: CREATE TABLE Persons 14 ( Buid int NOT NULL PRIMARY KEY, Lattiame archar(255) NOT NULL, FirstName varchar(255), Address varchar(255), 13. 14. City varchar(255) 15. To allow naming of a PRIMARY KEY constraint, and for defining a PRIMARY KEY constraint on multiple columns, DO the following SQL syntax: CREATE TABLE Persons 15 ( Ridint NOT NULL Laatame warchar(255) NOT NULL, FirstName varchar(255), Address varchar(255), City varchar(255). CONSTRAINT p Racob.IR, PRIMARY KEY ISLASMAMA) ) Note: In the example above there is only ONE PRIMARY KEY (Ok Bacoor However, the VALUE of the primary key is made up of TWO COLUMNS /d+ Lantiyawe). 16. DO the following: Build the "Persons 16" table with the same data fields and data records where the "R.Id"column in the "Persons 16" table is the PRIMARY KEY in the "Persons16" table. The "Persons 16" table: P.Id LastName FirstName Address City 1 Hansen Harry 12 Smith St. Edison 2 Svendeos Tammy 34 Apple Way Colonia 3 Pettersen Kimmie 56 Patio Place Iselin 17. To understand SQL FOREIGN KEY Constraint on CREATE TABLE, DO the following SQL creates a FOREIGN KEY on the "R_id" column when the "Orders 17" table is created: CREATE TABLE Orders17 O.JA int NOT NULL PRIMARY KEY, Ouderloint NOT NULL, Paid int, FOREIGN KEY ELA) REFERENCES Persons 16B.IO ) 18. To understand how to DROP a PRIMARY KEY constraint. Do the following SQL: ALTER TABLE Persons16 DROP CONSTRAINT pk. Dersoon 19. To allow naming of a FOREIGN KEY constraint, and for defining a FOREIGN KEY constraint on multiple columns, DO the following SQL syntax: CREATE TABLE Orders 19 JA int NOT NULL, Ouderdoint NOT NULL, Ridint PRIMARY KEY (JA), CONSTRAINT kBerQrders FOREIGN KEY EL REFERENCES Persons17(P.Id ) To understand how to DROP A FOREIGN KEY constraint, DO the following SQL: ALTER TABLE Orders 19 DROP CONSTRAINT klerOrders DO the following SQL to create a CHECK constraint on the "Beld" column when the "Persons" table is created. The CHECK constraint specifies that the column "Bild" must only include integers greater than 0. 20. 21. CREATE TABLE Persons21 Buid.int NOT NULL CHECKL). Lantiame varchar(255) NOT NULL, FirstName varchar(255), Address varchar(255) City varchar(255) ) Do the following to allow naming of a CHECK constraint, and for defining a CHECK constraint on multiple columns, use the following SQL syntax CREATE TABLE Persons 22 22. Beidint NOT NULL Lattiame varchar(255) NOT NULL, FirstName varchar(255), Address varchar(255). City varchar(255). CONSTRAINT dkk Berso CHECK BIDO AND City="Sandnes!) 23. To understand the SQL CHECK Constraint on ALTER TABLE, DO the following to create a CHECK constraint on the "Budd" column when the table is already created, use the following SQL: ALTER TABLE Persons 22 ADD CHECK B.140) To understand how to DROP a CHECK constraint, DO the following SQL: ALTER TABLE Persons 22 DROP CONSTRAINT chk. Person, To use the SQL DEFAULT Constraint on CREATE TABLE, DO the following SQL creates a DEFAULT constraint on the "City" column when the "Persons" table is created: CREATE TABLE Persons25 Ridint NOT NULL Lantawe warchar(255) NOT NULL, FirstName varchar(255), Address varchar(255). City varchar(255) DEFAULT Sandnex' > 25. 26. To understand how to use the DEFAULT constraint can also be used to insert system values, by using functions like SYSDATE, DO the following: CREATE TABLE Orders26 OdA int NOT NULL, Order No int NOT NULL, Ridint Order Date date DEFAULT SYSDATE 27. To understand how to use the SQL DEFAULT constraint on ALTER TABLE, DO the following to create a DEFAULT constraint on the "City" column when the table is already created, use the following SQL: ALTER TABLE Persons 27 MODIFY City DEFAULT 'SANDNES! 28. To demonstrate the SQL ALTER TABLE, DO the following: Build a "Persons28" table with the following columns and insert the data into the table: Bud LastName FirstName Address City 1 Hansen Harry 12 Smith St. Edison 2 Svendson Tammy 34 Apple Way Colonia 3 Pettersen Kimmie 56 Patio Place Iselin 28. 29. DO: Now add a column named "DateOfBirsta" in the "Persons 28" table by doing the following SQL statement: ALTER TABLE Persons28 ADD DataOlBirth date Notice that the new column. "DataOfBirth", is of type date and is going to hold a date. The data type specifies what type of data the column can hold. DO: Use a Select command to demonstrate that the "Persons28" table will now ok like this: Pia LastName FirstName Address City Date of Birth 1 Hansen Harry 12 Smith St. Edison 2 Svendson Tammy 34 Apple Way Colonia 3 Pettersen Kimmie 56 Patio Place Iselin 30. The 'DataQIBistka" column is now of type year and is going to hold a year in a two-digit or four-digit format. DO: Use a DESC statement on the "Persons28" table to see this change. 31. To delete the column named "DataOfBida" in the "Persons 28" table. Do the following SQL statement ALTER TABLE Persons 28 DROP COLUMN DataOfBirth 32 DO: Use a Select command to demonstrate that the "Persons28" table will now look like this: P.Id Lauape FirstName Address City 1 Hansen Harry 12 Smith St. Edison 2 Svendson Tammy 34 Apple Way Colonia Pettersen Kimmie 56 Patio Place Iselin 3 33. 34. In the Word document that you have been copying and pasting the contents into from each of the prior steps, do the following: a. At the top of the Word document, type the following: Your full name, CSC239-xx, Labo3 (then press the Enter key) (use your real name and put your section number where the xx is on the prior line) Save this Word document with the name of Lab03 in your flash drive's CSC239 folder named CSC239Lab Assignments. Print this Word document. Exit out of Word. Exit out of Oracle Express Remove your flash drive. 35. 36. 37. 38
Step by Step Solution
There are 3 Steps involved in it

Get step-by-step solutions from verified subject matter experts