

Question: Please help with this coding problem using Xcode. I attached the example code. (1) Initially, your program shows a white canvas (image). The size of
Please help with this coding problem using Xcode. I attached the example code.

(1) Initially, your program shows a white canvas (image). The size of the canvas can be flexible.
(2) Users can choose any position on the canvas to select a point by left mouse click. Every time, when a point is selected, a small red (other colors are acceptable) circle is drawn on the canvas indicating the selected point.
(3) As the number of selected points increases, the number of splines increases. Every four points define a spline. If the number of the points is not dividable by 4. It means the remaining number cannot construct a spline. So for these remaining points, you just draw the points on the canvas without a spline, e.g. you have created 7 points; the first 4 points define a spline; you need to draw both the 4 points and their corresponding spline on the canvas; for the remaining 3 points, you only draw these 3 points without a spline on the screen (see Figure 2 (a)). Also, two controlling straight-lines are drawn for the corresponding spline on the canvas that connect the 1st and 2nd points, and 3rd and 4th points respectively. Figure 2 (b) demonstrates: once the 8th point is selected, the second spline is drawn by the second group of four points.
(4) User can remove existing points by right clicking the mouse. Every right click removes one last selected point until the number of points is equal to zero. As the selected points decrease, the corresponding splines disappear accordingly. This process can be explained by Figure 2 too. Starting from Figure 2 (b), two splines are drawn by the 8 selected points. When the user right clicks the mouse, there are only 7 points left. So the second spline disappears. In addition to creating or removing a spline by mouse clicking, user can also have the following Four ways to modify a spline.
(5) Shape controlling: user can modify the curve shape by moving any of the four points of a spline to a new position. The 1st and 4th points determine the spline start and end location; the 2nd and 3rd points determine the splines curviness as figure 3 shows:
(6) Translation: user can move a whole spline to a new location. As you may notice, for each, spline, it has a little square in the center area. We call this square as Editing Region. As figure 3 shows, when the mouse moves to this region, it turns to green color. It means this spline is highlighted or selected. (Notice: you do NOT need to click the mouse button to highlight the spline. Rather you just need to move the mouse into the square region) Figure 4 shows the highlight result. Once the spline is highlighted, user can drag this spline by mouse left button down and holding it to a new position and releasing the mouse button when the new position is satisfied.
(7) Coloring: when the spline is highlighted with the editing region turning to green, you can use keyboard to change the highlighted spline to different colors: R or r red color G or g green color
B or b blue color P or p pink color Y or y yellow color (Attention: during this color operation, you do NOT need any mouse clicking.)
(8) Thickness: when the spline is highlighted with the editing region turning to green, you can also adjust the highlighted spline to different thickness by keyboard operation. Figure 5 shows the result by increasing the splines thickness and changing the color to blue.
I or i increase the spline thickness by 1 D or d decrease the spline thickness by 1 (the minimum is 1)
selected points decrease, the corresponding splines disappear accordingly. This process can be explained by Figure 2 too. Starting from Figure 2 (b), two splines are drawn by the 8 selected points. When the user right clicks the mouse, there are only 7 points left. So the second spline disappears.
(9) After drawing the curves, users can hit the . period key to remove all the points and straight-lines. So only the spline curves remain on the canvas.
(10) User can hit the s or S key to save the work to a local file (.jpg)
Please take these factors into mind.
(1) Correct Bezier spline drawing
- Draw the curve based on users 4 points input. Use Bezier matrix to multiple the 4 points to obtain the correct coefficients (ax,bx, cx, dx; ay, by, cy, dy).
Correctly plot the curves based on the coefficients.As long as one Bezier spline is drawn correctly, you will get the credits.
(2) Bezier controlling point editing to change the shape
User can drag the controlling points freely to change the point position. The two corresponding straight lines change dynamically according to the new positions of the controlling points.
The curve splines shape changes dynamically according to the new positions of the controlling points. Again, as long as you can have the controlling points of one Bezier spline work,
you will get the credits.
(3) Multiple spline drawing
- Your code allows user to draw as many splines as needed and able to edit any of them. User can also right-click mouse button to remove spline point and thus remove the corresponding spline.
(4) Correct spline highlight
- Draw a little square around the center of each spline in grey color, e.g. (200, 200, 200). You can make this square size 30x30 pixels When the mouse moves into the spline editing region, this region should turn to green (0, 200, 0).When the mouse moves out of the region, the square should turn back to grey.
(5) Translation operation Successfully move the spline to any position by mouse dragging
(6) Coloring operation Successfully change the spline to any color when a spline is highlighted
(7) Thickness operation Successfully adjust the spline with any thickness
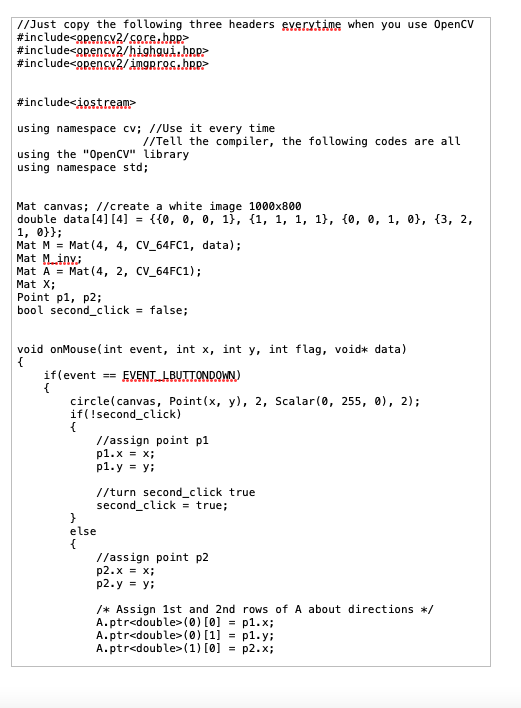
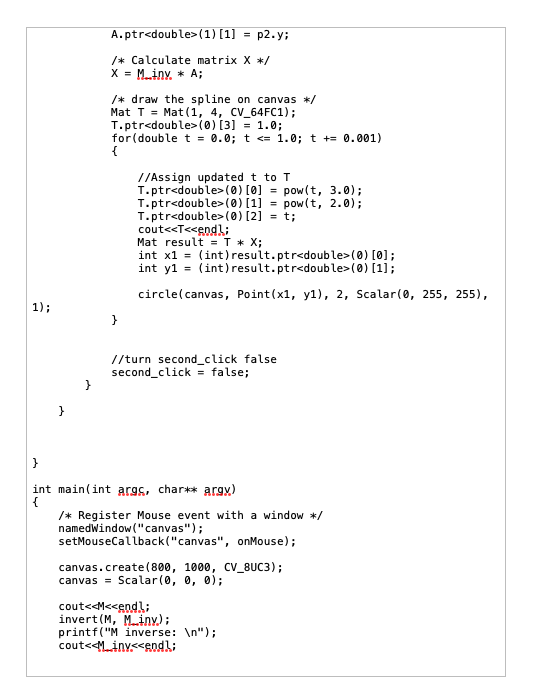
//Just copy the following three headers eyerytime when you use 0penCV \#include2/ cores. hpp> \#include \#include \#include using namespace cv; //Use it every time //Tell the compiler, the following codes are all using the "OpenCv" library using namespace std; Mat canvas; //create a white image 1000800 double data [4][4]={{0,0,0,1},{1,1,1,1},{0,0,1,0},{3,2, 1,0}3; Mat M=Mat(4,4,CV64FC1, data ); Mat Matiny; Mat A= Mat (4,2,CV_64FC1); Mat X; Point p1, p2; bool second_click = false; void onMouse(int event, int x, int y, int f lag, void* data) \{ if (event == EVENT L BUTTONDOWN) \{ circle(canvas, Point (x,y),2,Scalar(0,255,0),2); if(!second_click) \{ //assign point p1 p1.x=x; p1.y =y; // turn second_click true second_click = true; 3 else \{ //assign point p2 p2x=x; p2y=y; /* Assign 1st and 2nd rows of A about directions */ A. ptr (0)[0]=p1.x; A. ptr (0)[1]=p1.y; A. ptr
Step by Step Solution
There are 3 Steps involved in it

Get step-by-step solutions from verified subject matter experts