

Question: PYTHON In this first part of the lab, you are going to create a two-by-two wallpaper using any four of the images. We recommend images
PYTHON
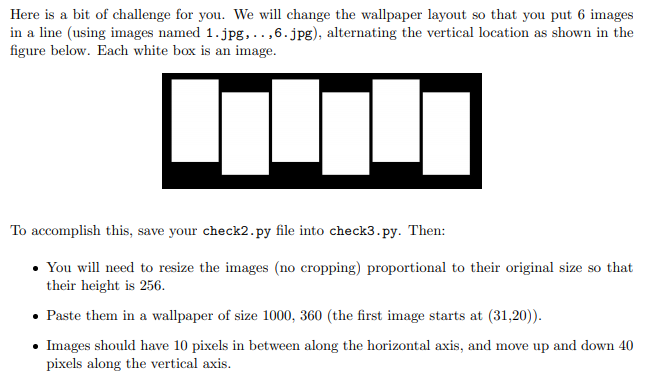
In this first part of the lab, you are going to create a two-by-two wallpaper using any four of the images. We recommend images titled 'ca.jpg','im.jpg', 'hk.jpg','bw.jpg', but you can use any image you wish. For this lab, you are going to hard code the names of the images into your program. Open a new file and save it out as check1.py. Next, create a 512x512 blank document. Then, open each image, resize it to size 256x256 and paste them into this new image to form a 2x2 wallpaper. All functions to do this are illustrated in the examples in the Lecture 7 notes. And, remember, the paste function modifies an image but does not return anything. When done, call the show() function to check that the wallpaper looks correct. You will see that the images are distorted because the original images are not square and the resize does not preserve the aspect ratio. We will fix this issue in for Checkpoint 2. To start this part, you are going to create a new file called check2_helper.py and create a function in it called make_square. Your function takes as an argument an image object, crops it to make it square and returns the resulting image. Remember to import Image in your file. In your function, you will check the size of the image and crop some part of it to make it into a square image. If the image is wider than longer (horizontal), then you must crop it along the X-axis. If the image is longer than wider (vertical), then you must crop it along the y-axis. Always start from the top left corner. Check the course notes for finding the size of an image and cropping. Remember that the crop function returns a new image. Now write some simple code to use this function to make one of the images from first checkpoint square and show. We recommend you try this with some of the images titled inc* as well to see if it works for horizontal images as well as vertical ones. Here is how example test code should look: im - Image.open('1.jpg') imsquare = make_square (im) imsquare.show() You see that your function does not open an image, but takes an image as input argument, and returns a new image. Once you are convinced that your function works, leave nothing in the file but the function. Here is a bit of challenge for you. We will change the wallpaper layout so that you put 6 images in a line (using images named 1.jpg,..,6.jpg), alternating the vertical location as shown in the figure below. Each white box is an image. To accomplish this, save your check2.py file into check3.py. Then: . You will need to resize the images (no cropping) proportional to their original size so that their height is 256. Paste them in a wallpaper of size 1000, 360 (the first image starts at (31,20)). Images should have 10 pixels in between along the horizontal axis, and move up and down 40 pixels along the vertical axis. In this first part of the lab, you are going to create a two-by-two wallpaper using any four of the images. We recommend images titled 'ca.jpg','im.jpg', 'hk.jpg','bw.jpg', but you can use any image you wish. For this lab, you are going to hard code the names of the images into your program. Open a new file and save it out as check1.py. Next, create a 512x512 blank document. Then, open each image, resize it to size 256x256 and paste them into this new image to form a 2x2 wallpaper. All functions to do this are illustrated in the examples in the Lecture 7 notes. And, remember, the paste function modifies an image but does not return anything. When done, call the show() function to check that the wallpaper looks correct. You will see that the images are distorted because the original images are not square and the resize does not preserve the aspect ratio. We will fix this issue in for Checkpoint 2. To start this part, you are going to create a new file called check2_helper.py and create a function in it called make_square. Your function takes as an argument an image object, crops it to make it square and returns the resulting image. Remember to import Image in your file. In your function, you will check the size of the image and crop some part of it to make it into a square image. If the image is wider than longer (horizontal), then you must crop it along the X-axis. If the image is longer than wider (vertical), then you must crop it along the y-axis. Always start from the top left corner. Check the course notes for finding the size of an image and cropping. Remember that the crop function returns a new image. Now write some simple code to use this function to make one of the images from first checkpoint square and show. We recommend you try this with some of the images titled inc* as well to see if it works for horizontal images as well as vertical ones. Here is how example test code should look: im - Image.open('1.jpg') imsquare = make_square (im) imsquare.show() You see that your function does not open an image, but takes an image as input argument, and returns a new image. Once you are convinced that your function works, leave nothing in the file but the function. Here is a bit of challenge for you. We will change the wallpaper layout so that you put 6 images in a line (using images named 1.jpg,..,6.jpg), alternating the vertical location as shown in the figure below. Each white box is an image. To accomplish this, save your check2.py file into check3.py. Then: . You will need to resize the images (no cropping) proportional to their original size so that their height is 256. Paste them in a wallpaper of size 1000, 360 (the first image starts at (31,20)). Images should have 10 pixels in between along the horizontal axis, and move up and down 40 pixels along the vertical axis
Step by Step Solution
There are 3 Steps involved in it

Get step-by-step solutions from verified subject matter experts