

Question: The code is for Python on a Raspberry Pi I've already completed this part 1 which is as follows I need the code and diagrams(how
The code is for Python on a Raspberry Pi
I've already completed this part 1 which is as follows
I need the code and diagrams(how to wire) for Part 2 and Part 3
I
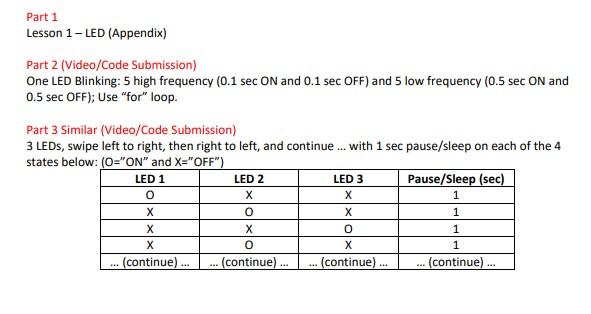
BLINKING AN LED To blink an LED, use three male-to-female jumper wires and a 220 Ohm resistor (red, red, brown) to connect the LED to the GPIO port as shown below. Note that it is important for the LED to be connected with correct polarity or it will not light up and you may damage the LED. The longer leg of an LED is called the Anode (+) and the shorter leg is called the Cathode (-). In this example, the shorter leg (Cathode) is to be connected to the resistor. ..10 .....::::::: fritzing IVU VUI import RPi GPIO as GPIO import time GPIO.setwarnings (False) GPIO.setmode (GPIO.BCM) GPIO.setup (18, GPIO. OUT) while True : GPIO.output (18, True) time. sleep (1) GPIO.output (18, False) time. sleep (1) Part 1 Lesson 1-LED (Appendix) Part 2 (Video/Code Submission) One LED Blinking: 5 high frequency (0.1 sec ON and 0.1 sec OFF) and 5 low frequency (0.5 sec ON and 0.5 sec OFF); Use "for" loop. Part 3 Similar (Video/Code Submission) 3 LEDs, swipe left to right, then right to left, and continue... with 1 sec pause/sleep on each of the 4 states below: (O="ON" and X="OFF") LED 1 LED 2 LED 3 Pause/Sleep (sec) 0 1 X 0 X 1 0 1 X 0 X 1 (continue)... (continue).. (continue) ... (continue)
Step by Step Solution
There are 3 Steps involved in it

Get step-by-step solutions from verified subject matter experts