

Question: This is using JavaFx. I am getting the GUI and start button to show up, but am doing something incorrectly with the inner class attributes/constructor/run
This is using JavaFx. I am getting the GUI and start button to show up, but am doing something incorrectly with the inner class attributes/constructor/run method. The inner class would be class InnerProgress extends FlowPane implements Runnable { ... }
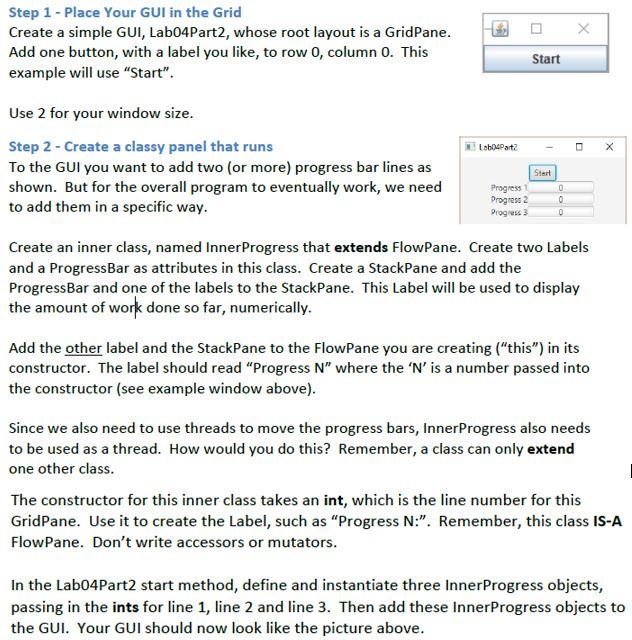
Step 1 - Place Your GUI in the Grid Create a simple GUI, Lab04Part2, whose root layout is a GridPane. Add one button, with a label you like, to row 0, column 0. This example will use "Start". Start Lab Part2 - X Start Use 2 for your window size. Step 2 - Create a classy panel that runs To the GUI you want to add two (or more) progress bar lines as shown. But for the overall program to eventually work, we need Progress Progress 2 to add them in a specific way. Create an inner class, named Inner Progress that extends FlowPane. Create two Labels and a ProgressBar as attributes in this class. Create a StackPane and add the ProgressBar and one of the labels to the StackPane. This Label will be used to display the amount of work done so far, numerically. 0 0 0 Progress 3 Add the other label and the StackPane to the FlowPane you are creating ("this) in its constructor. The label should read "Progress N where the 'N' is a number passed into the constructor (see example window above). Since we also need to use threads to move the progress bars, Inner Progress also needs to be used as a thread. How would you do this? Remember, a class can only extend one other class. The constructor for this inner class takes an int, which is the line number for this GridPane. Use it to create the Label, such as Progress N:". Remember, this class IS-A FlowPane. Don't write accessors or mutators. In the Labo4Part2 start method, define and instantiate three Inner Progress objects, passing in the ints for line 1, line 2 and line 3. Then add these Inner Progress objects to the GUI. Your GUI should now look like the picture above
Step by Step Solution
There are 3 Steps involved in it

Get step-by-step solutions from verified subject matter experts