

Question: Topics Serializing an Object Deserialize an Object Discussion When we serialize an object, we store the values of its instance variables in a file in
Topics
Serializing an Object
Deserialize an Object
Discussion
When we serialize an object, we store the values of its instance variables in a file in a serialized format. If an instance variable points to an object, then the values of the instance variables of that object are also stored and so on to an unlimited depth. So, serializing a single object may involve serializing a sequence of objects. Additionally, we can serialize multiple objects each involving a sequence of objects in a single file by issuing multiple writeObject to the file.
Deserialization is the opposite of serialization. Deserialization involves creating an object (or a sequence of objects) or multiple objects (or multiple sequence of objects) and populating it (them) with the values stored in the serialized file. The deserialization process must be able to find all the class files needed for creating the objects on the same machine that the object/s are being deserialized. Also, the class file must be in the same format (version) as when the object was serialized. During deserialization process, object/s are created using class files and the values of their instance variables are populated without calling the constructor/s.
Certain type of instance variables such as Thread type are not serializable. Their values are not stored during serialization and it is required that the user must add the word transient before the type name in their declaration. Otherwise, you will get an exception during deserialization.
Description
In this exercise, we will serialize and deserialize an extended JPanel object. We chose an extended JPanel object for this purpose because we will be able to see it visually when we serialize it and later when we deserialize it. For example, if the background color of the extended JPanel was yellow at the time of the serialization, then later, on de-serialization, its color should still be yellow. We will be able to verify that visually.
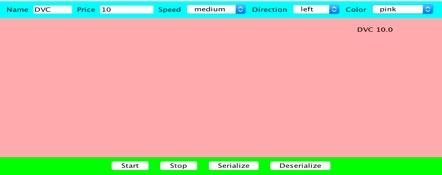
We will design a Graphical User Interface (GUI) application for serializing and deserializing the extended JPanel object. The GUI application will be designed as an extended JFrame. It will house two JPanels, one towards the top and one towards the bottom. In the center (middle) will be the extended JPanel object that will be serialized and deserialized. See the Picture section below.
The central extended JPanel object will be implemented as a moving ticker. The top JPanel will contain text fields and combo-boxes for setting the property values of the extended JPanel ticker object. This will include setting ticker name, price, speed, direction of movement and background color. The bottom JPanel will contain buttons for starting and stopping the moving ticker and serializing and deserializing the extended JPanel object.
Testing Procedure
Start the application.
Using the text fields and combo-boxes in the top JPanel, set the desired name, value, speed, direction and background color of the ticker object. Also, using the start and stop buttons in the bottom JPanel, set the moving property of the ticker. Pressing the start button will set the moving property of the ticker object to true and pressing the stop button will set it to false.
Press the Serialize button to serialize the middle extended JPanel object to a file.
Close the application.
Restart the application.
Using the text fields, combo-boxes and start and stop buttons, set the name, price, speed, direction, background color and moving properties of the ticker object such that they are different from what they were when you serialized the object.
Press the Deserialize button to deserialize the extended JPanel object from the serialized file. The button handler code should not only deserialize the object but should replace the current extended JPanel object in the JFrame with the deserilized extended JPanel object.
(On deserialization, if it worked correctly, you will see the deserialized object in the center of the JFrame with its properties visibly the same as the properties when the object was serialized.)
Sample Code
Serializing Code for the Serialize Button Handler
JPanelExt jPanelExt;
ObjectOutputStream out = new ObjectOutputStream
(new FileOutputStream("serialized-filename"));
out.writeObject(jPanelExt);
out.flush();
out.close();
Deserializing Code for the Deserialize Button Handler
JPanelExt jPanelExtDeserialized;
ObjectInputStream in = new ObjectInputStream
(new FileInputStream("serialized-filename"));
jPanelExtDeserialized = (JPanelExt) in.readObject();
in.close();
//remove the current extended JPanel object from the content pane and
//replace with deserialized object
contentPane.remove(jPanelExt);
jPanelExt = jPanelExtDeserialized;
contentPane.add(jPanelExt, BorderLayout.Center);
contentPane.updateUI();
Adding Transient
Make sure to add the word transient in front of all instance variables in the extended JPanel object that are not serializable. For example, an object of class Thread is not serializable. Therefore, add the word transient in front of it as shown below. If the word transient is missing, we will get an exception at the time of deserialization.
private transient Thread thread;
Recreating Thread Object
An object of Thread class is not a serializable. Its reference is labeled as transient as shown above and its contents are not saved during serialization. Therefore, after deserializing a Thread object needs to be recreated and the thread needs to restarted.
When a target object is created vis deserialization, its constructor is not called. Hence, on deserialization, the Thread object should be recreated and thread started in a part of the code other than a constructor. You may do that in the method setMoving of the target object as shown below which is normally invoked when start and stop buttons are pressed.
A part of setMoving code:
(In the code below thread is the instance variable that contains the Thread object reference)
if (thread == null){
//create the Thread object
//start the Thread object
}
Step by Step Solution
There are 3 Steps involved in it

Get step-by-step solutions from verified subject matter experts