

Question: Use visual studio for coding. You will code, build, and execute two programs requiring decisions. The first program will determine the number of stars to
Use visual studio for coding.
You will code, build, and execute two programs requiring decisions. The first program will determine the number of stars to give a product based on a rating. The second program adds money to a bank account until the balance reaches $1000. Pseudocode is provided.
Learning outcomes:
- To be able to design program logic using either a flowchart or pseudocode
- To be able to define and use data types
- To be able to prompt the user for input
- To be able to use the assignment statement for calculations
- To be able to display output to the console in a formatted manner
- To be able to debug a program of syntax and logic errors
- To be able to make decisions
- To be able to use repetition.
Deliverables
Section | Deliverable | Points |
Part A | Step 7: Program Listing and Output | 20 |
Part B | Step 7: Program Listing and Output | 20 |
All Parts | Total | 40 |
Lab Steps
Preparation:
If you are using the Citrix remote lab, follow the login instructions located in the lab (under General Resources within Course Resources) in Course Home. Locate the Visual Studio 2015 icon, and launch the application.
Part A: Give Stars from Rating |
| ||||||||||||
Step 1: Requirements |
| ||||||||||||
| Write a program that assigns a rating to a product based on customer reviews. Use the following table to assign from one to five stars:
Your program should ask the user for the rating (0 to 100) and then use selection to report the number of stars. Display an opening header before asking for input. Be sure to add proper documentation to your code. Challenge: It is not required, but if you choose to, add logic to make sure that the number entered is between 0 and 100. The best way to do this is with a loop that keeps asking for a number until it meets the criteria. Sample output from program:
Another example:
|
| ||||||||||||
Step 2: Pseudocode |
| ||||||||||||
| Using the pseudocode below, write the code that will meet the requirements. Declare variables for the rating and stars (no decimal numbers used) Display opening message. Prompt the user for the rating Input the rating If rating is greater than or equal to 81 then display the message for 5 stars Else if rating is greater than or equal to 61 then display the message for 4 stars Else if rating is greater than or equal to 41 then display the message for 3 stars Else if rating is greater than or equal to 21 then display the message for 2 stars Else display the message for 1 star End If
|
| ||||||||||||
Step 3: Create a New Project | |||||||||||||
Create a new project and name it CIS170_Lab2A_YourLastName. Write your code using the processing logic in Part A, Step 2. Document your program with a header and added comments. | |||||||||||||
Step 4: Save Program | |||||||||||||
| Save your program by clicking File on the menu bar and then clicking Save Program.cpp, or by clicking the Save button on the toolbar, or Ctrl + S.
| |||||||||||||
Step 5: Build Solution | |||||||||||||
| To compile the program, click Debug and then Build solution (F7). You should receive no error messages. If you see some error messages, check the code above to make sure you didnt key in something wrong. Once you make your corrections to the code, go ahead and click Build >> Build Solution again.
| |||||||||||||
Step 6: Execute the Program | |||||||||||||
| Once you have no syntax errors, to execute or run your program, click Debug on the menu bar, and then click Start Debugging.
| |||||||||||||
Step 7: Capture the Output | |||||||||||||
|
1. Capture screen prints of your output. (Use Alt+Print Screen, and paste into an MS Word document.) Test your program with a few different ratings to make sure the logic works. For example, you might want to use test values such as 0, 100, 80, 55, etc. Include screenshots of all your tests. 2. Copy your code and paste it into the same MS Word document that contains the screen print of your output. 3. Save the Word Document as CIS170_Lab2_LastName_FirstInitial. 4. Zip the Project Folder containing all project files to submit.
| |||||||||||||
END OF PART A |
| ||||||||||||


Part B: Savings Program |
|
Step 1: Requirements |
|
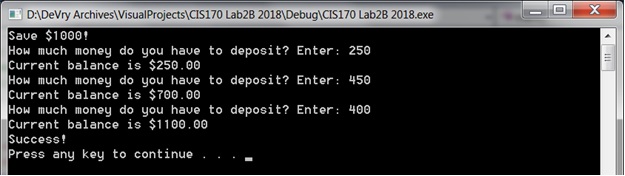
| Write a program that uses a to keep adding money from the user into a bank account until the balance is $1000 or greater. Start with a balance of zero. Display money is proper money formatting. Sample Output from Program:
|
|
Step 2: Pseudocode |
|
| Using the pseudocode below, write the code that will meet the requirements. Be sure to document your program properly with a header and other comments. Declare variable for balance and set to zero, declare variable for amount to deposit Display the opening message While balance is less than 1000 Do Display a prompt to ask user for an amount to deposit Read in the amount Add amount to balance Display the current balance End While Display Success message
|
|
Step 3: Create a New Project | |
Create a new project and name it CIS170_Lab2B_YourLastName. Make sure you close your previous program by clicking File >> Close Solution. Write your code using the Processing Logic in Part B Step 2. | |
Step 4: Save Program | |
| Save your program by clicking File on the menu bar and then clicking Save Program.cpp, or by clicking the Save button on the toolbar, or Ctrl + S.
| |
Step 5: Build Solution | |
| To compile the program, click Debug then Build solution (F7). You should receive no error messages. If you see some error messages, check the code above to make sure you didnt key in something wrong. Once you make your corrections to the code, go ahead and click Build >> Build Solution again.
| |
Step 6: Execute the Program | |
| Once you have no syntax errors, to execute or run your program, click Debug on the menu bar, and then click Start Debugging. Test your program with different amounts each time.
| |
Step 7: Capture the Output | |
|
1. Capture a screen print of your output. (Use Alt+Print Screen, and paste into the same Word document you used for Part A.) 2. Copy your code and paste it into the same MS Word document. 3. Submit the Word document with code for Parts A and B and all screenshots. 4. Zip the Project Folder containing all project files to submit.
| |
DADeVry ArchivesVisualProjectsCIS|70 Lab2A 2018DebugCIS|70 Lab2A 2018.exe Stars Rating Program Please enter the rating (0 to 100): 66 The stars for this product is: 4 Press any key to continue
Step by Step Solution
There are 3 Steps involved in it

Get step-by-step solutions from verified subject matter experts