

Question: using python and textbook algorithm design and applications Read the submission instruction in the blackboard and strictly follow it. Q1. [10] AVL Tree Generate an
![instruction in the blackboard and strictly follow it. Q1. [10] AVL Tree](https://dsd5zvtm8ll6.cloudfront.net/si.experts.images/questions/2024/09/66f3ab1e60247_08566f3ab1e009fa.jpg)
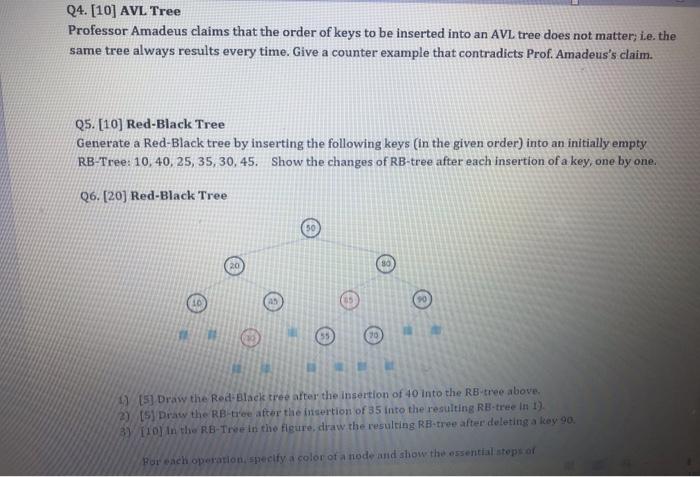
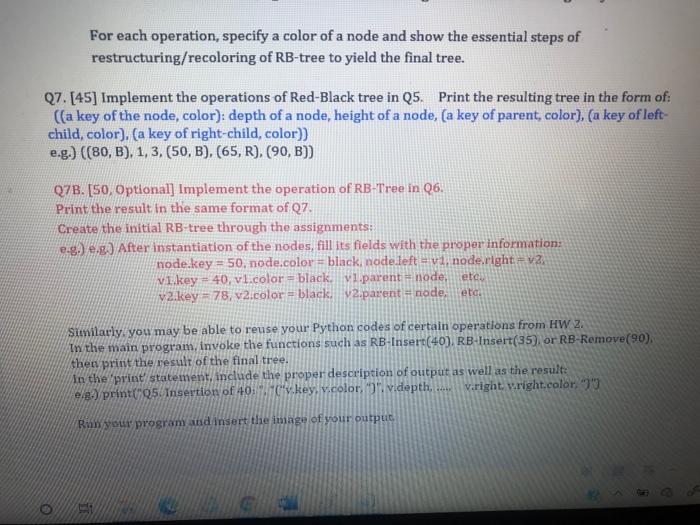
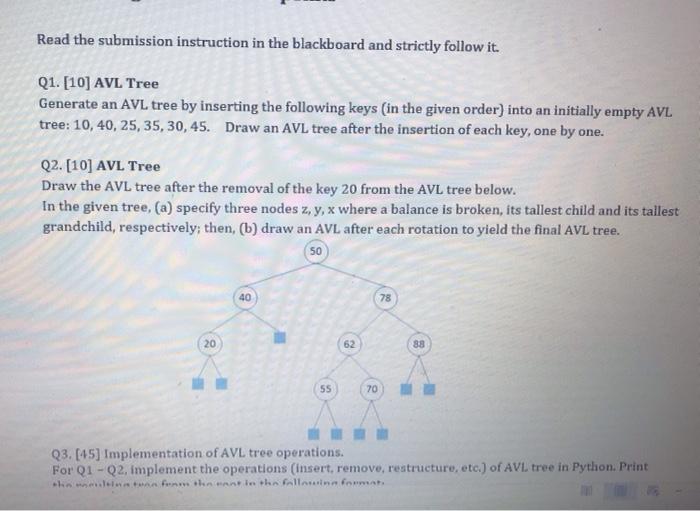
Read the submission instruction in the blackboard and strictly follow it. Q1. [10] AVL Tree Generate an AVL tree by inserting the following keys (in the given order) into an initially empty AVL tree: 10, 40, 25, 35, 30, 45. Draw an AVL tree after the insertion of each key, one by one. Q2. [10] AVL Tree Draw the AVL tree after the removal of the key 20 from the AVL tree below. In the given tree, (a) specify three nodes z, y, x where a balance is broken, its tallest child and its tallest grandchild, respectively; then. (b) draw an AVL after each rotation to yield the final AVL tree. 50 40 78 20 62 88 55 70 Q3. [45] Implementation of AVL tree operations. For Q1 - Q2, implement the operations (insert, remove, restructure, etc.) of AVL tree in Python. Print heft in the following format Q3. [45] Implementation of AVL tree operations. For Q1 - Q2, implement the operations (insert, remove, restructure, etc.) of AVL tree in Python. Print the resulting tree from the root in the following format: (a key of node: a depth of node, a height of node, a key of parent, a key of left-child, a key of right-child), e.g.) (50:0, 4, null, 40, 78). In the implementation of Q2, you can create the initial tree of Q2 either through a series of insertion of the keys or using the assignment statements. e.g.) insert 50, 40,78, 20, 62, 88, 55, 70. Or e.g.) After instantiation of the nodes, fill its fields with the information: node key = 50, node.left = v1, node.right =v2, v1.key = 40, vi.parent=node, v2.key = 78, v2.parent - node, etc. Since AVL tree is a balanced Binary Search Tree, you may be able to reuse (or modify) your Python codes of certain functions from HW 2. In the main program, invoke the functions such as AVL-Insert(10), AVL Insert(40), ... AVL-Remove(20), then print the result of the final tree. In the 'print' statement, include the proper description of output as well as the results e.g.) print("Q1. Insertion of 10: ", v.key, v.depth. ....Vheight) Run your program and insert the image of your output Q4. [10] AVL Tree Professor Amadeus claims that the order of keys to be inserted into an AVL tree does not matter, ie the same tree always results every time. Give a counter example that contradicts Prof. Amadeus's claim. Q5. [10] Red-Black Tree Generate a Red-Black tree by inserting the following keys (in the given order) into an initially empty RB-Tree: 10,40, 25, 35, 30, 45. Show the changes of RB-tree after each insertion of a key, one by one. Q6. [20) Red-Black Tree 30 90 1) [5] Draw the Red-Black tree after the insertion of 40 into the RB-tree above. 2) [S] Draw the RB-tree after the insertion of 35 into the resulting RB-tree in 1). 3 [10 In the RB-Tree in the figure, draw the resulting RE-tree after deleting a key 90. Por each operation, specify a color of a node and show the essential steps of For each operation, specify a color of a node and show the essential steps of restructuring/recoloring of RB-tree to yield the final tree. Q7. [45] Implement the operations of Red-Black tree in Q5. Print the resulting tree in the form of: ((a key of the node, color): depth of a node, height of a node, (a key of parent color), (a key of left- child, color), (a key of right-child, color)) e.g.) ((80, B), 1, 3,(50,B),(65, R), (90, B)) Q7B. [50, Optional] Implement the operation of RB-Tree in 26. Print the result in the same format of Q7. Create the initial RB-tree through the assignments: e.g.) ...) After instantiation of the nodes, fill its fields with the proper information: node.key = 50, node.color=black, node.left = vi node right + V2 vi.key = 40, vl.color=black v1.parent = node, v2.key=78, v2.color = black v2.parent - node. etc eta Similarly, you may be able to reuse your Python codes of certain operations from HW 2. In the main program, Invoke the functions such as RB-Insert(40), RB-Insert(35), or RB-Remove(90). then print the result of the final tree. in the print statement, include the proper description of output as well as the result: eig.) print("Q5 Insertion of 40:1"key, v.color, 9. v.depth.... v.right, v.right.color, 93 Raw your program and insert the image of your output
Step by Step Solution
There are 3 Steps involved in it

Get step-by-step solutions from verified subject matter experts