

Question: Using the information provided above, develop a Gantt chart. Please help! Milestone Description Date Day 1 Complete clearing of Clearing the job site, removing any
 Using the information provided above, develop a Gantt chart.
Please help!
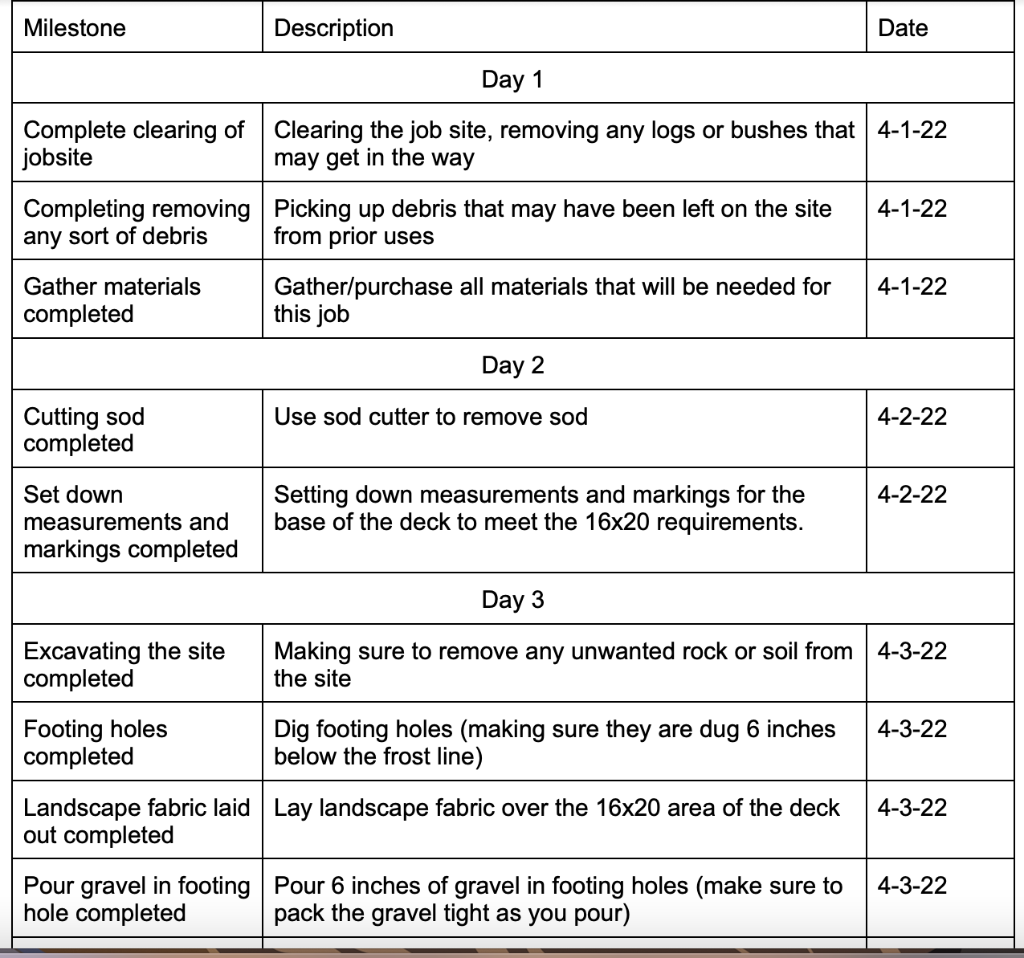
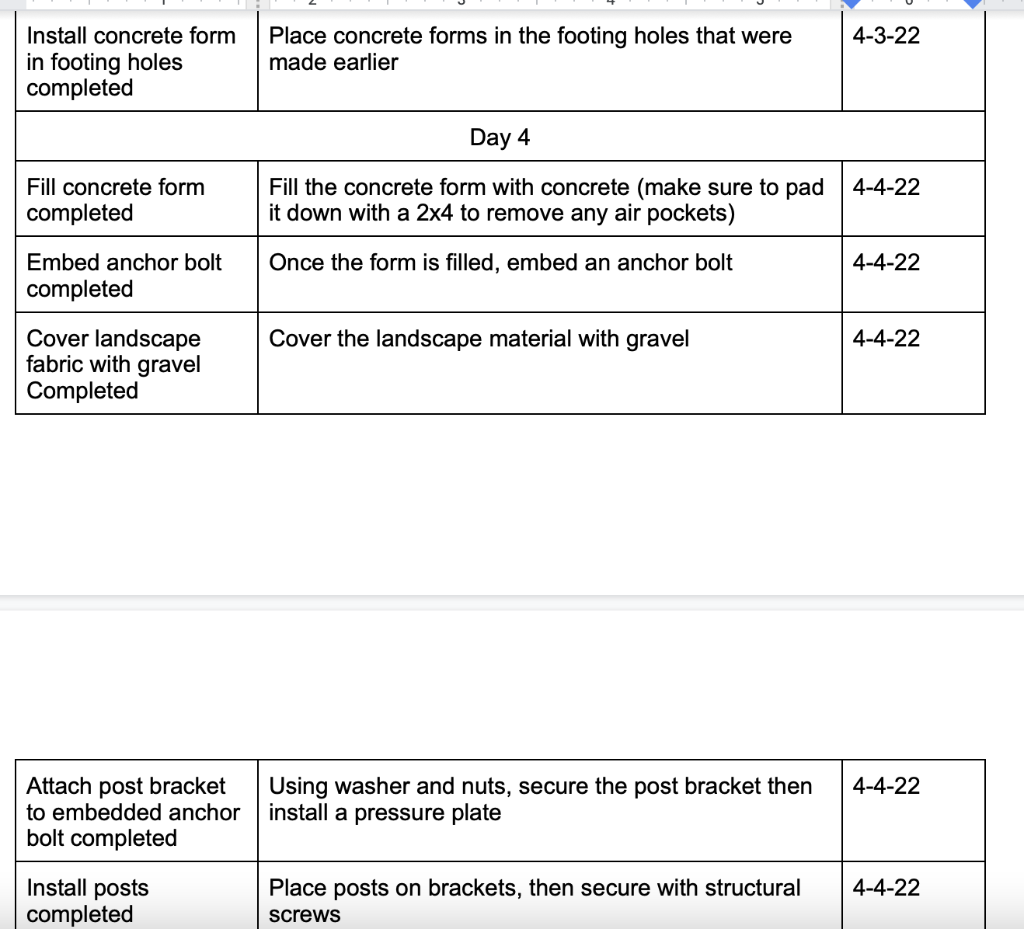
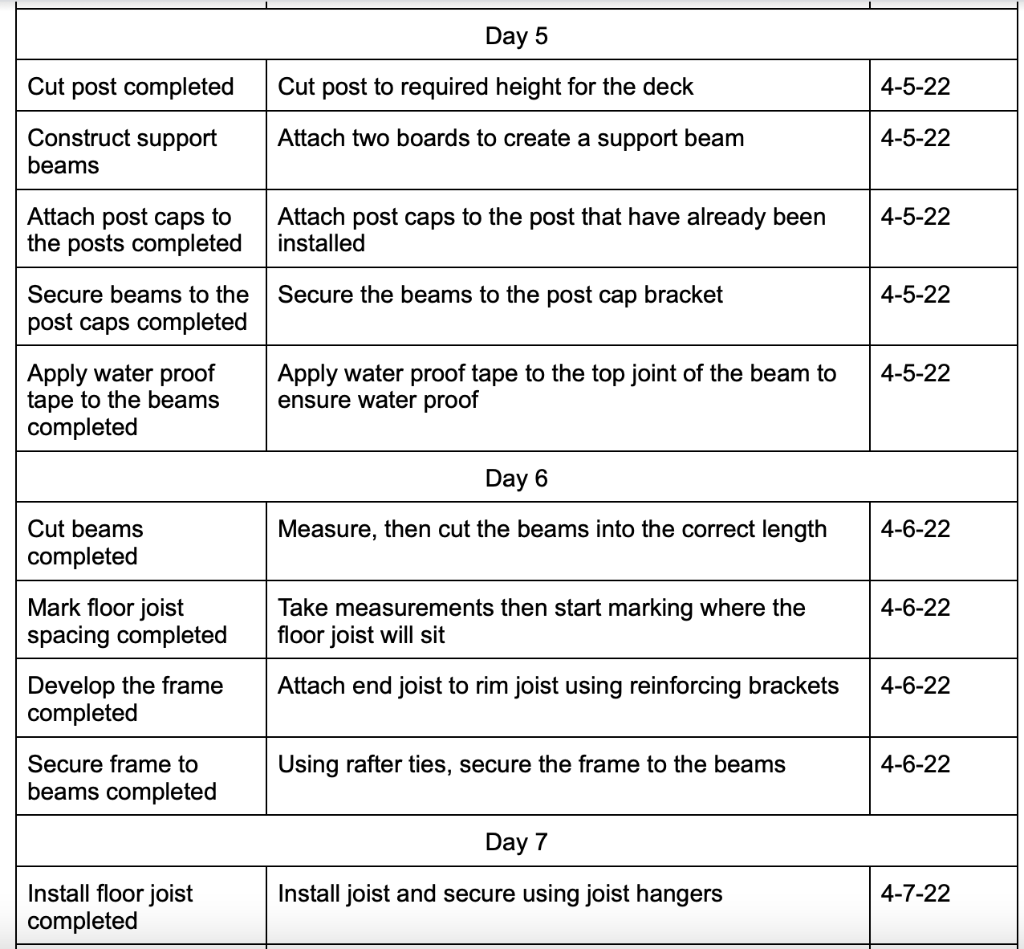
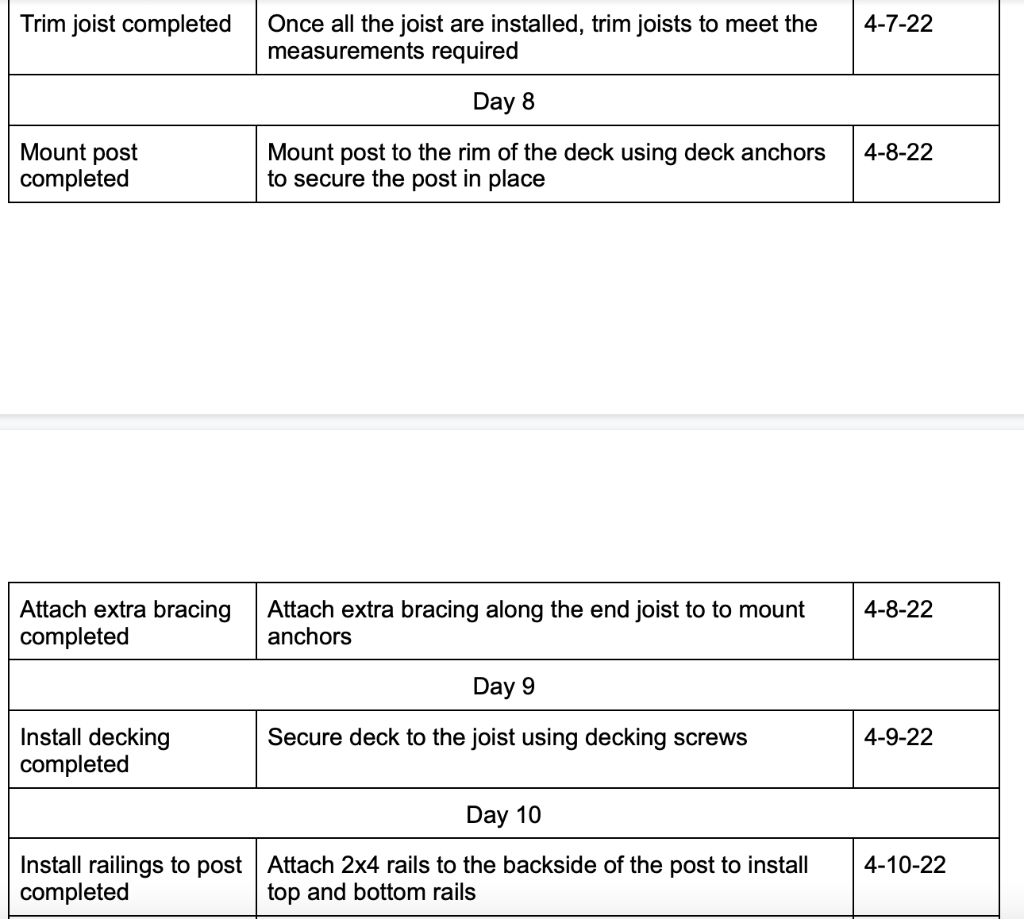
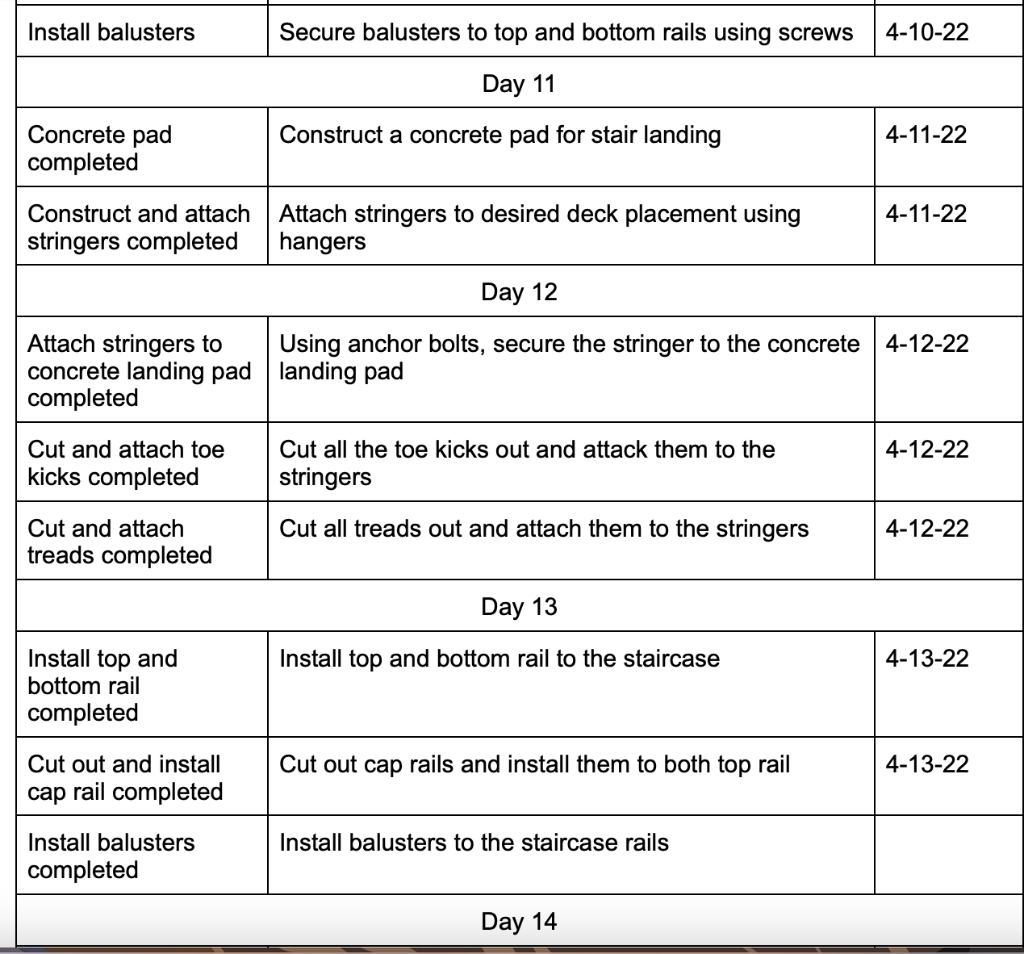
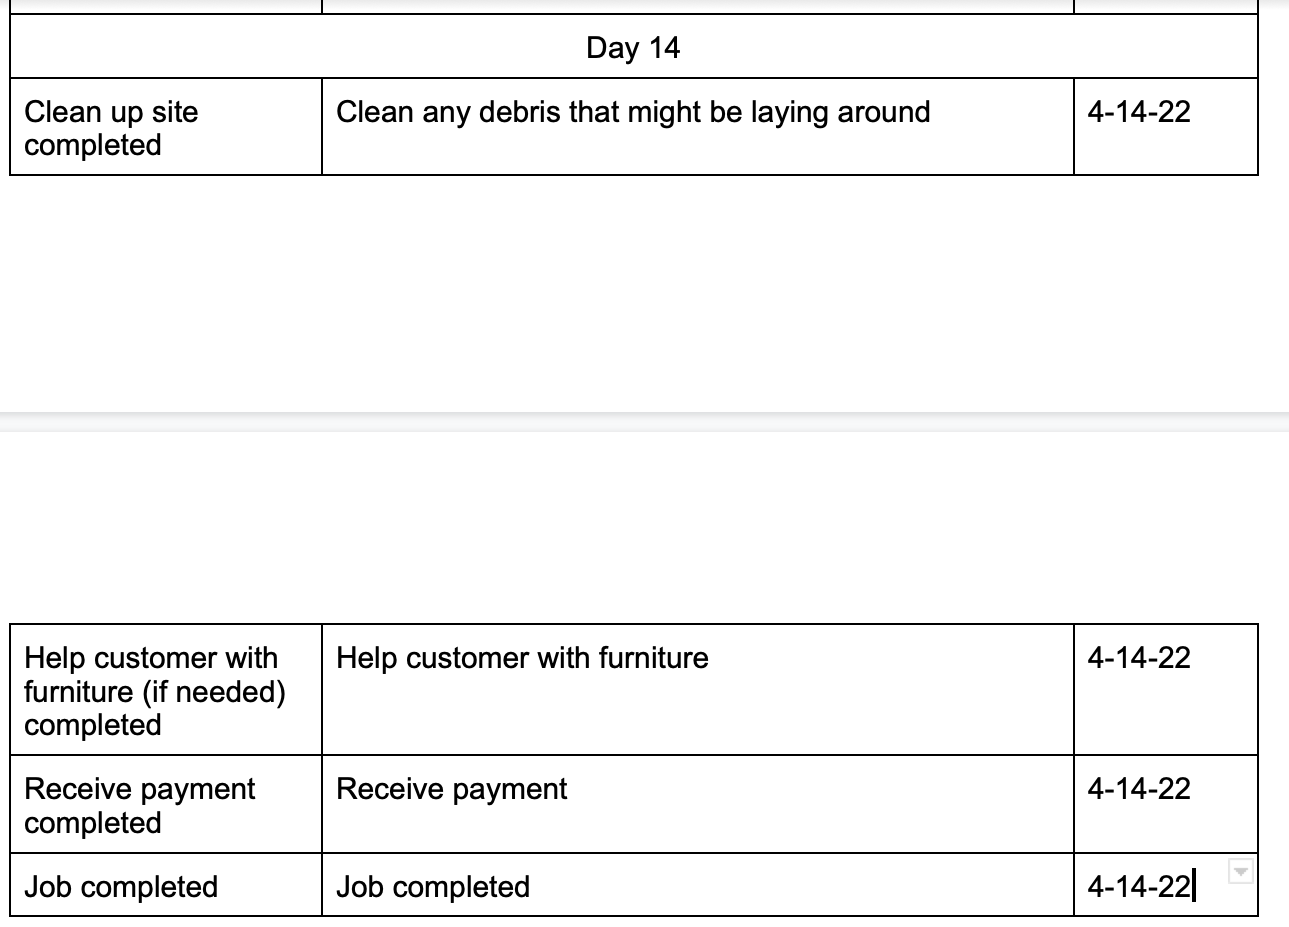
Milestone Description Date Day 1 Complete clearing of Clearing the job site, removing any logs or bushes that 4-1-22 jobsite may get in the way 4-1-22 Completing removing Picking up debris that may have been left on the site any sort of debris from prior uses Gather materials completed Gather/purchase all materials that will be needed for 4-1-22 this job Day 2 Use sod cutter to remove sod 4-2-22 Cutting sod completed 4-2-22 Set down measurements and markings completed Setting down measurements and markings for the base of the deck to meet the 16x20 requirements. Day 3 Excavating the site completed Making sure to remove any unwanted rock or soil from 4-3-22 the site 4-3-22 4-3-22 Footing holes Dig footing holes (making sure they are dug 6 inches completed below the frost line) Landscape fabric laid Lay landscape fabric over the 16x20 area of the deck out completed Pour gravel in footing Pour 6 inches of gravel in footing holes (make sure to hole completed pack the gravel tight as you pour) 4-3-22 4-3-22 Install concrete form in footing holes completed Place concrete forms in the footing holes that were made earlier Day 4 4-4-22 Fill concrete form completed Fill the concrete form with concrete (make sure to pad it down with a 2x4 to remove any air pockets) Once the form is filled, embed an anchor bolt 4-4-22 Embed anchor bolt completed Cover the landscape material with gravel 4-4-22 Cover landscape fabric with gravel Completed 4-4-22 Attach post bracket to embedded anchor bolt completed Using washer and nuts, secure the post bracket then install a pressure plate Install posts completed Place posts on brackets, then secure with structural 4-4-22 screws Day 5 Cut post completed Cut post to required height for the deck 4-5-22 Construct support beams Attach two boards to create a support beam 4-5-22 4-5-22 Attach post caps to the posts completed Attach post caps to the post that have already been installed Secure the beams to the post cap bracket 4-5-22 Secure beams to the post caps completed 4-5-22 Apply water proof tape to the beams completed Apply water proof tape to the top joint of the beam to ensure water proof Day 6 Measure, then cut the beams into the correct length 4-6-22 Cut beams completed 4-6-22 Mark floor joist spacing completed Take measurements then start marking where the floor joist will sit Attach end joist to rim joist using reinforcing brackets 4-6-22 Develop the frame completed Secure frame to beams completed Using rafter ties, secure the frame to the beams 4-6-22 Day 7 Install floor joist completed Install joist and secure using joist hangers 4-7-22 Trim joist completed 4-7-22 Once all the joist are installed, trim joists to meet the measurements required Mount post completed Day 8 Mount post to the rim of the deck using deck anchors to secure the post in place 4-8-22 4-8-22 Attach extra bracing completed Attach extra bracing along the end joist to to mount anchors Day 9 Install decking completed Secure deck to the joist using decking screws 4-9-22 Day 10 4-10-22 Install railings to post Attach 2x4 rails to the backside of the post to install completed top and bottom rails Install balusters Secure balusters to top and bottom rails using screws 4-10-22 Day 11 Construct a concrete pad for stair landing 4-11-22 Concrete pad completed 4-11-22 Construct and attach stringers completed Attach stringers to desired deck placement using hangers Day 12 4-12-22 Attach stringers to concrete landing pad completed Using anchor bolts, secure the stringer to the concrete landing pad 4-12-22 Cut and attach toe kicks completed Cut all the toe kicks out and attack them to the stringers Cut all treads out and attach them to the stringers 4-12-22 Cut and attach treads completed Day 13 Install top and bottom rail to the staircase 4-13-22 Install top and bottom rail completed Cut out cap rails and install them to both top rail 4-13-22 Cut out and install cap rail completed Install balusters to the staircase rails Install balusters completed Day 14 Day 14 Clean up site completed Clean any debris that might be laying around 4-14-22 Help customer with furniture 4-14-22 Help customer with furniture (if needed) completed Receive payment 4-14-22 Receive payment completed Job completed Job completed 4-14-22Step by Step Solution
There are 3 Steps involved in it
1 Expert Approved Answer
Step: 1 Unlock

Question Has Been Solved by an Expert!
Get step-by-step solutions from verified subject matter experts
Step: 2 Unlock
Step: 3 Unlock