

Question: 1. Instructions: Go the PHET web site and select the Geometric Optics simulation. The following link will take you directly to the simulation: h_ttpL//phet.colorado.edu/sims/html/geometric- gptics/latest/geometricoptics_en.html
1.
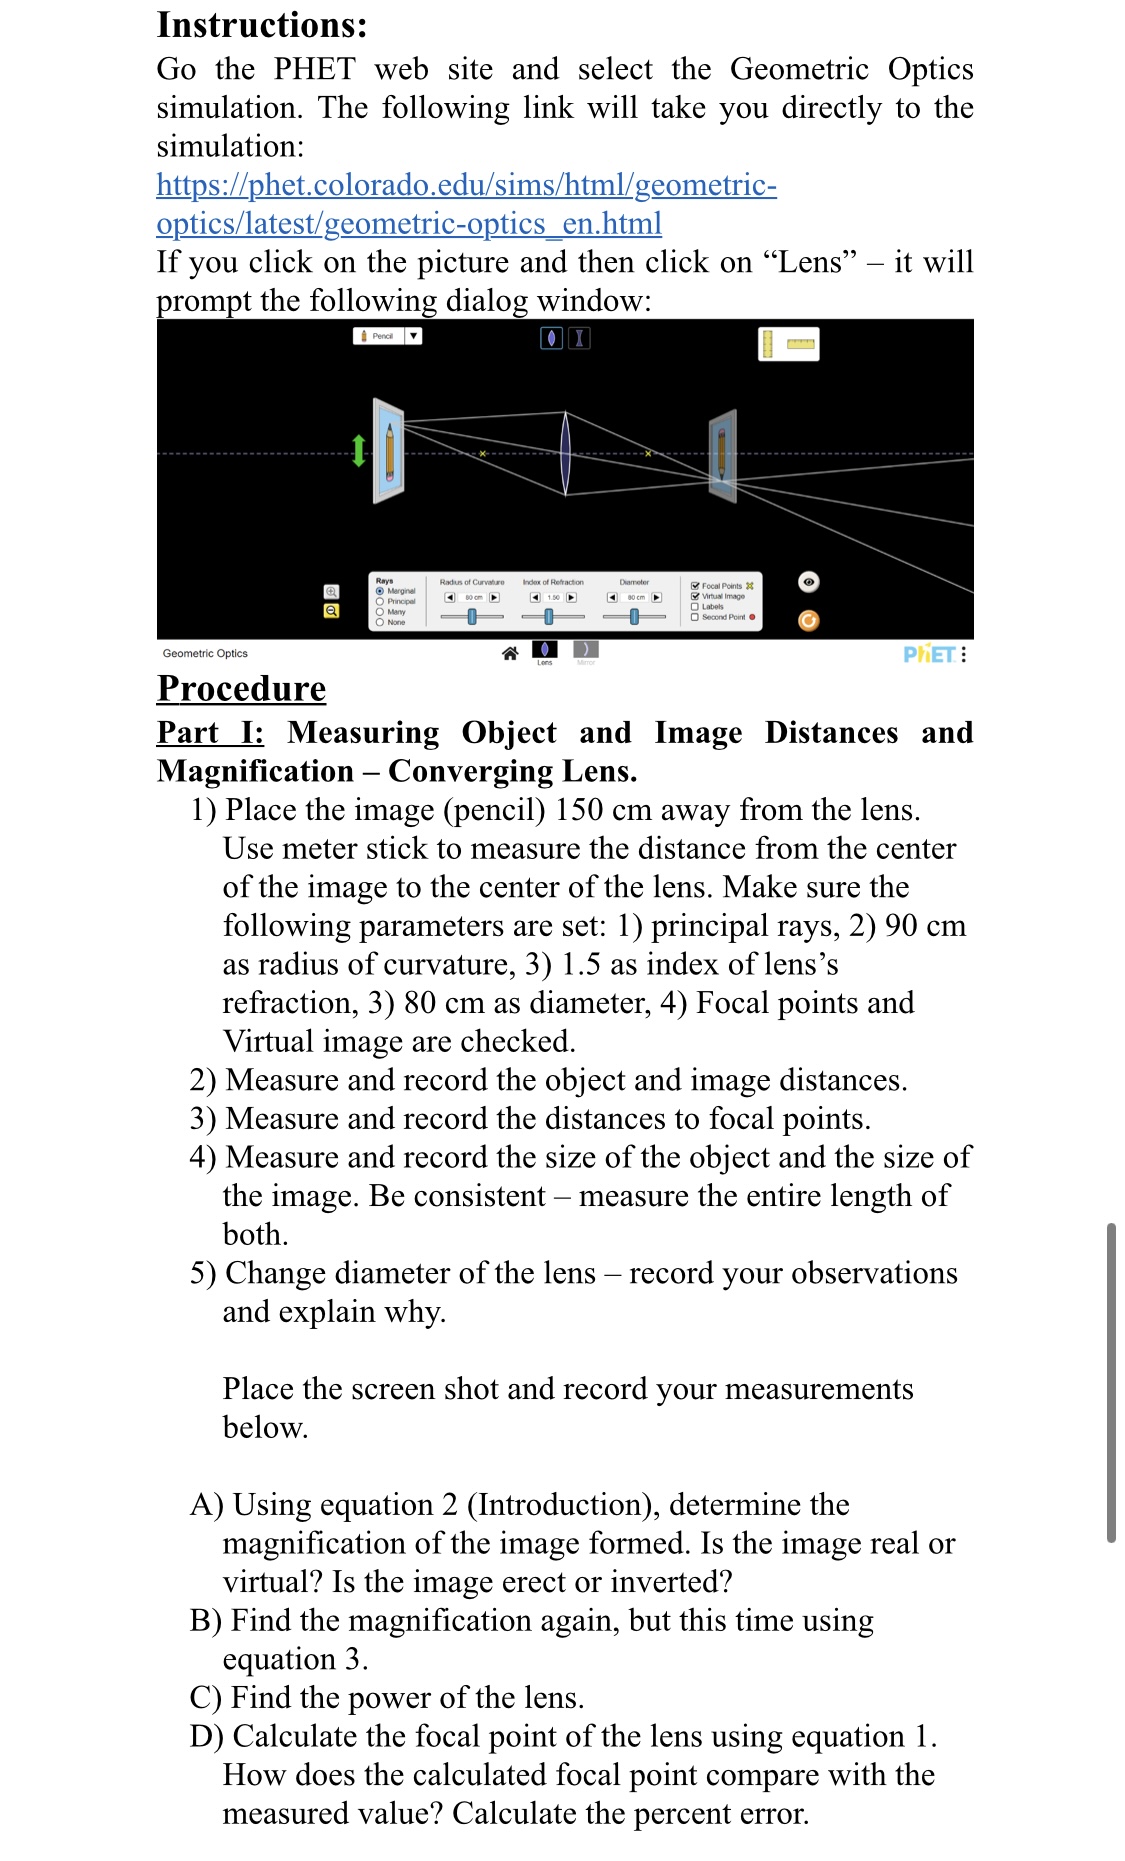
Instructions: Go the PHET web site and select the Geometric Optics simulation. The following link will take you directly to the simulation: h_ttpL//phet.colorado.edu/sims/html/geometric- gptics/latest/geometricoptics_en.html If you click on the picture and then click on \"Lens\" it will prompt the following dialog window: Gaummc Opllcs \"- \" P ET 3 Procedure Part I: Measuring Object and Image Distances and Magnication Converging Lens. 1) Place the image (pencil) 150 cm away from the lens. Use meter stick to measure the distance from the center of the image to the center of the lens. Make sure the following parameters are set: 1) principal rays, 2) 90 cm as radius of curvature, 3) 1.5 as index of lens's reection, 3) 80 cm as diameter, 4) Focal points and Virtual image are checked. 2) Measure and record the object and image distances. 3) Measure and record the distances to focal points. 4) Measure and record the size of the object and the size of the image. Be consistent measure the entire length of both. 5) Change diameter of the lens record your observations and explain why. Place the screen shot and record your measurements below. A) Using equation 2 (Introduction), determine the magnication of the image formed. Is the image real or virtual? Is the image erect or inverted? B) Find the magnification again, but this time using equation 3. C) Find the power of the lens. D) Calculate the focal point of the lens using equation 1. How does the calculated focal point compare with the measured value? Calculate the percent error. Part II: Measuring Object and Image Distances and Magnication Diverging Lens. 1) Switch to diverging lens setup (I). 2) Place the image (pencil) 240 cm away from the lens. Use meter stick to measure the distance from the center of the image to the center of the lens. Make sure the following parameters are set: 1) principal rays, 2) 125 cm as radius of curvature, 3) 1.5 as index of lens's refraction, 3) 80 cm as diameter, 4) Focal points and Virtual image are checked. 3) Measure and record the object and image distances. 4) Measure and record the distances to focal points. 5) Measure and record the size of the object and the size of the image. Be consistent measure the entire length of both. 6) Does the change in diameter of the lens produce the same effect as for the converging lens? Place the screen shot and record your measurements below. E) Using equation 2 (Introduction), determine the magnication of the image formed. Is the image real or Virtual? Is the image erect or inverted? F) Find the magnication again, but this time using equation 3. G) Find the power of the lens. H) Calculate the focal point of the lens using equation 1. How does the calculated focal point compare with the measured value? Calculate the percent error. Part III: Determining the Focal Length of a Converging Lens. Lens maker's equation. 1) Switch to converging lens setup. 2) Set the radius of curvature to 105 cm and index of refraction to 1.5. 3) Calculate the focal point using equation 4. Recall that radius of curvature has a sign notation, making R1: +100 cm and R2= - 100cm. The lens is symmetric so the magnitude of R1 is equal to the magnitude of R2. 4) Measure the distance to the focal point, compare to the calculated value and calculate the percent error
Step by Step Solution
There are 3 Steps involved in it

Get step-by-step solutions from verified subject matter experts