Question: 30 ft M o M 12 ft 9 10 11 12 13 14 15 0 5 ft M 0 o o 16 O O o
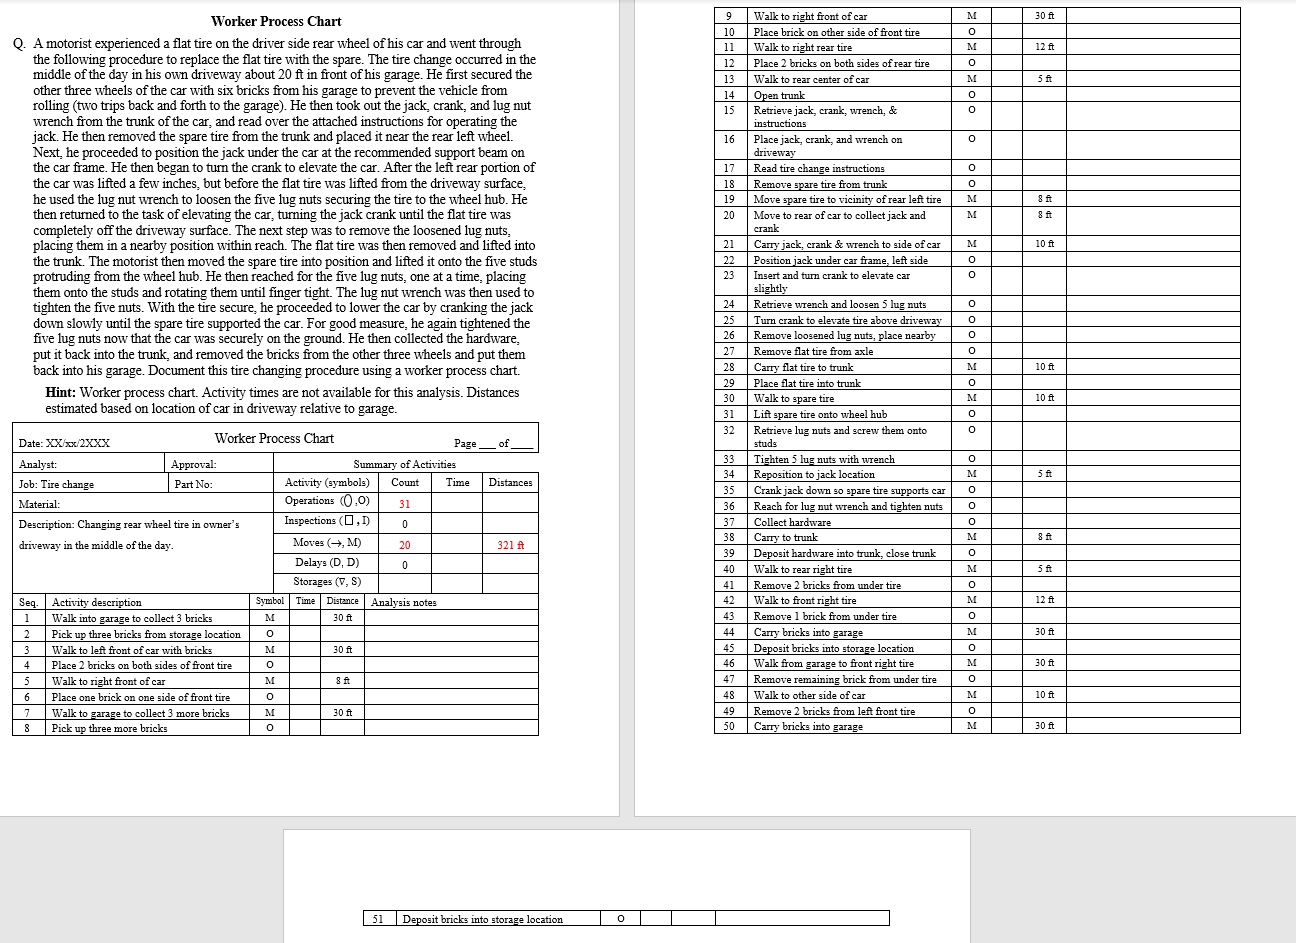
30 ft M o M 12 ft 9 10 11 12 13 14 15 0 5 ft M 0 o o 16 O O o 0 Worker Process Chart Q. A motorist experienced a flat tire on the driver side rear wheel of his car and went through the following procedure to replace the flat tire with the spare. The tire change occurred in the middle of the day in his own driveway about 20 ft in front of his garage. He first secured the other three wheels of the car with six bricks from his garage to prevent the vehicle from rolling (two trips back and forth to the garage). He then took out the jack, crank, and lug nut wrench from the trunk of the car, and read over the attached instructions for operating jack. He then removed the spare tire from the trunk and placed it near the rear left wheel. Next, he proceeded to position the jack under the car at the recommended support beam on the car frame. He then began to turn the crank to elevate the car. After the left rear portion of the car was lifted a few inches, but before the flat tire was lifted from the driveway surface, he used the lug nut wrench to loosen the five lug nuts securing the tire to the wheel hub. He then returned to the task of elevating the car, turning the jack crank until the flat tire was completely off the driveway surface. The next step was to remove the loosened lug nuts, placing them in a nearby position within reach. The flat tire was then removed and lifted into the trunk. The motorist then moved the spare tire into position and lifted it onto the five studs protruding from the wheel hub. He then reached for the five lug nuts, one at a time, placing them onto the studs and rotating them until finger tight. The lug nut wrench was then used to tighten the five nuts. With the tire secure, he proceeded to lower the car by cranking the jack down slowly until the spare tire supported the car. For good measure, he again tightened the five lug nuts now that the car was securely on the ground. He then collected the hardware, put it back into the trunk, and removed the bricks from the other three wheels and put them back into his garage. Document this tire changing procedure using a worker process chart. Hint: Worker process chart. Activity times are not available for this analysis. Distances estimated based on location of car in driveway relative to garage. 17 18 19 20 M 8 ft 8 ft M M 10 ft 21 22 23 O O 0 o o O 24 25 26 27 28 29 30 31 32 10 ft Walk to right front of car Place brick on other side of front tire Walk to right rear tire Place 2 bricks on both sides of rear tire Walk to rear center of car Open trunk Retrieve jack, crank, wrench, & instructions Place jack, crank, and wrench on driveway Read tire change instructions Remove spare tire from trunk Move spare tire to vicinity of rear left tire Move to rear of car to collect jack and crank Carry jack, crank & wrench to side of car Position jack under car frame, left side Insert and turn crank to elevate car slightly Retrieve wrench and loosen 5 lug nuts Turn crank to elevate tire above driveway Remove loosened lug nuts, place nearby Remove flat tire from axle Carry flat tire to trunk Place flat tire into trunk Walk to spare tire Lift spare tire onto wheel hub Retrieve lug nuts and screw them onto studs Tighten 5 lug nuts with wrench Reposition to jack location Crank jack down so spare tire supports car Reach for lug nut wrench and tighten nuts Collect hardware Carry to trunk Deposit hardware into trunk, close trunk at malo Walk to rear right tire Remove 2 bricks from under tire . Walk to front right tire Remove 1 brick from under tire Carry bricks into garage anty Deposit bricks into storage location TTT Walk from garage to front right tire Remove remaining brick from under tire Walk to other side of car Remove 2 bricks from left front tire Carry bricks into garage M *** 0 M 10 ft O o of O M 5 ft Distances o 0 0 M 8. 321 ft 0 33 34 35 36 37 38 39 40 41 . 42 43 44 45 46 M Date: XXxx 2XXX Worker Process Chart Page Analyst: Approval: Summary of Activities Job: Tire change Part No: Activity (symbols) Count Time Material: Operations (0,0) 31 Description: Changing rear wheel tire in owner's Inspections (0,1) 0 driveway in the middle of the day Moves (M) 20 Delays (DD) 0 Storages (V, S) Seq. Activity description Symbol Time Distance Analysis notes 1 Walk into garage to collect 3 bricks M 30 ft 2 Pick up three bricks from storage location o 3 Walk to left front of car with bricks M 30 ft 4 Place 2 bricks on both sides of front tire o 5 Walk to right front of car M 8 ft 6 6 Place one brick on one side of front tire o 7 Walk to garage to collect 3 more bricks M 30 ft 8 8 Pick up three more bricks 5 tt 0 M 12 ft o 30 ft M O o M O 30 ft 47 48 M 10 ft 49 50 o M 30 ft | 51 Deposit bricks into storage location o 30 ft M o M 12 ft 9 10 11 12 13 14 15 0 5 ft M 0 o o 16 O O o 0 Worker Process Chart Q. A motorist experienced a flat tire on the driver side rear wheel of his car and went through the following procedure to replace the flat tire with the spare. The tire change occurred in the middle of the day in his own driveway about 20 ft in front of his garage. He first secured the other three wheels of the car with six bricks from his garage to prevent the vehicle from rolling (two trips back and forth to the garage). He then took out the jack, crank, and lug nut wrench from the trunk of the car, and read over the attached instructions for operating jack. He then removed the spare tire from the trunk and placed it near the rear left wheel. Next, he proceeded to position the jack under the car at the recommended support beam on the car frame. He then began to turn the crank to elevate the car. After the left rear portion of the car was lifted a few inches, but before the flat tire was lifted from the driveway surface, he used the lug nut wrench to loosen the five lug nuts securing the tire to the wheel hub. He then returned to the task of elevating the car, turning the jack crank until the flat tire was completely off the driveway surface. The next step was to remove the loosened lug nuts, placing them in a nearby position within reach. The flat tire was then removed and lifted into the trunk. The motorist then moved the spare tire into position and lifted it onto the five studs protruding from the wheel hub. He then reached for the five lug nuts, one at a time, placing them onto the studs and rotating them until finger tight. The lug nut wrench was then used to tighten the five nuts. With the tire secure, he proceeded to lower the car by cranking the jack down slowly until the spare tire supported the car. For good measure, he again tightened the five lug nuts now that the car was securely on the ground. He then collected the hardware, put it back into the trunk, and removed the bricks from the other three wheels and put them back into his garage. Document this tire changing procedure using a worker process chart. Hint: Worker process chart. Activity times are not available for this analysis. Distances estimated based on location of car in driveway relative to garage. 17 18 19 20 M 8 ft 8 ft M M 10 ft 21 22 23 O O 0 o o O 24 25 26 27 28 29 30 31 32 10 ft Walk to right front of car Place brick on other side of front tire Walk to right rear tire Place 2 bricks on both sides of rear tire Walk to rear center of car Open trunk Retrieve jack, crank, wrench, & instructions Place jack, crank, and wrench on driveway Read tire change instructions Remove spare tire from trunk Move spare tire to vicinity of rear left tire Move to rear of car to collect jack and crank Carry jack, crank & wrench to side of car Position jack under car frame, left side Insert and turn crank to elevate car slightly Retrieve wrench and loosen 5 lug nuts Turn crank to elevate tire above driveway Remove loosened lug nuts, place nearby Remove flat tire from axle Carry flat tire to trunk Place flat tire into trunk Walk to spare tire Lift spare tire onto wheel hub Retrieve lug nuts and screw them onto studs Tighten 5 lug nuts with wrench Reposition to jack location Crank jack down so spare tire supports car Reach for lug nut wrench and tighten nuts Collect hardware Carry to trunk Deposit hardware into trunk, close trunk at malo Walk to rear right tire Remove 2 bricks from under tire . Walk to front right tire Remove 1 brick from under tire Carry bricks into garage anty Deposit bricks into storage location TTT Walk from garage to front right tire Remove remaining brick from under tire Walk to other side of car Remove 2 bricks from left front tire Carry bricks into garage M *** 0 M 10 ft O o of O M 5 ft Distances o 0 0 M 8. 321 ft 0 33 34 35 36 37 38 39 40 41 . 42 43 44 45 46 M Date: XXxx 2XXX Worker Process Chart Page Analyst: Approval: Summary of Activities Job: Tire change Part No: Activity (symbols) Count Time Material: Operations (0,0) 31 Description: Changing rear wheel tire in owner's Inspections (0,1) 0 driveway in the middle of the day Moves (M) 20 Delays (DD) 0 Storages (V, S) Seq. Activity description Symbol Time Distance Analysis notes 1 Walk into garage to collect 3 bricks M 30 ft 2 Pick up three bricks from storage location o 3 Walk to left front of car with bricks M 30 ft 4 Place 2 bricks on both sides of front tire o 5 Walk to right front of car M 8 ft 6 6 Place one brick on one side of front tire o 7 Walk to garage to collect 3 more bricks M 30 ft 8 8 Pick up three more bricks 5 tt 0 M 12 ft o 30 ft M O o M O 30 ft 47 48 M 10 ft 49 50 o M 30 ft | 51 Deposit bricks into storage location o


