

Question: asp.net database visual studio project download files https://ufile.io/1s8je Chapter 13-2 Homework - Create an application that Create another data source and bind it to a
asp.net database visual studio
project download files
https://ufile.io/1s8je
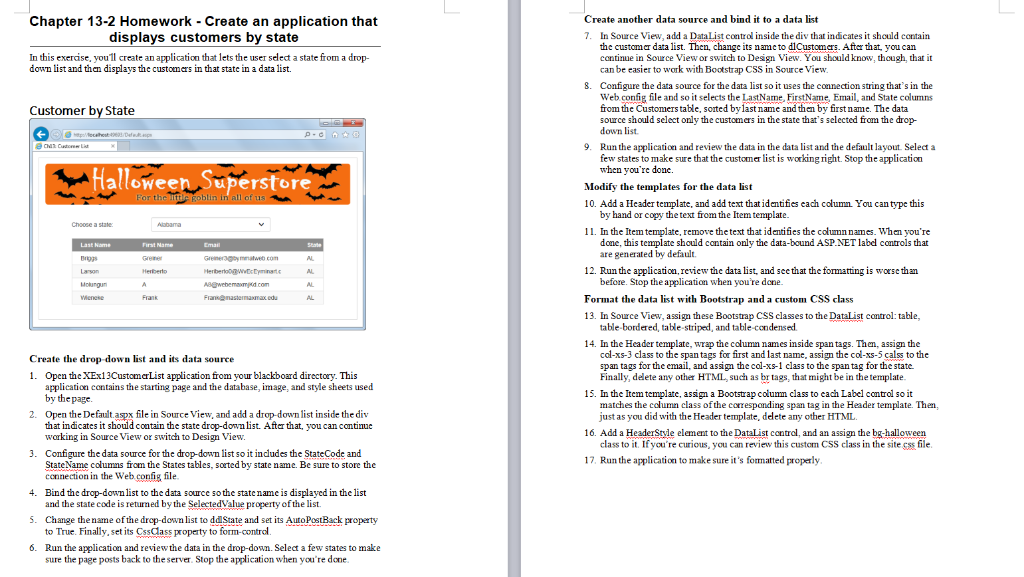
Chapter 13-2 Homework - Create an application that Create another data source and bind it to a data list displays customers by state 7. In this exerdse, you1l create an application that lets the useseleta state from a drop- down list and then displays the customers in that state in a data list. In Source View, add a DataList control inside the div that indicates it should contain the customer data list. Then, change its name to diCustomers. After that you can continue in Source View or switch to Design View. You should know, though, that it can be easier to work with Bootstrap CSS in Source View 8. Configure the data source for the data list so it uses the connection string that's in the Web config file and so it selects the LastName, FirstName, Email, and State columns from the Customers ta, sorted by lastname and then by first name. The data source should select only the customers in the state that's selected from the drop- down list Customer by State 9. Runthe application and review the data in the data list and the default layout Select a few states to make sure that the customer list is working right. Stop the application when you're done. Halloween Sperstore Modify the templates for the data list 10. Add a Header template, and add text thatidentifies each column You can type this by hand or copy the text from the Item template. 11. In the Item template, remove thetext that identifies the column names. When you're done, this template should contain only the data-bound ASP NET label controls that are generated by default. Drggs 12. Runthe application, review the data list, and see that the formatting is worse th an Molungun before. Stop the application when you're done Wenese Format the data list with Bootstrap and a custom CSS class 13. In Source View, assign these Bootstrap CSS classes to the DataList control: table, table bordered, table-striped, and table-condensed 14. In the Header temple, wrap the column names inside span tags. Thm, assign the Create the drop-down list and its data source 1. Open the XEx13CustomerList application from your blackboard directory. This col-xs-3 class to the span tags for first and last name, assign the col-xs-5 calss to the span tags for the email, and assigm the col-xs-1 class to the span tag for the state Finally, delete any other HTML such as br tags, that might be in thetemplate. application contains the starting page and the database, image, and style sheets used by the page 15. In the Item template, assign a Bootstap columm class to each Label control so it 2. Open the Default.aspx file in Source View, and add a drop-down list inside the div matches the cclumn class ofthe corresponding span tag in the Header template. Then, just as you did with the Header template, delete any other HTML. that indicates it should contain the state drop-down list. After that, you can continue working in Source View or switch to Design View Configure the data source for the drop-down list so it indudes the StateCode and StateName columns from the States tables, sorted by state name. Be sure to store the connection in the Web config file. 16. Add a HeaderStvle element to the DataList contral, and an assign the bg-halloween class to it. If yo re curious, you can review this custom CSS class in the sitess file 3. 17, Runthe application to make sure it's fomatted properly 4. Bind the drop-down list to the data source so the state name is displayed in the list 5. Change the name of the drop-down list to ddlState and set its AutoPostBack propaty 6. Run the application and reviewthe data in the drop-down. Select a few states to make and the state code is returned by the SelectedValue property of the list. to True. Finally, set its Csslass property to form-control sure the page posts back to theserr. Stop the application when you're done Chapter 13-2 Homework - Create an application that Create another data source and bind it to a data list displays customers by state 7. In this exerdse, you1l create an application that lets the useseleta state from a drop- down list and then displays the customers in that state in a data list. In Source View, add a DataList control inside the div that indicates it should contain the customer data list. Then, change its name to diCustomers. After that you can continue in Source View or switch to Design View. You should know, though, that it can be easier to work with Bootstrap CSS in Source View 8. Configure the data source for the data list so it uses the connection string that's in the Web config file and so it selects the LastName, FirstName, Email, and State columns from the Customers ta, sorted by lastname and then by first name. The data source should select only the customers in the state that's selected from the drop- down list Customer by State 9. Runthe application and review the data in the data list and the default layout Select a few states to make sure that the customer list is working right. Stop the application when you're done. Halloween Sperstore Modify the templates for the data list 10. Add a Header template, and add text thatidentifies each column You can type this by hand or copy the text from the Item template. 11. In the Item template, remove thetext that identifies the column names. When you're done, this template should contain only the data-bound ASP NET label controls that are generated by default. Drggs 12. Runthe application, review the data list, and see that the formatting is worse th an Molungun before. Stop the application when you're done Wenese Format the data list with Bootstrap and a custom CSS class 13. In Source View, assign these Bootstrap CSS classes to the DataList control: table, table bordered, table-striped, and table-condensed 14. In the Header temple, wrap the column names inside span tags. Thm, assign the Create the drop-down list and its data source 1. Open the XEx13CustomerList application from your blackboard directory. This col-xs-3 class to the span tags for first and last name, assign the col-xs-5 calss to the span tags for the email, and assigm the col-xs-1 class to the span tag for the state Finally, delete any other HTML such as br tags, that might be in thetemplate. application contains the starting page and the database, image, and style sheets used by the page 15. In the Item template, assign a Bootstap columm class to each Label control so it 2. Open the Default.aspx file in Source View, and add a drop-down list inside the div matches the cclumn class ofthe corresponding span tag in the Header template. Then, just as you did with the Header template, delete any other HTML. that indicates it should contain the state drop-down list. After that, you can continue working in Source View or switch to Design View Configure the data source for the drop-down list so it indudes the StateCode and StateName columns from the States tables, sorted by state name. Be sure to store the connection in the Web config file. 16. Add a HeaderStvle element to the DataList contral, and an assign the bg-halloween class to it. If yo re curious, you can review this custom CSS class in the sitess file 3. 17, Runthe application to make sure it's fomatted properly 4. Bind the drop-down list to the data source so the state name is displayed in the list 5. Change the name of the drop-down list to ddlState and set its AutoPostBack propaty 6. Run the application and reviewthe data in the drop-down. Select a few states to make and the state code is returned by the SelectedValue property of the list. to True. Finally, set its Csslass property to form-control sure the page posts back to theserr. Stop the application when you're done
Step by Step Solution
There are 3 Steps involved in it

Get step-by-step solutions from verified subject matter experts