Question: Assignment 2: Git Usage In this assignment, you will get familiar with Git and some of its main features. The assignment assumes that you are

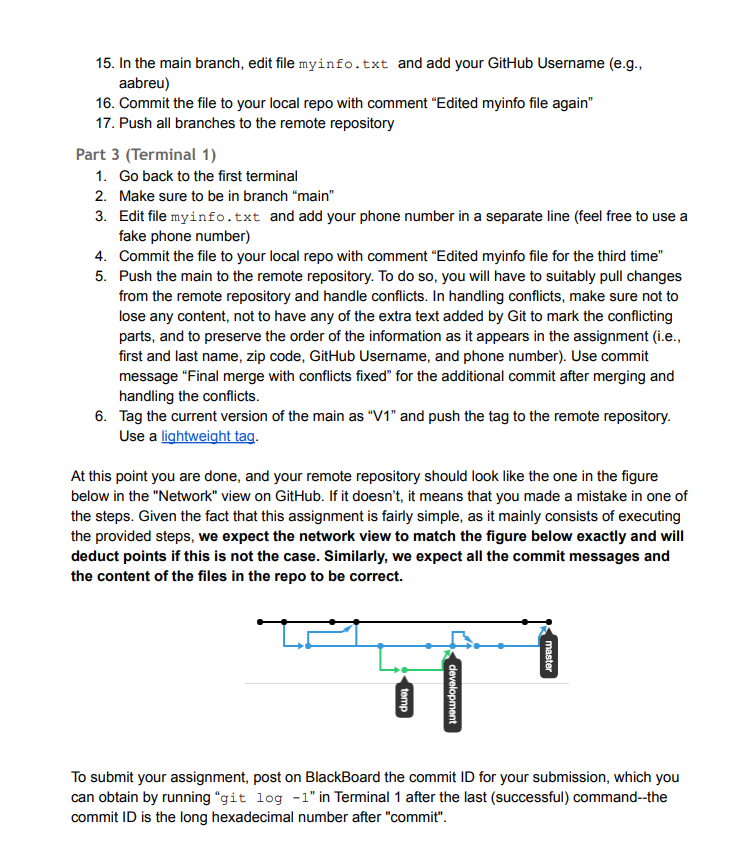
Assignment 2: Git Usage In this assignment, you will get familiar with Git and some of its main features. The assignment assumes that you are working from the command line, and we will simulate the presence of multiple users using two terminal windows. If you are already familiar with Git and a specific Git client, feel free to use that, as long as you do what the assignment requires. In the following, we use the term "REPO" to indicate the personal repository we assigned to you, which is named: https://github.com/qc-se-spring23/370Spring23.git When we create REPO, you will receive an email at your GitHub registered email address notifying you that you have been added to REPO. The subject will be along the lines of "andyabreuqc invited you to qc-se-spring23/370Spring23". Notes: - If you have not received the above email within a day from the release of this assignment despite having completed Assignment 1, make sure to check your spam folder and that you are actually checking your GitHub registered email address. - We will not be able to give you access to REPO until you complete Assignment 1 , as we need your GitHub account Please contact us on Piazza in case of problems and, once more, make sure to use the repository we assigned to you and not one you created. Please also make sure to read the whole assignment before getting started and to follow the instructions we provide to the letter (e.g., use the exact commit messages provided in the assignment, rather than variations of them). If you don't know how to accomplish a task, either consult Git's help by running "git --help " or leverage online resources (there are plenty, such as this Git cheat sheet). If you receive an error while executing a Git command, make sure to read the error message-Git often suggests exactly the right thing to do. If you are not familiar with Git and feel completely lost, we suggest that you have a second look at the Git notes from class and mimic the steps in the demo on your machine. In addition, you can also take the tutorial at http://try.github.io/levels/1/challenges/1, which should further get you familiar with Git's basic concepts. We also suggest that you use GitHub's "Network" view to monitor the state of your local and remote repository throughout the assignment. To do so, go to the GitHub page for REPO, select menu "Graphs" on the right, and then select the "Network" tab at the top. In this way, you will have a visual representation of how the repository evolves, which can be very useful for better understanding Git and how it operates. In addition, we provide a screenshot of how your repository should look at the end of the assignment. Alternatively, you can run "git log --graph" from the command line, which outputs a text-based representation of the same information. Finally, we suggest that you practice the assignment on a separate repository and then perform the assignment on REPO when you feel comfortable with the various commands. (This would also allow you to get started before you receive your official repo from us.) If you were to make a mistake while working on REPO, however, and you wanted to restart from a clean slate, in most cases you should be able to do so by executing the following instructions: - Run "git log" from within your local repository - Get the last commit ID in the list (i.e., the one with the earliest date, which should have "Initial commit." as its associated comment.) - Run in each of the two terminals, and from the root of your repo (directory 370spring 23) git checkout main git branch -D development temp git push origin : development git push origin : temp git tag -d V1 git push origin :V1 git reset --hard git push --force - IMPORTANT: These are instructions that you should follow only if you mess up REPO. This is one of the few cases in which we recommend the use of the "git push --force" command, which we otherwise strongly discourage, as it can have disastrous effects. Some of the above commands may fail if you haven't yet done what they are trying to undo. These errors can be safely ignored. After resetting the state, there is no need to re-clone the repository (i.e., there is no need to perform the first 5 steps of the instructions). Assignment Instructions: Part 1 (Terminal 1) Before you start, make sure to specify your name and email address using command "git config", if you haven't already. 1. Open a terminal window 2. Create and go to directory User 1 3. Clone REPO 4. This should create a directory called 370 spring 23 under directory User 1 . 5. Go to directory 370 Spring 3 (here you can also open the Network view in GitHub and start monitoring how your repository evolves) 6. Make sure that the directory contains a file called README . md 7. Create and go to directory Assignment2 (under 370 Spring 23 ) 8. Create a file called myinfo. txt that contains only one line with your first and last name 9. Commit the file to your local repo with comment "Added myinfo file" 10. Create a branch called "development" and switch to it 11. Create a file called dev1. txt that contains the text "Dev 1 file". 12. Commit the file to your local repo (it should be in branch "development") with comment "Added dev1 file" 13. Switch to the "main" branch 14. Edit file myinfo. txt and add your zip code in a separate line (feel free to make up the code, if you don't want to use yours) 15. Commit the file to your local repo with comment "Edited myinfo file" 16. Merge the "development" branch into the "main" branch with commit message "Merge #1 17. Push all branches to the remote repository Part 2 (Terminal 2) 1. Open a second terminal window 2. Create and go to directory User 2 3. Clone REPO 4. Just like before, this should create a directory called 370 Spring 23 under directory User 2 5. Go to directory 370 Spring 23/ Assignment 2 6. Switch to the "development" branch 7. Create a file called dev2.txt that contains the text "Dev 2 file". 8. Commit the file to your local repo (it should be in branch "development") with comment "Added dev2 file" 9. Create a branch called "temp" and switch to it 10. Create a file called mytemp . txt that contains the text "Mytemp file". 11. Commit the file to your local repo (it should be in branch "temp") with comment "Added mytemp file" 12. Create and commit to the branch "development", with the usual comment, a file called dev3.txt that contains the text "Dev 3 file". 13. Merge the "temp" branch into the "development" branch with commit message "Merge \#2" 14. Merge the "development" branch into the "main" branch with commit message "Merge \#3" 15. In the main branch, edit file myinfo.txt and add your GitHub Username (e.g., aabreu) 16. Commit the file to your local repo with comment "Edited myinfo file again" 17. Push all branches to the remote repository Part 3 (Terminal 1) 1. Go back to the first terminal 2. Make sure to be in branch "main" 3. Edit file myinfo.txt and add your phone number in a separate line (feel free to use a fake phone number) 4. Commit the file to your local repo with comment "Edited myinfo file for the third time" 5. Push the main to the remote repository. To do so, you will have to suitably pull changes from the remote repository and handle conflicts. In handling conflicts, make sure not to lose any content, not to have any of the extra text added by Git to mark the conflicting parts, and to preserve the order of the information as it appears in the assignment (i.e., first and last name, zip code, GitHub Username, and phone number). Use commit message "Final merge with conflicts fixed" for the additional commit after merging and handling the conflicts. 6. Tag the current version of the main as "V1" and push the tag to the remote repository. Use a lightweight tag. At this point you are done, and your remote repository should look like the one in the figure below in the "Network" view on GitHub. If it doesn't, it means that you made a mistake in one of the steps. Given the fact that this assignment is fairly simple, as it mainly consists of executing the provided steps, we expect the network view to match the figure below exactly and will deduct points if this is not the case. Similarly, we expect all the commit messages and the content of the files in the repo to be correct. To submit your assignment, post on BlackBoard the commit ID for your submission, which you can obtain by running " g it log1 " in Terminal 1 after the last (successful) command--the commit ID is the long hexadecimal number after "commit


