Question: can you help me with my cnc midterm asap please! thank you! 1) Which of the following ASME Y14.5 symbols represents a controlled radius? a.
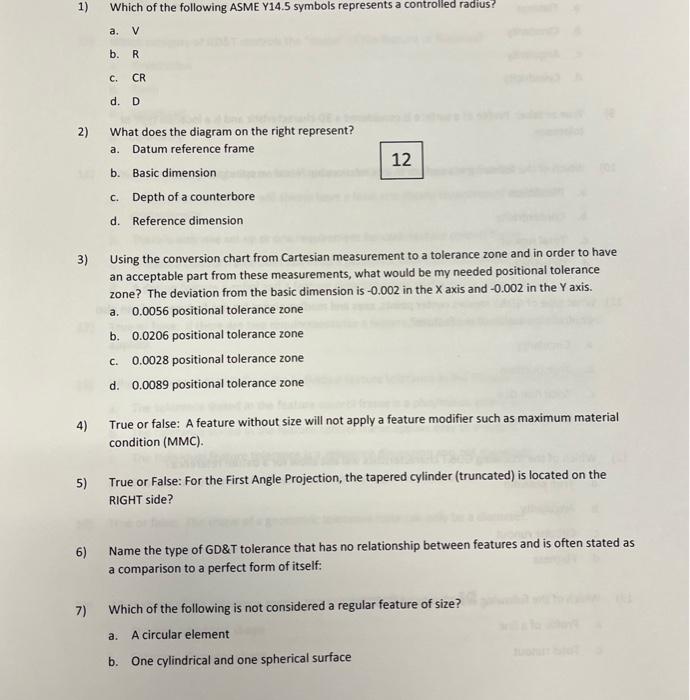
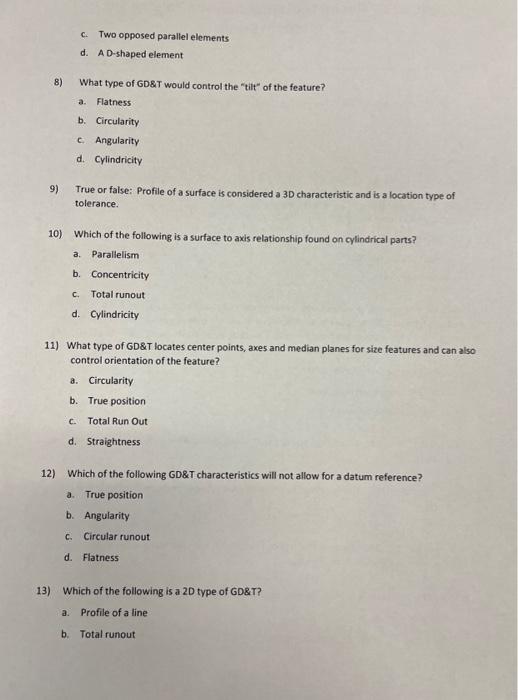
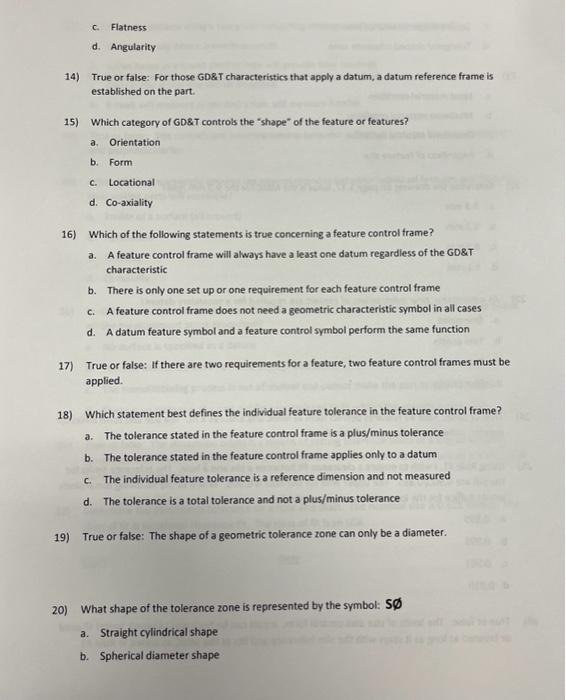
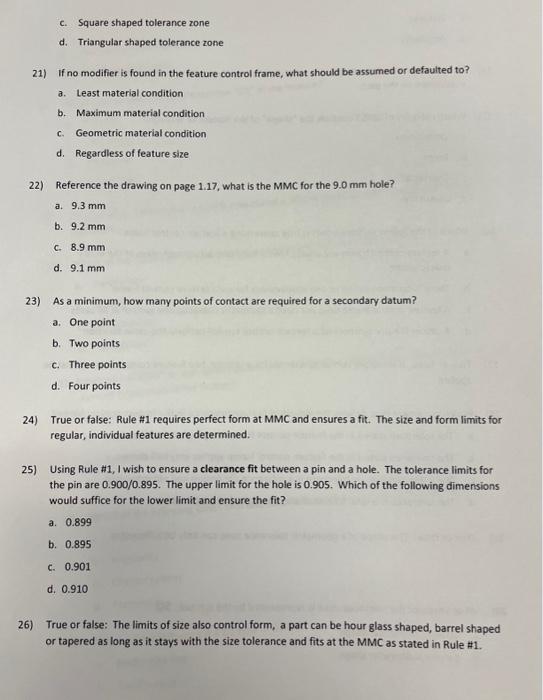
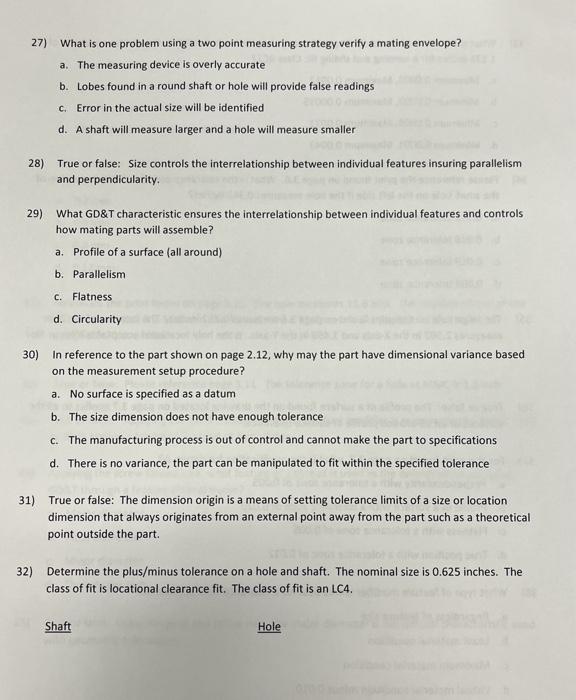
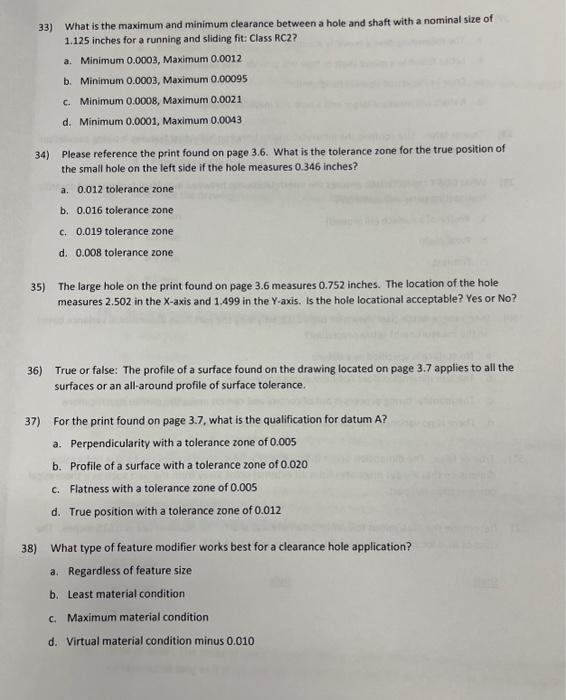
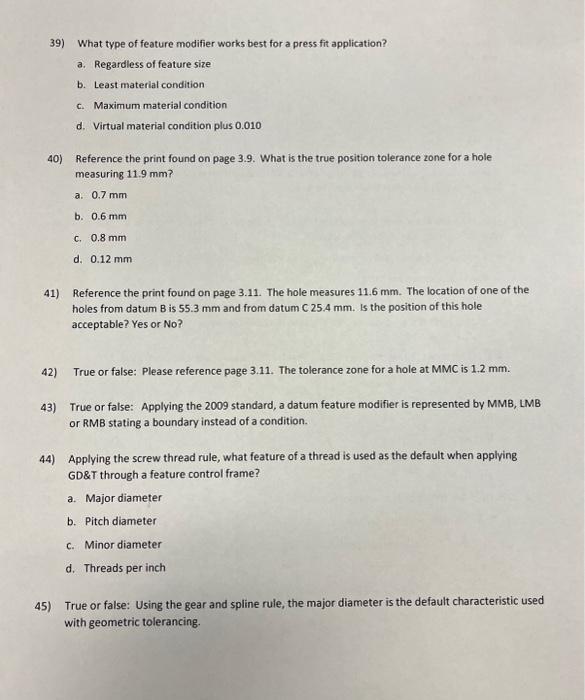
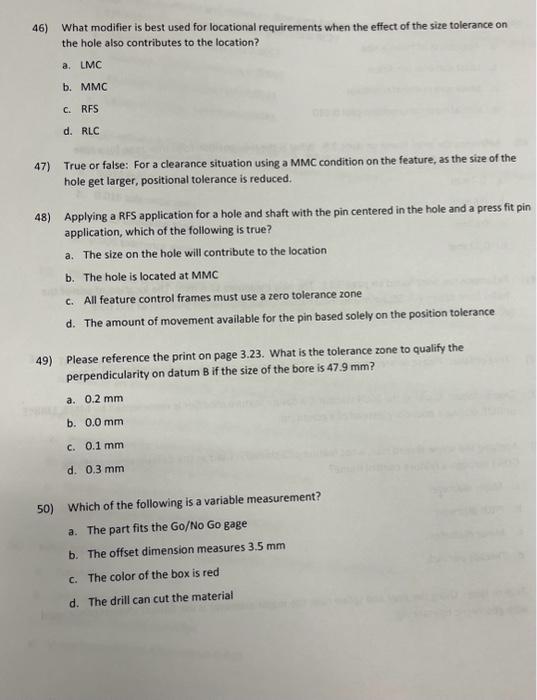
1) Which of the following ASME Y14.5 symbols represents a controlled radius? a. V b. R c. CR d. D 2) What does the diagram on the right represent? a. Datum reference frame b. Basic dimension 12 c. Depth of a counterbore d. Reference dimension 3) Using the conversion chart from Cartesian measurement to a tolerance zone and in order to have an acceptable part from these measurements, what would be my needed positional tolerance zone? The deviation from the basic dimension is -0.002 in the X axis and -0.002 in the Y axis. a. 0.0056 positional tolerance zone b. 0.0206 positional tolerance zone c. 0.0028 positional tolerance zone d. 0.0089 positional tolerance zone 4) True or false: A feature without size will not apply a feature modifier such as maximum material condition (MMC). 5) True or False: For the First Angle Projection, the tapered cylinder (truncated) is located on the RIGHT side? 6) Name the type of GD\&T tolerance that has no relationship between features and is often stated as a comparison to a perfect form of itself: 7) Which of the following is not considered a regular feature of size? a. A circular element b. One cylindrical and one spherical surface c. Two opposed parallel elements d. A D-shaped element 8) What type of GD\&T would control the "tilt" of the feature? a. Flatness b. Circularity c. Angularity d. Cylindricity 9) True or false: Profile of a surface is considered a 30 characteristic and is a location type of tolerance. 10) Which of the following is a surface to axis relationship found on cylindrical parts? 3. Paralielism b. Concentricity c. Total runout d. Cylindricity 11) What type of GD\&T locates center points, axes and median planes for size features and can also control orientation of the feature? a. Circularity b. True position c. Total Run Out d. Straightness 12) Which of the following GD\&T characteristics will not allow for a datum reference? a. True position b. Angularity c. Circular runout d. Flatness 13) Which of the following is a 2D type of GD\&T? a. Profile of a line b. Total runout c. Flatness d. Angularity 14) True or false: For those GD\&T characteristics that apply a datum, a datum reference frame is established on the part. 15) Which category of GDET controls the "shape" of the feature or features? a. Orientation b. Form c. Locational d. Co-axiality 16) Which of the following statements is true concerning a feature control frame? a. A feature control frame will always have a least one datum regardless of the GD\&T characteristic b. There is only one set up or one requirement for each feature control frame c. A feature control frame does not need a geometric characteristic symbol in all cases d. A datum feature symbol and a feature control symbol perform the same function 17) True or false: If there are two requirements for a feature, two feature control frames must be applied. 18) Which statement best defines the individual feature tolerance in the feature control frame? a. The tolerance stated in the feature control frame is a plus/minus tolerance b. The tolerance stated in the feature control frame applies only to a datum c. The individual feature tolerance is a reference dimension and not measured d. The tolerance is a total tolerance and not a plus/minus tolerance 19) True or false: The shape of a geometric tolerance zone can only be a diameter. 20) What shape of the tolerance zone is represented by the symbol: S a. Straight cylindrical shape b. Spherical diameter shape c. Square shaped tolerance zone d. Triangular shaped tolerance zone 21) If no modifier is found in the feature control frame, what should be assumed or defaulted to? a. Least material condition b. Maximum material condition c. Geometric material condition d. Regardless of feature size 22) Reference the drawing on page 1.17, what is the MMC for the 9.0mm hole? a. 9,3mm b. 9.2mm C. 8.9mm d. 9.1mm 23) As a minimum, how many points of contact are required for a secondary datum? a. One point b. Two points c. Three points d. Four points 24) True or false: Rule \#1 requires perfect form at MMC and ensures a fit. The size and form limits for regular, individual features are determined. 25) Using Rule \#1, I wish to ensure a clearance fit between a pin and a hole. The tolerance limits for the pin are 0.900/0.895. The upper limit for the hole is 0.905 . Which of the following dimensions would suffice for the lower limit and ensure the fit? a. 0.899 b. 0.895 c. 0.901 d. 0.910 26) True or false: The limits of size also control form, a part can be hour glass shaped, barrel shaped or tapered as long as it stays with the size tolerance and fits at the MMC as stated in Rule \#1. 27) What is one problem using a two point measuring strategy verify a mating envelope? a. The measuring device is overly accurate b. Lobes found in a round shaft or hole will provide false readings c. Error in the actual size will be identified d. A shaft will measure larger and a hole will measure smaller 28) True or false: Size controls the interrelationship between individual features insuring parallelism and perpendicularity. 29) What GD\&T characteristic ensures the interrelationship between individual features and controls how mating parts will assemble? a. Profile of a surface (all around) b. Parallelism c. Flatness d. Circularity 30) In reference to the part shown on page 2.12 , why may the part have dimensional variance based on the measurement setup procedure? a. No surface is specified as a datum b. The size dimension does not have enough tolerance c. The manufacturing process is out of control and cannot make the part to specifications d. There is no variance, the part can be manipulated to fit within the specified tolerance 31) True or false: The dimension origin is a means of setting tolerance limits of a size or location dimension that always originates from an external point away from the part such as a theoretical point outside the part. 32) Determine the plus/minus tolerance on a hole and shaft. The nominal size is 0.625 inches. The class of fit is locational clearance fit. The class of fit is an LC4. Shaft Hole 33) What is the maximum and minimum clearance between a hole and shaft with a nominal size of 1.125 inches for a running and sliding fit: Class RC2? a. Minimum 0.0003, Maximum 0.0012 b. Minimum 0.0003 , Maximum 0.00095 c. Minimum 0.0008 , Maximum 0.0021 d. Minimum 0.0001, Maximum 0.0043 34) Please reference the print found on page 3.6. What is the tolerance zone for the true position of the small hole on the left side if the hole measures 0.346 inches? a. 0.012 tolerance zone b, 0.016 tolerance zone c. 0.019 tolerance zone d. 0.008 tolerance zone 35) The large hole on the print found on page 3.6 measures 0.752 inches. The location of the hole measures 2.502 in the X-axis and 1.499 in the Y-axis. Is the hole locational acceptable? Yes or No? 36) True or false: The profile of a surface found on the drawing located on page 3.7 applies to all the surfaces or an all-around profile of surface tolerance. 37) For the print found on page 3.7, what is the qualification for datum A? a. Perpendicularity with a tolerance zone of 0.005 b. Profile of a surface with a tolerance zone of 0.020 c. Flatness with a tolerance zone of 0.005 d. True position with a tolerance zone of 0.012 38) What type of feature modifier works best for a clearance hole application? a. Regardless of feature size b. Least material condition c. Maximum material condition d. Virtual material condition minus 0.010 39) What type of feature modifier works best for a press fit application? a. Regardless of feature size b. Least material condition c. Maximum material condition d. Virtual material condition plus 0.010 40) Reference the print found on page 3.9. What is the true position tolerance zone for a hole measuring 11.9mm ? a. 0.7mm b. 0.6mm c. 0.8mm d. 0.12mm 41) Reference the print found on page 3.11. The hole measures 11.6mm. The location of one of the holes from datum B is 55.3mm and from datum C25.4mm. is the position of this hole acceptable? Yes or No? 42) True or false: Please reference page 3.11. The tolerance zone for a hole at MMC is 1.2mm. 43) True or false: Applying the 2009 standard, a datum feature modifier is represented by MMB, LMB or RMB stating a boundary instead of a condition. 44) Applying the screw thread rule, what feature of a thread is used as the default when applying GD\&T through a feature control frame? a. Major diameter b. Pitch diameter c. Minor diameter d. Threads per inch 45) True or false: Using the gear and spline rule, the major diameter is the default characteristic used with geometric tolerancing. 46) What modifier is best used for locational requirements when the effect of the size tolerance on the hole also contributes to the location? a. LMC b. MMC c. RFS d. RLC 47) True or false: For a clearance situation using a MMC condition on the feature, as the size of the hole get larger, positional tolerance is reduced. 48) Applying a RFS application for a hole and shaft with the pin centered in the hole and a press fit pin application, which of the following is true? a. The size on the hole will contribute to the location b. The hole is located at MMC c. All feature control frames must use a zero tolerance zone d. The amount of movement available for the pin based solely on the position tolerance 49) Please reference the print on page 3.23. What is the tolerance zone to qualify the perpendicularity on datum B if the size of the bore is 47.9mm ? a. 0.2mm b. 0.0mm c. 0.1mm d. 0.3mm 50) Which of the following is a variable measurement? a. The part fits the Go/No Go gage b. The offset dimension measures 3.5mm c. The color of the box is red d. The drill can cut the material
Step by Step Solution
There are 3 Steps involved in it

Get step-by-step solutions from verified subject matter experts


