

Question: Cr eate a new branch in Git. Start by selecting the Git menu in Android Studio and select Branches. In the resulting dialog click New
- Cr eate a new branch in Git. Start by selecting the "Git" menu in Android Studio and select "Branches". In the resulting dialog click "New branch" and call it "lab_2". Using a new branch means all your commits will only change this branch and not the original branch. This means you can go back to the "main" branch at any time.
- Go to https://flaglane.com/ and look for an image of an American flag. You should download the small PNG file, 200 pixels wide. Once downloaded, rename the file flag.png. Copy the file into the drawable folder in AndroidStudio. Next right-click on the "res" folder and select "New" -> "Android Resource Directory". Set the resource type to be drawable and set the directory name to be "drawable-fr". Next, download a French flag from httsp://flaglane.com/, a PNG file 200 pixels wide. Rename that file flag.png and copy it into the new drawable-fr folder you created. You will use these flags for the ImageButton later.
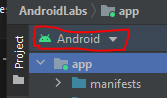
Note that if you are in Android view, you will not be able to see the empty "drawables-fr" folder in Android Studio. If you click "Android" you can switch into project view which will let you see empty folders.
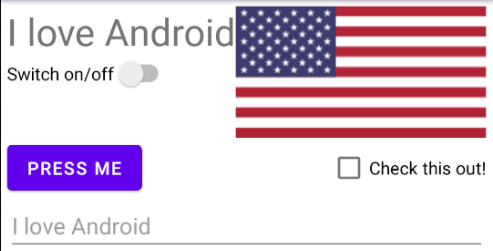
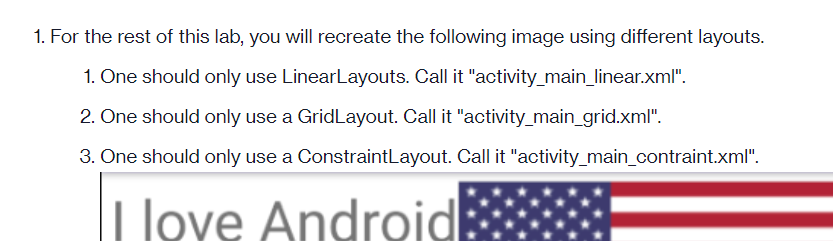
\fI love Android Switch on/off PRESS ME Check this out! I love Android1. For the rest of this lab, you will recreate the following image using different layouts. 1. One should only use LinearLayouts. Call it "activity_main_linear.xml". 2. One should only use a GridLayout. Call it "activity_main_grid.xml". 3. One should only use a ConstraintLayout. Call it "activity_main_contraint.xml". I love Android
Step by Step Solution
There are 3 Steps involved in it
1 Expert Approved Answer
Step: 1 Unlock

Question Has Been Solved by an Expert!
Get step-by-step solutions from verified subject matter experts
Step: 2 Unlock
Step: 3 Unlock