

Question: M_M.bmp, In this assignment, we will try to hide a message image within a context image. Then we will also implement a function to recover

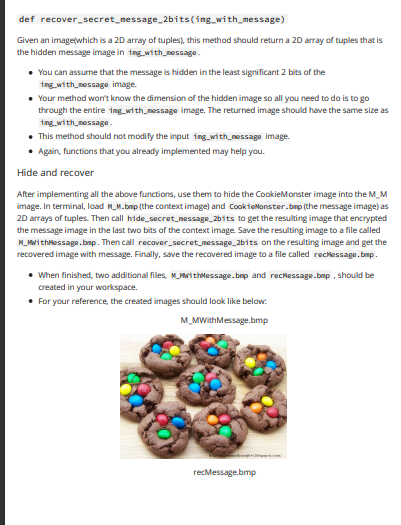
M_M.bmp, In this assignment, we will try to hide a message image within a context image. Then we will also implement a function to recover that message image from a combined image. Fudan ImgLib.py provides image loading/saving and some other supports, do not change anything in it. steganography. py contains starter code for this PA. Complete functions with \#TODo comments by following the instructions below. Please create steganopgrahy.py by pasting the following code def get_least_significant2(num) This method takes in an integer and returns the two least significant bits (rightmost two) as an integer. - You can assume num will always be an integer between 0 and 255 inclusive. - For example, get_least_significant2(255) should return 3 (since the rightmost two bits of 11111111 is 11) and get_least_signtficant2(253) should return 1 (since the rightmost two bits of 11111101 is 01). def get_most_significant2 (nun) This method takes in an integer and returns the two most significant bits (leftmost two) in decimal form. - You can assume num will always be an integer between 0 and 255 inclusive. - For example, get_most_significant2(28e) should return 3 (since the leftmost two bits of 11001000 is 11) and get_nost_significant2(159) should retum 2 (since the leftmost two bits of 10010110 is 10%. def embed_digits2(context_val, nessage_val) This mechod takes in two integers and retums the result of replacing the two least significant digits (rightmost two) in context_val with the value of message_val. - You can assume that context_val will always be an integer between 0 and 255 inclusive (i.e. an 8 -bit integer) and nessage_val will always be an integer between 0 and 3 inclusive (i.e. a 2 bit integer). - Hint: One way to approach this problem is first to "clear" the two least significant digits of context_val (f.e., set them to 0 ) and then use addition to add in nessage_val . There are many ways you can clear these two digits, but a quick way is just to shift right and then shift left again. E.g- 00111111 shift right 2 yields 0000 1111. If you shift 00001111 left 2 you will get 00111100. def hide_secret_nessage_2bits(context_img, nessage_ing) This method takes in two 2D array of tuples (similar to the inage format in PA6) and returns a new image with image message_ting hidden in image context_ing's least significant 2 bits. - You need to hide the most significant 2 bits of message_ing's RGB values in the least significant 2 bits of the corresponding RGB values of context_ing. - You can assume that message_1ng will always be the same size as context_ing - This method should make a copy of the image stored in context_ing and modify and retum that copy. It should not modify the input context_img image. - Hint make use of the functions that you already implemented above. def recover_secret_nessage_2bits(ing__ith_message) Given an imagelwhich is a 2D array of tuples), this method should return a 2D array of tuples that is the hidden message image in 1ng_with_nessage - - You can assume that the message is hidder in the least significant 2 bits of the 1ng_with_nessage image. - Your method worrt know the dimension of the hidden image so all you need to do is to go through the entire ing_with_nessage image. The returned image should have the same size as ing_with_nessage. - This method should not modify the input ing_with_nessage image. - Again, functions that you already implemented may help you. Hide and recover After implementing all the above functions, use them to hide the CookieMonster image into the M_M image. In terminal, load M_M.bmp (the context image) and CookieMonster_bmp (the message image) as 2D arrays of tuples. Then call hide_secret_nessage_2bits to get the resulting image that encrypted the message image in the last two bits of the context image. Save the resulting image to a file called M_NwithMessage.bmp. Then call recover_secret_message_2bits on the resulting image and get the recovered image with message. Finally, save the recovered image to a file called recmessage.bmp. - When finished, two additional files, M_MwithMessage.bop and recMessage.bmp, should be created in your workspace. - For your reference, the created images should look like below. M_MWithMessage.bmp
Step by Step Solution
There are 3 Steps involved in it

Get step-by-step solutions from verified subject matter experts