

Question: Please Answer 3, 4, 5, 6 and 7. The bundle wizard looks like the picture above. You diagram will look a little different based on
Please Answer 3, 4, 5, 6 and 7.
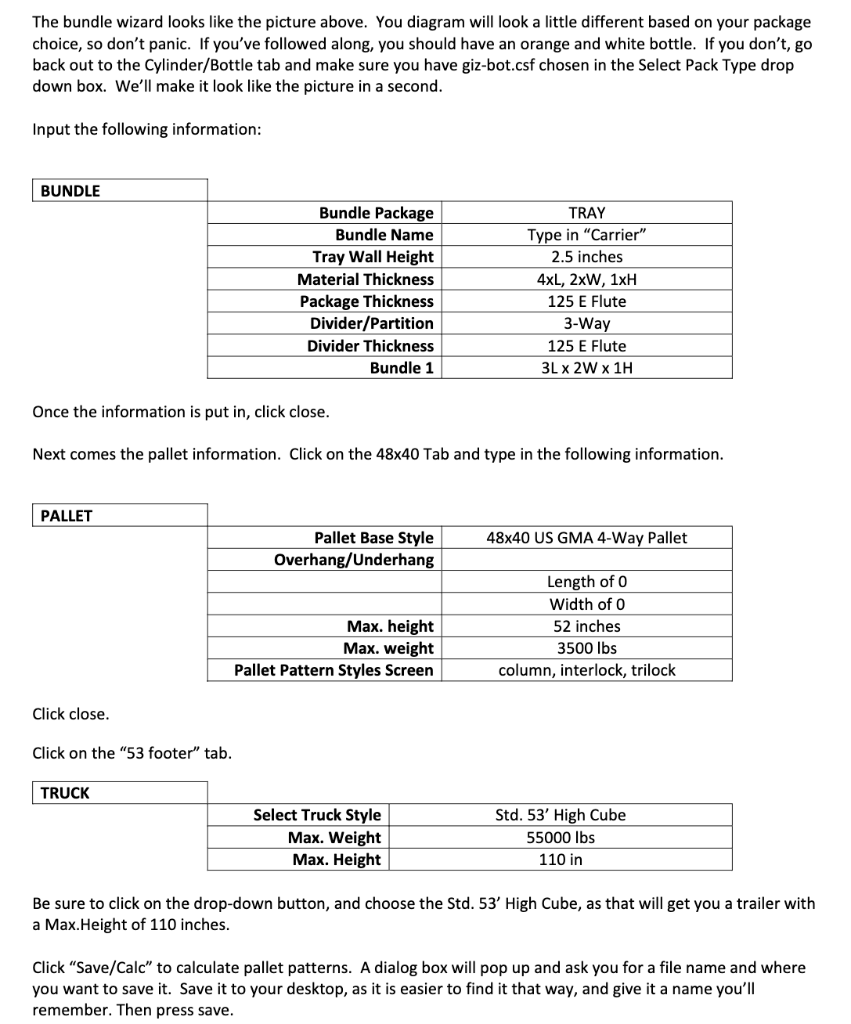
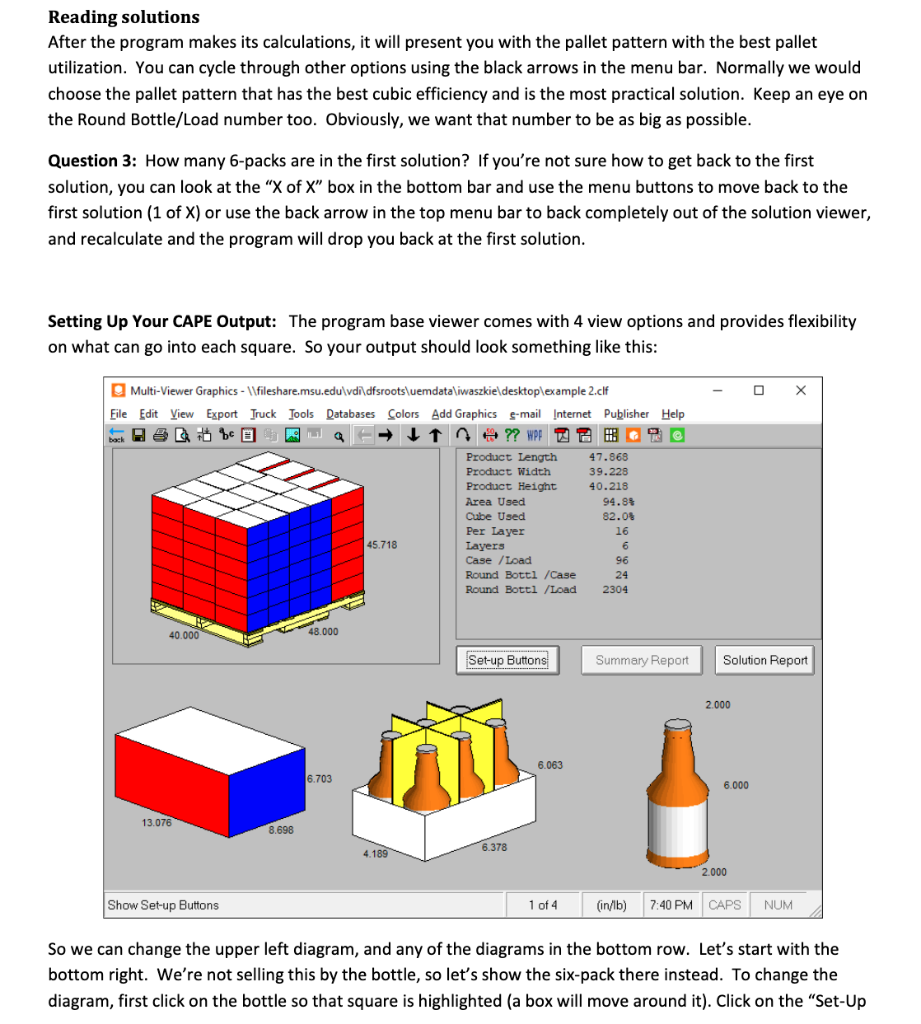
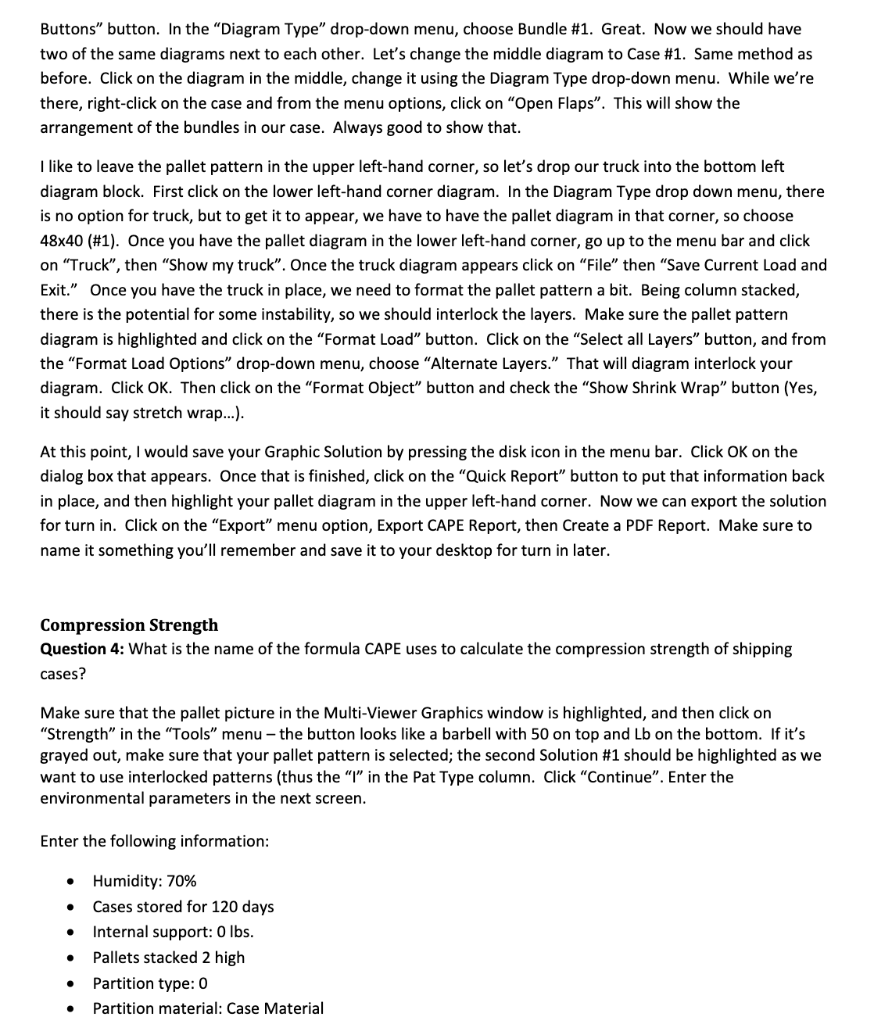

The bundle wizard looks like the picture above. You diagram will look a little different based on your package choice, so don't panic. If you've followed along, you should have an orange and white bottle. If you don't, go back out to the Cylinder/Bottle tab and make sure you have giz-bot.csf chosen in the Select Pack Type drop down box. We'll make it look like the picture in a second. Input the following information: Once the information is put in, click close. Next comes the pallet information. Click on the 4840Tab and type in the following information. Click close. Click on the "53 footer" tab. Be sure to click on the drop-down button, and choose the Std. 53' High Cube, as that will get you a trailer with a Max.Height of 110 inches. Click "Save/Calc" to calculate pallet patterns. A dialog box will pop up and ask you for a file name and where you want to save it. Save it to your desktop, as it is easier to find it that way, and give it a name you'll remember. Then press save. Reading solutions After the program makes its calculations, it will present you with the pallet pattern with the best pallet utilization. You can cycle through other options using the black arrows in the menu bar. Normally we would choose the pallet pattern that has the best cubic efficiency and is the most practical solution. Keep an eye on the Round Bottle/Load number too. Obviously, we want that number to be as big as possible. Question 3: How many 6-packs are in the first solution? If you're not sure how to get back to the first solution, you can look at the " X of X " box in the bottom bar and use the menu buttons to move back to the first solution ( 1 of X ) or use the back arrow in the top menu bar to back completely out of the solution viewer, and recalculate and the program will drop you back at the first solution. Setting Up Your CAPE Output: The program base viewer comes with 4 view options and provides flexibility on what can go into each square. So your output should look something like this: So we can change the upper left diagram, and any of the diagrams in the bottom row. Let's start with the bottom right. We're not selling this by the bottle, so let's show the six-pack there instead. To change the diagram, first click on the bottle so that square is highlighted (a box will move around it). Click on the "Set-Up two of the same diagrams next to each other. Let's change the middle diagram to Case \#1. Same method as before. Click on the diagram in the middle, change it using the Diagram Type drop-down menu. While we're there, right-click on the case and from the menu options, click on "Open Flaps". This will show the arrangement of the bundles in our case. Always good to show that. I like to leave the pallet pattern in the upper left-hand corner, so let's drop our truck into the bottom left diagram block. First click on the lower left-hand corner diagram. In the Diagram Type drop down menu, there is no option for truck, but to get it to appear, we have to have the pallet diagram in that corner, so choose 4840 (\#1). Once you have the pallet diagram in the lower left-hand corner, go up to the menu bar and click on "Truck", then "Show my truck". Once the truck diagram appears click on "File" then "Save Current Load and Exit." Once you have the truck in place, we need to format the pallet pattern a bit. Being column stacked, there is the potential for some instability, so we should interlock the layers. Make sure the pallet pattern diagram is highlighted and click on the "Format Load" button. Click on the "Select all Layers" button, and from the "Format Load Options" drop-down menu, choose "Alternate Layers." That will diagram interlock your diagram. Click OK. Then click on the "Format Object" button and check the "Show Shrink Wrap" button (Yes, it should say stretch wrap...). At this point, I would save your Graphic Solution by pressing the disk icon in the menu bar. Click OK on the dialog box that appears. Once that is finished, click on the "Quick Report" button to put that information back in place, and then highlight your pallet diagram in the upper left-hand corner. Now we can export the solution for turn in. Click on the "Export" menu option, Export CAPE Report, then Create a PDF Report. Make sure to name it something you'll remember and save it to your desktop for turn in later. Compression Strength Question 4: What is the name of the formula CAPE uses to calculate the compression strength of shipping cases? Make sure that the pallet picture in the Multi-Viewer Graphics window is highlighted, and then click on "Strength" in the "Tools" menu - the button looks like a barbell with 50 on top and Lb on the bottom. If it's grayed out, make sure that your pallet pattern is selected; the second Solution \#1 should be highlighted as we want to use interlocked patterns (thus the "I" in the Pat Type column. Click "Continue". Enter the environmental parameters in the next screen. Enter the following information: - Humidity: 70% - Cases stored for 120 days - Internal support: 0lbs. - Pallets stacked 2 high - Partition type: 0 - Partition material: Case Material - Case type: RSC - Amount of case print: Simple - Layers are interlocked - Solution mode: Ring Crush Notice the "Single Wall" and "Double Wall" tabs. You need to understand the following terminologies. We will discuss them further in class. Question 5: What is the Static Strength for a 42-26-42 C-flute box? Question 6: How many pallet loads high stacking can a 42-26-42 C-flute box support? Question 7: Is there a single wall case that can support 3 high stacking in the warehouse? GRADING RUBRIC
Step by Step Solution
There are 3 Steps involved in it

Get step-by-step solutions from verified subject matter experts