

Question: please answer this question is simple. Thanksb Exercise 2: Create ASP.NET MVC application 1. Start your visual studio 2019 2. Click on Create a new
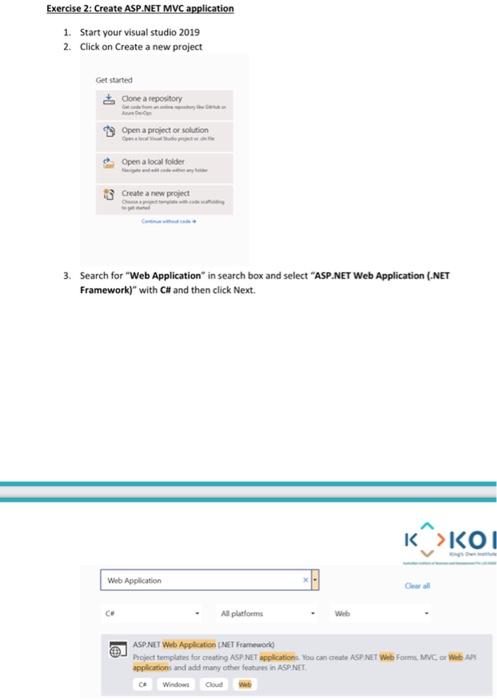
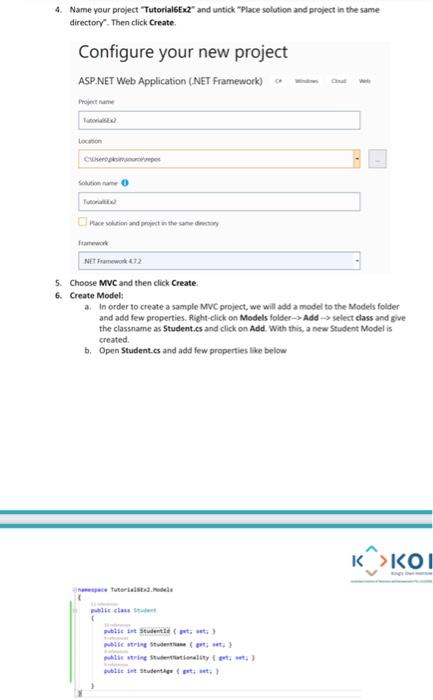
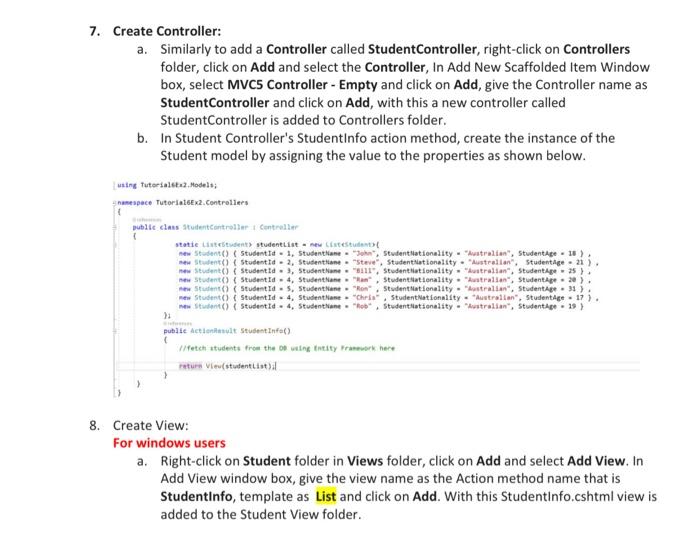
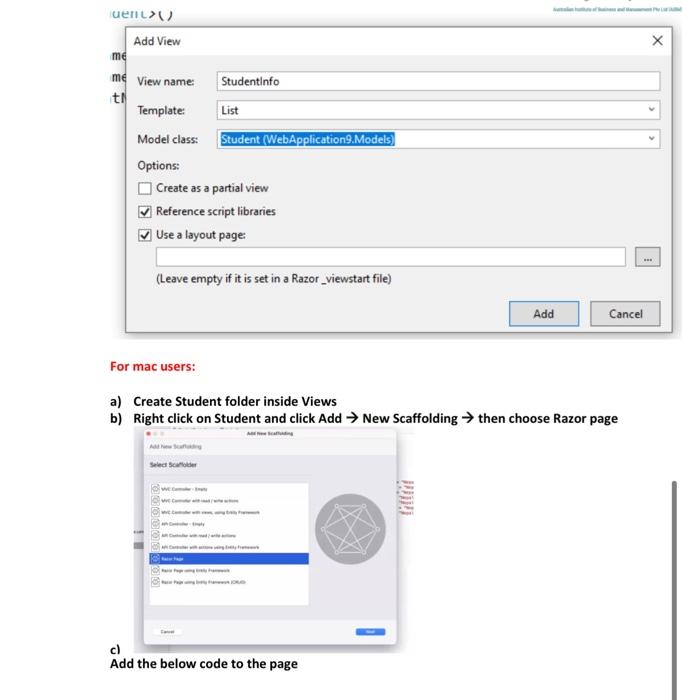
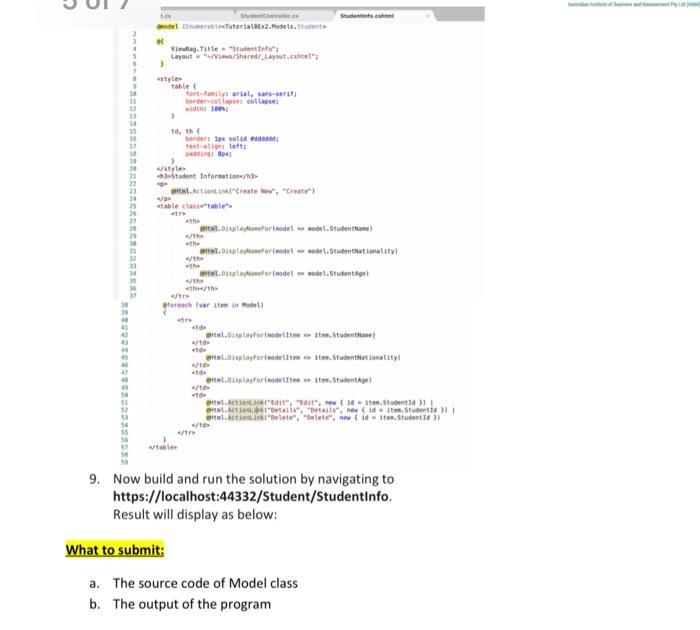
Exercise 2: Create ASP.NET MVC application 1. Start your visual studio 2019 2. Click on Create a new project Get started Cone a repository Open a project or solution Open a local folder Create a new project 3. Search for "Web Application in search box and select "ASP.NET Web Application (.NET Framework) with C# and then click Next. K? K >KOU Web Application G CH All platforms Web ASP.NET Web Application (NET Framework Project templates for creating ASP.NET applications to cance ASP NET Web Form MVC Wait AR applications and add many other features in ASP NET Windows 4. Name your project Tutorial6x2* and untick "Place solution and project in the same directory. Then click Create Configure your new project ASP.NET Web Application (NET Framework) Tutorial Clerin and the same day NET Framework 2 5. Choose MVC and then click Create 6. Create Model: a In order to create a sample MVC project, we will add a model to the Models folder and add few properties. Right click on Models folder-> Add-> select class and give the classname as Student.cs and click on Add. With this, a new Student Modelis created b. Open Student.cs and add few properties like below K>KOI e Tree welke ne Student { t :) Instwem ering Studentity : public int Student 7. Create Controller: a. Similarly to add a Controller called StudentController, right-click on Controllers folder, click on Add and select the Controller, In Add New Scaffolded Item Window box, select MVCS Controller - Empty and click on Add, give the Controller name as StudentController and click on Add, with this a new controller called StudentController is added to Controllers folder. b. In Student Controller's Studentinfo action method, create the instance of the Student model by assigning the value to the properties as shown below. using Tutorials Models; namespace Tutorial2.Controllers public class studentController Controller statte en studentListew Cett new Student) Studentit - 1, Studenthane - Bohn, Studentilationality Australian", Studentipe - 10 ) w Student Student I. 2, studentane. "Steve", Studentrationality Australian", Studentige. 21) new Student() { studenti, Studentane . 111", Studentilationality. "ustralian", Studentage 25 ) new Student Student id. 4, Studentane Studentationality. "Australian Student pe 20 ). Student StudentId. S. Studentranton Studentrationality. "stralian Student Age 31 ) new Student StudentId. 4. Studentane "Chri, Student Nationality Australian", Studentige 17). Student) StudentId . 4. Studentane . Studentilationality. Australian", Studentp. 19 > public Action StudentInfo() Wetch students from the wing taty Fork here return View(studentLista 8. Create View: For windows users a. Right-click on Student folder in Views folder, click on Add and select Add View. In Add View window box, give the view name as the Action method name that is Studentinfo, template as List and click on Add. With this Studentinfo.cshtml view is added to the Student View folder. uen> Add View me me View name Studentinfo ti Template: List Model class: Student (WebApplication. Models) Options Create as a partial view Reference script libraries Use a layout page (Leave empty if it is set in a Razor_viewstart file) Add Cancel For mac users: a) Create Student folder inside Views b) Right click on Student and click Add New Scaffolding then choose Razor page Select code c) Add the below code to the page Studio Stude indel bestutorial.Models. Sub Vieta Title Student Layouts/shared/_Layout." style le font-family:arial, sans-serit - cotta 10 td, the er lok solid et letti in put abstudent Information/> Action in Create ,"Create" table table 21 22 23 24 th SORES Derfodel rodel. StudentName Diforindelosel.Studentilationality) the ...O platinefor model model Studentage! th th / Stores artes Motel ..xplavarlosdeltet, Studente) ...Layor Ceedele Ite. Studentut Sonality) Ortst.isplayPorodetes >> Ite. Student w/ tt D., E, rewidten. Studenti Actions, Detaite", ne dite. Studente Acidite. Student 9. Now build and run the solution by navigating to https://localhost:44332/Student/StudentInfo. Result will display as below: What to submit: a. The source code of Model class b. The output of the program
Step by Step Solution
There are 3 Steps involved in it

Get step-by-step solutions from verified subject matter experts