

Question: 1. In this exercise, you need create an application for C-Sharp University that uses a data source and text boxes to maintain the textbook information
1. In this exercise, you need create an application for C-Sharp University that uses a data source and text boxes to maintain the textbook information in the Products table of the CSharp University database.
2. Start Visual Studio.
3. Click the Create Project hyperlink or use the File-New Project menu option.
4. In the New Project dialog box type a name for the projectname the project Lab18_19- SectionTime-YourLastName-YourFirstName
5. Change the forms File Name property from Form1.vb to a new name ProductDataGridView.cs
6. Add the CSharpUniversity.accdb file from Blackboard to the project. Then, use the Data Source Configuration Wizard to create a data source that includes the both the product and student tables. When youre done, set the Copy to Output Directory property of the CSharpUniversity.accdb file to Copy if Newer.
link to CSharpUniversity.accdb file -- http://www22.zippyshare.com/v/VfLeLsbR/file.html
7. On the existing drag the Products table to create a DataGrid View as shown below.
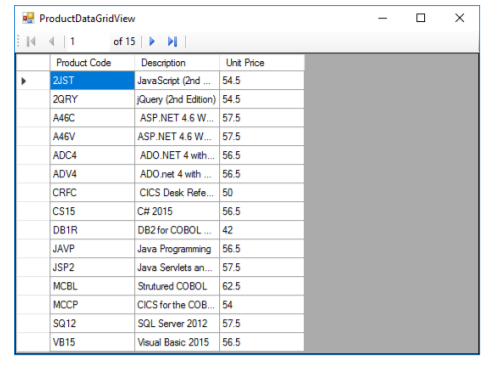
8. Click on the smart tag of the data grid on the form and dock it to the Parent Container. Allow only column reordering and disallow Adding, editing or deleting.
9. Remove the add, delete and save buttons from the binding navigator control so that the user cannot modify the contents from this grid
10. Test the application to be sure this works.
Part B
11. Add a new windows form and name it Textbooks.cs
12. Display the Data Sources window, and then change the view to Details view and then drag the Products table onto the default form to add a text box for each column.
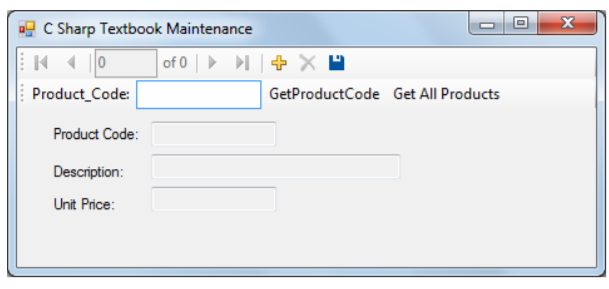
13. Set the properties of the form and controls so they appear as shown above. Move all the controls on the form down some to make room for the new query on step 14.
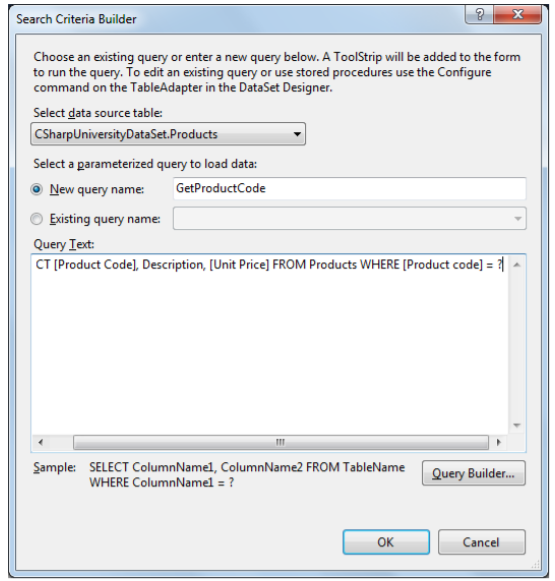
14. Add a parameterized query by clicking on the smart tag of the tableAdapter in the component tray and choosing Add Query.
15. Name the new query as shown below and add the Where clause as shown below
16. Add a try/catch block to the Get ProductCode event handler with a general exception if one should occur.
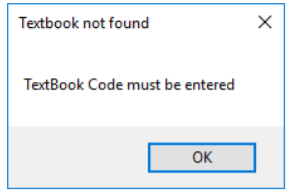
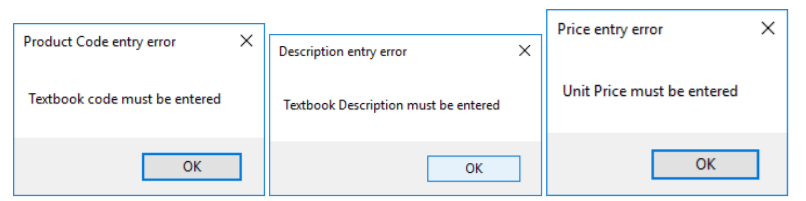
17. Add an If statement to the GetProductCode event that will check to see if the textbox contains data. You will need to use the count property to see if the product binding source is not equal to zero. Deliver a message box below if it is.
18. Add a new button to the tool strip and with a text property that reads Get All Products. Change the Display Style of the button to Text instead of image. Name the button getAlltoolStripButton.
19. Remove the code that is in the load event and add it to the click event of the Get all Products button. Then, add a try-catch statement to the Get all products event handler that catches any exceptions that occur. If an exception occurs, the catch block should display the exception but this will be unlikely unless the database does not load.
20. In the load event set the focus to the Product Code textbox tool strip item on the tool strip and make sure the Tab Stop property of the tool strip is set to True.
21. Format the Unit Price text box so the data it contains is displayed as currency with two decimal places. Then, test the application one more time.
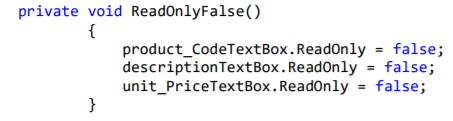
22. Create a method called ReadOnlyFalse and ReadonlyTrue to set the ReadOnly property of the textboxes to false or true. The code for false is below. You will need to generate the true.
23. Code the Add button to call the ReadOnlyFalse method above. Set the getProductToolStrip visible property to false. Set the bindingNavigatorAddItem and bindingNavigatorDeleteItem visible property to false.
24. Add and code the Cancel button. Change the display style to text and name it cancelToolStripMenuItem. Call the ReadOnlyTrue Method above. Set the getProductToolStrip visible property to true. Set the bindingNavigatorAddItem and bindingNavigatorDeleteItem visible property to true.
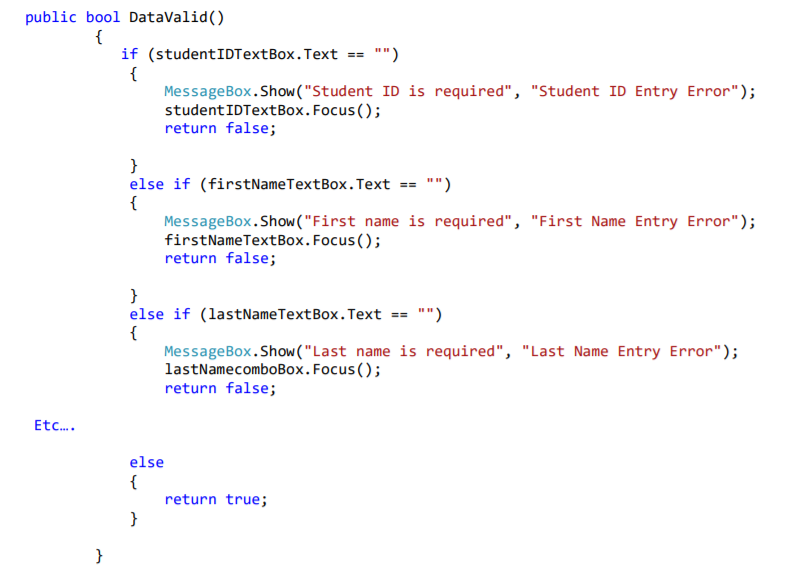
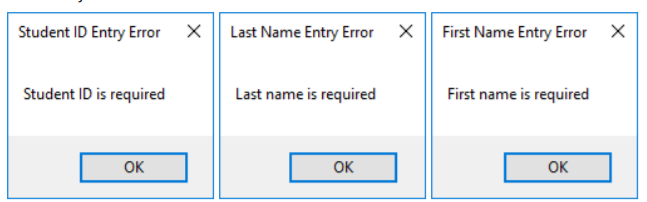
25. Create a DataValid method to check to see if all textboxes have data. If data is missing deliver a message box indicating such. See step 37 below for a similar DataValid method.
26. Call the DataValid method above to the Save event handler using an If statement and delete the current one that is there (this.Validate())
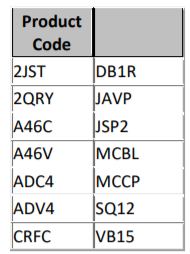
27. Test the application to be sure it works. Use the following codes to ensure you have coded the GetProductCode parameterized query correct.
Part C
28. Add a new form and name it Student.cs
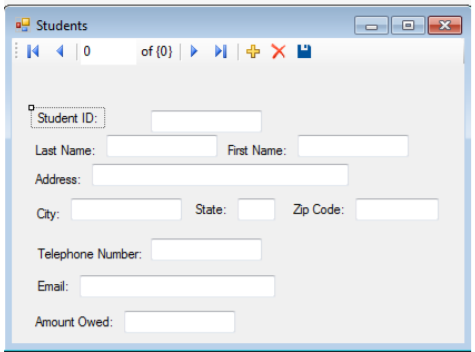
29. Change the title of the form as shown above.
30. Display the Data Sources window, and then change the view to Details view and then drag the Students table onto the default form to add a text box for each column.
31. Set the properties of the form and controls properties so they appear as shown above. Make all textboxes ReadOnly.
32. Change the startup form for the application by modifying the Program.cs file to be Students versus Textbook and test the application to be sure this works.
33. Test the application to be sure this works.
34. Add a Cancel button and an Edit button to the form. Change the display style property to text versus image. Name them editToolStripMenuItem and cancelToolStripMenuItem.
35. Then, add a try-catch statement to the Load event handler that catches any exceptions that occur. If an exception occurs, the catch block should display the exception but this is unlikely unless the database fails to load.
36. Add a lastNameComboBox to the Student form next to Student ID that will display Student last names. You will need to use Data bound items to do this. Data source will be the studentBindingSource, display member will be last name, and Value member will be StudentID since the Last name is not the primary key.
37. Create a method called DataValid to ensure all textboxes during Add have data. Be sure to call the DataValid function to the Save button click event using an If statement if (DataValid()) and remove the this.Validate() that is currently given. Code for DataValid method below:
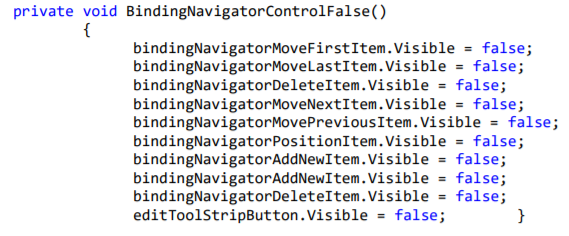
38. Create two methods called BindingNavigatorControlFalse and BindingNavigatorControlTrue that will make the binding navigator items hidden on the form when the Add button is selected or shown when the Cancel button is selected. Below is the BindingNavigatorControlFalse code. You will have to generate the True code.
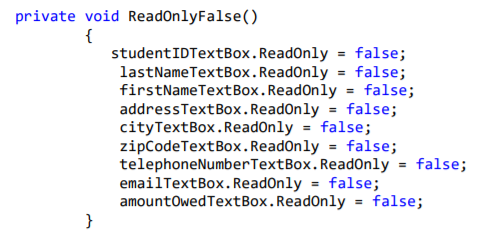
39. Create a method called ReadOnlyFalse and ReadOnlyTrue with no parameters or return type that will set all textboxes ReadOnly property to False or True. Below is the ReadOnlyFalse code. You will have to generate the True code.
40. Code the Add button on the binding navigator so that when the user click on it all ReadOnly property of the textboxes are set to False by calling the ReadOnlyFalse method created above. Also code the Add button so that when the user clicks on it all visible properties of the binding navigator control items are set to False by calling the BindingNavigatorControlFalse method created above. Be sure to disable the Last name combobox (lastNameComboBox.enabled = false).
41. Code the Cancel Button on the binding navigator so that when the user clicks cancel all textboxes ReadOnly property are set to True by calling the ReadonlyTrue method create above. You will also need to call the BindingNavigtorControlTrue method to show the direction items on binding navigator control once again. Be sure to enable the Last name combobox (lastNameComboBox.enabled = true)
42. Test the application
ProductDataGridView Product Code Description JST 2QRY A46C A46V ADC ADV4 CRFC CS15 DB1R JAVP JSP2 MCBL MCCP SQ12 VB15 Unit Price JavaScript (2nd. 54.5 Query (2nd Edition) 54.5 ASP.NET 4.6 w 57.5 ASP.NET 4.6W.. 57.5 ADO NET 4 with... 56.5 ADO net 4 wth.. 56.5 CICS Desk Refre...50 C# 2015 DB2 for COBOL...42 Java Programming 565 Java Servlets an... 57.5 Strutured COBOL 625 CICS for the COB... 54 SQL Server 2012 57.5 Visual Basic 2015 56.5 56.5 ProductDataGridView Product Code Description JST 2QRY A46C A46V ADC ADV4 CRFC CS15 DB1R JAVP JSP2 MCBL MCCP SQ12 VB15 Unit Price JavaScript (2nd. 54.5 Query (2nd Edition) 54.5 ASP.NET 4.6 w 57.5 ASP.NET 4.6W.. 57.5 ADO NET 4 with... 56.5 ADO net 4 wth.. 56.5 CICS Desk Refre...50 C# 2015 DB2 for COBOL...42 Java Programming 565 Java Servlets an... 57.5 Strutured COBOL 625 CICS for the COB... 54 SQL Server 2012 57.5 Visual Basic 2015 56.5 56.5
Step by Step Solution
There are 3 Steps involved in it

Get step-by-step solutions from verified subject matter experts