

Question: Please answer what you can! Python3. Will do thumbs up! This part of the lab is structured a bit differently from what you have been

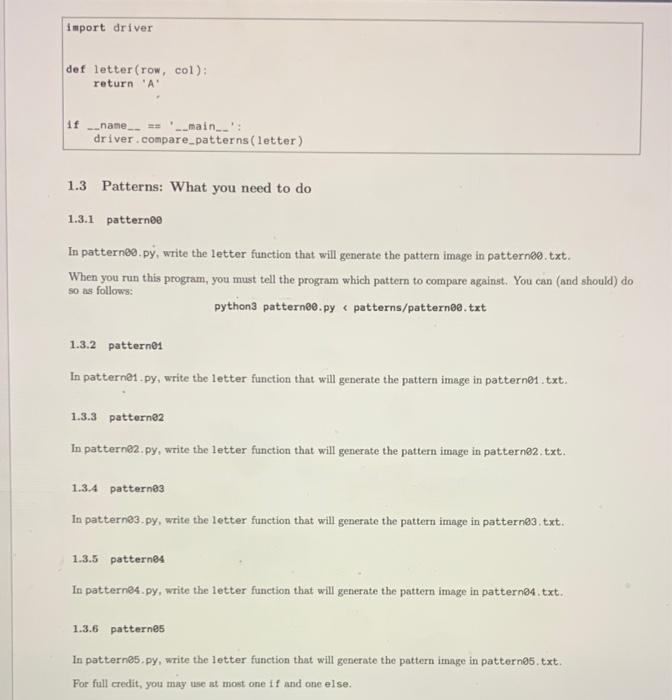
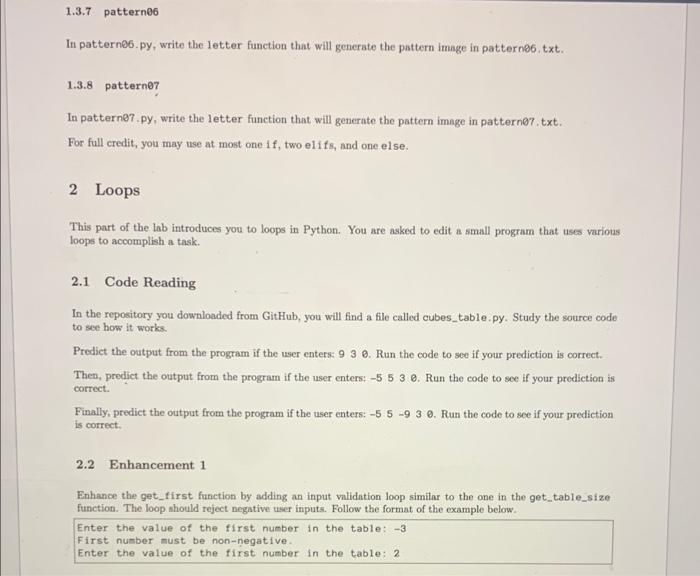
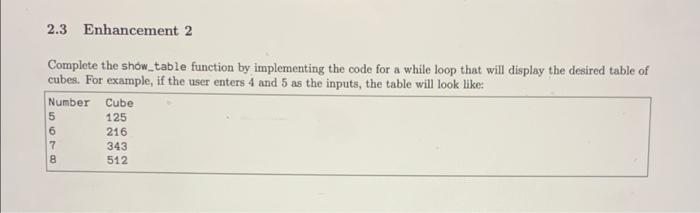
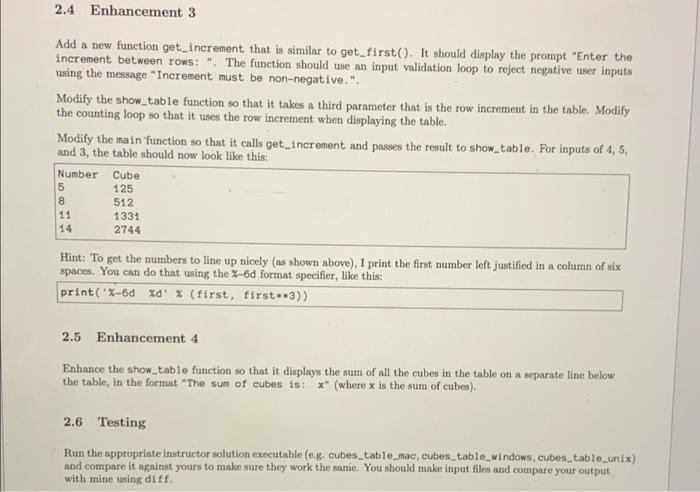
This part of the lab is structured a bit differently from what you have been asked to do in the past. You are given driver.py and a patterns directory with multiple pattern files. You will not (and should not need to modify these files. The driver provides a mostly complete program, but it needs a function to work properly. This is the function that you are to write: The pattern files provide text-based "images". 1.1 letter Each pattern file consists of an "image" made up of letters. For a given pattern, you must write a function that returns the correct letter for the row/column position specified (ns the function's arguments). This function will be called multiple times, once for each position in the pattern image. As an example, patterno.txt is made up entirely of repeated 'A' characters. As such, the letter function could be written as follows: det letter (row, col): return 'A' In general, however, the letter function must determine which letter to return based on the row and column provided. In the patter files, rows and columns are counted beginning at 0. As such the top-left character is at row == 0 and col == . So if the patter consisted of all 'A' characters but with a single 'G' character in the top-left corner, then the letter function might look as follows. def letter (row, col): 11 row = @ and col = 0 return 'G else: return 'A 1.2 Multiple Files and All That You will write multiple versions of this letter function. Since the driver.py file will remain unchanged, you must place your letter function in a separate file. The name for this file is given below (for convenience, it is the name of the pattern) Of course, for a given execution, the driver must be told" which specific letter function to use. You will do this by importing the driver in your file and calling the compare patterns function in the driver. To this function, you must pow your letter function (by specifying the name was you would a variable). The following code completes the "all A" pattern example discussed above. import driver def letter(row, col): return 'A if __name__** __main__': driver.compare_patterns (letter) 1.3 Patterns: What you need to do 1.3.1 pattern In patterns.py, write the letter function that will generate the pattern image in patternco.txt. When you run this program, you must tell the program which pattern to compare against. You can (and should) do so as follows: python3 patternee.py patterns/patterne.txt 1.3.2 patternes In patterne1.py, write the letter function that will generate the pattern image in pattern@1.txt. 1.3.3 patterne In patterne2.py, write the letter function that will generate the pattern image in pattern@2.txt. 1.3.4 patternes In patternes.py, write the letter function that will generate the pattern image in patterns.txt 1.3.5 patterns In patterns.py, write the letter function that will generate the pattern image in patterno.txt. 1.3.6 patternes In patternes.py, write the letter function that will generate the pattern image in pattern@5.txt. For full credit, you may use at most one if and one else. 1.3.7 pattern In patterns.py, write the letter function that will generate the pattern image in pattern86.txt. 1.3.8 pattern In pattern@7.py, write the letter function that will generate the pattern image in pattern@7.txt. For full credit, you may use at most one if, two elifs, and one else, 2 Loops This part of the lab introduces you to loops in Python. You are asked to edit a small program that uses various loops to accomplish a task. 2.1 Code Reading In the repository you downloaded from GitHub, you will find a file called cubes_table.py. Study the source code to see how it works Predict the output from the program if the user enters: 9 3 2. Run the code to see if your prediction is correct. Then, predict the output from the program if the user enters: -5 5 3 2. Run the code to see if your prediction is correct. Finally, predict the output from the program if the user enters: -5 6 -9 3 9. Run the code to see if your prediction is correct 2.2 Enhancement 1 Enhance the get_first function by adding an input validation loop similar to the one in the get_table_size function. The loop should reject negative user inputs. Follow the format of the example below Enter the value of the first number in the table: -3 First number must be non-negative Enter the value of the first number in the table: 2 2.3 Enhancement 2 Complete the show_table function by implementing the code for a while loop that will display the desired table of cubes. For example, if the user enters 4 and 5 as the inputs, the table will look like: Number Cube 5 125 6 216 7 512 343 8 2.4 Enhancement 3 Add a new function get_increment that is similar to get_first(). It should display the prompt "Enter the increment between rows: ". The function should use an input validation loop to reject negative user inputs using the message "Increment must be non-negative.". Modify the show_table function so that it takes a third parameter that is the row increment in the table. Modify the counting loop so that it uses the row increment when displaying the table. Modify the main function so that it calls get_increment and passes the result to show_table. For inputs of 4, 5, and 3, the table should now look like this: Number Cube 125 8 1331 5 512 11 2744 Hint: To get the numbers to line up nicely (as shown above), I print the first number left justified in a column of six spaces. You can do that using the Z-6d format specifier, like this: print("X-6d %d % (first, first--3)) 2.5 Enhancement 4 Enhance the show_table function so that it displays the sun of all the cubes in the table on a separate line below the table, in the format "The sun of cubes is: ** (where x is the sum of cubes). 2.6 Testing Run the appropriate instructor solution executable (0.g. cubes_table_mac, cubes_table_windows, cubes_table_unix) and compare it against yours to make sure they work the same. You should make input files and compare your output with mine using diff
Step by Step Solution
There are 3 Steps involved in it

Get step-by-step solutions from verified subject matter experts