

Question: Project 7-5: Creating a Custom View in Microsoft Windows Event Viewer Microsoft Windows Event Viewer also can be used to create custom logs and collect
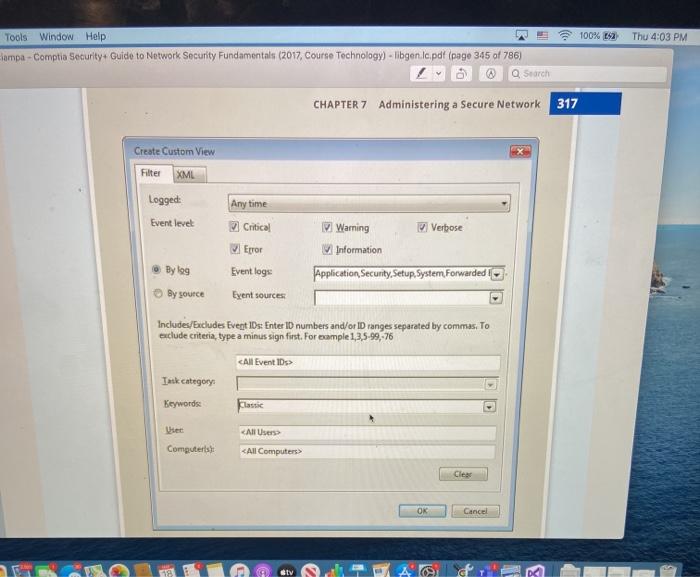

Project 7-5: Creating a Custom View in Microsoft Windows Event Viewer Microsoft Windows Event Viewer also can be used to create custom logs and collect copies of events from different systems. In this project, you use the Event Viewer to create a custom log 1. If necessary, launch Event Viewer by clicking Start and then typing Administrative Tools in the Search programs and files box. Click the Administrative Tools folder and then double-click Event Viewer 2. In the right pane entitled Actions, click Create Custom View. 3. Under Logged click the drop-down arrow next to Any time. Several options appear of times to log the events. Click Custom range and note that you can create a specific period to log these events. Click Cancel and be sure the Logged setting is Any time to capture all events. 4. Under Event level check each box (Critical, Error, Warning Information, Verbose) to capture all levels of events. 5. Under By source, click the radio button if necessary and then click the drop-down arrow next to Event sources Scroll through the list of sources that can be used to Create a log entry 6. For this custom view, instead of selecting specific sources, you will use log entries collected from default logs. Under By log, click the radio button if necessary and then click the drop-down arrow next to Event logs. 7. Click the sign by Windows Logs and Applications and Services Logs any of these logs can be used as input into your custom logs. Click the box next to Windows Logs to select all the available Windows logs, 1. You also can include or exclude specific events. Be sure that all Event ID is selected 9. Next to Keywords Select Classic 10. Next to User be sure that All Users is selected so that any user who logs in to this system will have log entries created 11. Your completed dialog box will look like that shown in Figure 7-11. Click OK. If an Event Viewer dialog box spears, click Yes system will have log entries created. 11. Your completed dialog box will look like that shown in Figure 7-11. Click OK. If an Event Viewer dialog box appears, click Yes 12. In the Save Filter to Custom View dialog box, next to Name, enter All Events. 13. Next to Description, enter All Events. Click OK. 14. In the left pane under Event Viewer (Local), double-click Custom Views if necessary to display the custom view. Display your view by clicking on it. 15. Close Event Viewer and all windows 16. Reboot the system 17. If necessary, launch Event Viewer by clicking Start and then typing Administrative Tools in the Search programs and files box. Click the Administrative Tools folder and then double-click Event Viewer. 100% Sa Thu 4:03 PM Tools Window Help lampa - Comptio Security Guide to Network Security Fundamentals (2017, Course Technology) - libgenlapdf (page 345 of 786) Q Search CHAPTER 7 Administering a Secure Network 317 Create Custom View Filter XML Logged Any time Event level Critical Warning Verbose V Error Information Bylog Event logs Application Security Setup, System Forwarded as By source Event sources: Includes/Excludes Event IDs: Enter ID numbers and/or ID ranges separated by commas. To exclude criteria, type a minus sign first. For example 1,3,5-99,-76
Step by Step Solution
There are 3 Steps involved in it

Get step-by-step solutions from verified subject matter experts