Question: Reviewing System Properties and Exploring Server Manager - Local Server Server SA1 Pre Lab Activities - Rename your virtual machine Server SA1-XX, where XX is
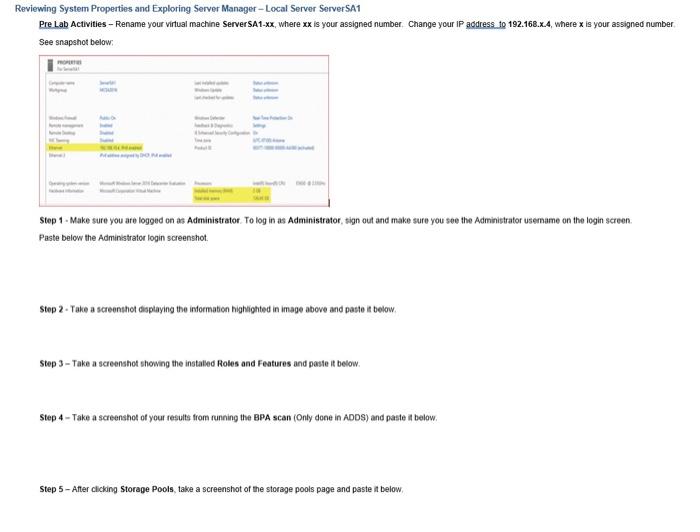
Reviewing System Properties and Exploring Server Manager - Local Server Server SA1 Pre Lab Activities - Rename your virtual machine Server SA1-XX, where XX is your assigned number. Change your IP address to 192.168.2.4, where x is your assigned number See snapshot below: Stop - Make sure you are logged on as Administrator. To log in as Administrator, sign out and make sure you see the Administrator usemame on the login screen Paste below the Administrator login screenshot Step 2 - Take a screenshot displaying the information highlighted in image above and pasto it below, Step 3 - Take a screenshot showing the installed Roles and Features and paste it below. Step 4 - Take a screenshot of your results from running the BPA scan (Only done in ADDS) and paste it below. Step 5 - After clicking Storage Pools, take a screenshot of the storage pools page and paste it below Examining NTFS Permissions and Attributes - Any Folder Server SA1 Step 1 - After clicking the General tab, take a screenshot and paste it below. Step 2 - After clicking Advanced, take a screenshot and paste it below. Step 3 - After clicking Security tab, take a screenshot and paste it below. Step 4 - After clicking Advanced, take a screenshot and paste it below Working with MMCs - Add MMC console ServerSA1 Step 5 - Take a screenshot of the MMC icon on the desktop and paste it below. Step 11 - Before clicking OK to close the Add or Remove Snap-ins Windows Firewall dialog box, take a screenshot and paste it below. Step 13 - Before clicking Cancel, take a screenshot of the Windows Firewall properties screen and paste it below Disk Management (Add Virtual Disk 40GB) - Creating a Volume and Sharing a Folder - Server SA1 Step 1 - Add Virtual Disk. You will have to place Disk 1 online before you begin. After you initialize Disk 1, take a screenshot and paste it below Step 2 - Aher clicking Next, take a screenshot of the Details screen for the new volume and paste it below Step 3 - Before clicking Done, take a screenshot of the folder share and paste it below. Step 4 - Anor clicking Shares take a screenshot (see Figure 1-17) and paste it below Exploring Windows Networking Components - ServerSA1 Step 1 - After clicking the Ethernet link, take a screenshot (see Figure 1-19) and paste it below Step 2 - Betore closing the TCPIPv4 Properties box, take a screenshot and paste it below, Working with PowerShell - Servers 1 Step 1 - Take a screenshot of your PowerShell window and paste it below Step 2 - Your Ethemet interface is likely named Etherneto. Type Get Neladapter to get the name of the Ethernet interface - use that name instead. The correct command should be Get NetAdress. Where InterfaceAlias -eq Etherneto Step 3 -Take a screenshot of your PowerShell window and paste it below. a Reviewing System Properties and Exploring Server Manager - Local Server Server SA1 Pre Lab Activities - Rename your virtual machine Server SA1-XX, where XX is your assigned number. Change your IP address to 192.168.2.4, where x is your assigned number See snapshot below: Stop - Make sure you are logged on as Administrator. To log in as Administrator, sign out and make sure you see the Administrator usemame on the login screen Paste below the Administrator login screenshot Step 2 - Take a screenshot displaying the information highlighted in image above and pasto it below, Step 3 - Take a screenshot showing the installed Roles and Features and paste it below. Step 4 - Take a screenshot of your results from running the BPA scan (Only done in ADDS) and paste it below. Step 5 - After clicking Storage Pools, take a screenshot of the storage pools page and paste it below Examining NTFS Permissions and Attributes - Any Folder Server SA1 Step 1 - After clicking the General tab, take a screenshot and paste it below. Step 2 - After clicking Advanced, take a screenshot and paste it below. Step 3 - After clicking Security tab, take a screenshot and paste it below. Step 4 - After clicking Advanced, take a screenshot and paste it below Working with MMCs - Add MMC console ServerSA1 Step 5 - Take a screenshot of the MMC icon on the desktop and paste it below. Step 11 - Before clicking OK to close the Add or Remove Snap-ins Windows Firewall dialog box, take a screenshot and paste it below. Step 13 - Before clicking Cancel, take a screenshot of the Windows Firewall properties screen and paste it below Disk Management (Add Virtual Disk 40GB) - Creating a Volume and Sharing a Folder - Server SA1 Step 1 - Add Virtual Disk. You will have to place Disk 1 online before you begin. After you initialize Disk 1, take a screenshot and paste it below Step 2 - Aher clicking Next, take a screenshot of the Details screen for the new volume and paste it below Step 3 - Before clicking Done, take a screenshot of the folder share and paste it below. Step 4 - Anor clicking Shares take a screenshot (see Figure 1-17) and paste it below Exploring Windows Networking Components - ServerSA1 Step 1 - After clicking the Ethernet link, take a screenshot (see Figure 1-19) and paste it below Step 2 - Betore closing the TCPIPv4 Properties box, take a screenshot and paste it below, Working with PowerShell - Servers 1 Step 1 - Take a screenshot of your PowerShell window and paste it below Step 2 - Your Ethemet interface is likely named Etherneto. Type Get Neladapter to get the name of the Ethernet interface - use that name instead. The correct command should be Get NetAdress. Where InterfaceAlias -eq Etherneto Step 3 -Take a screenshot of your PowerShell window and paste it below. a