

Question: RSLogix500 need help EM OPERATIONAL LOGIC - (Program Specific Requirements) - continued: NORMAL. OPERATION: [after STARTUP is complete] - When the system initially begins NORMAL
RSLogix500 need help 
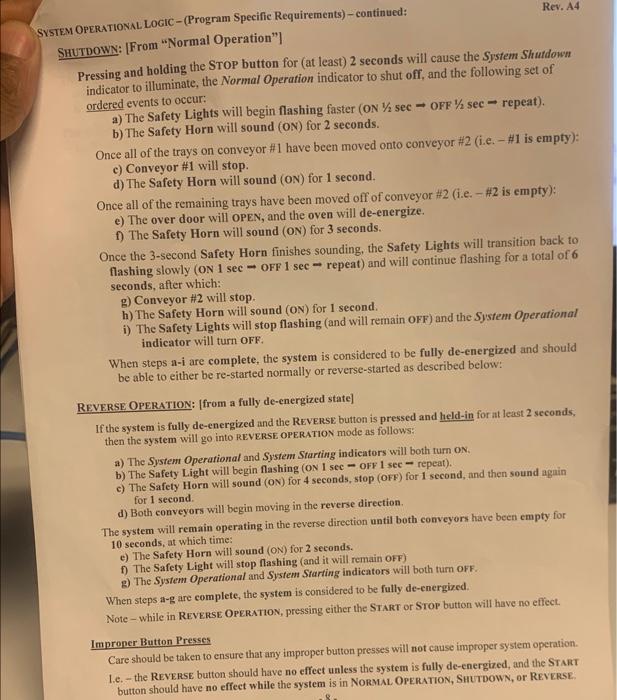
EM OPERATIONAL LOGIC - (Program Specific Requirements) - continued: NORMAL. OPERATION: [after STARTUP is complete] - When the system initially begins NORMAL OPERATION, the Safety Lights will transition back to flashing slowly (ON 1 sec OFF 1 sec repeat) and Conveyor \#1 will start moving. Once conveyor \#1 begins moving, workers may begin placing cookie trays onto conveyor \#1. CONVEYOR \#1 - Normal Operation Optical detector OD-0 is located at the beginning of the conveyor in order to detect (count) the trays entering the conveyor. - Optical detector OD-1 is located just before the end of conveyor #1 in order to determine the type of the next cookie tray that will be passed onto conveyor $2. - Optical detector OD- 2 is located at the end of conveyor \#1 to cue the trays before they are passed onto conveyor \#2. When a tray reaches the end of conveyor #1 and breaks (triggers) OD-2, the status of OD-1 will be used to set the next cookie type (clear - type 0, triggered - type 1) and based on the result, one of the following will happen: A) If conveyor #2 is empty, then the OVEN PRESET will be set to the next Cookie Type and conveyor #1 will wait (if needed) for the OvEN STATUS signal to indicate that the oven has reached correct operating temperature before delivering the tray onto conveyor #2, B) If conveyor \#2 contains trays of the same type as that located at OD-2 and the oven door is closed, then conveyor \#1 will continue moving the tray onto conveyor \#2. But, if the oven door is already open when the tray triggered OD-2, then conveyor \#1 will stop and wait for the oven door to close, after which conveyor \#1 will deliver the tray onto conveyor #2. C) If conveyor #2 contains trays of a different type than that located at the end of conveyor \#1, then conveyor \#1 will stop until conveyor #2 is completely empty, after which the Cookie Type will be set to the new value and conveyor #1 will wait (if needed) for the OVEN STATUS signal to indicate that the over has reached correct operating temperature before delivering the tray onto conveyor H2. CONVEYOR \#2 - Normal Operation Conveyor H2 should operate at a constant speed in the forward direction, without stopping. while a single type of cookie is being transported through the oven. The speed at which conveyor 42 operates is determined by the Cookie Type that is passing through the oven on conveyor #2, and the speed should not change while any cookie trays are still on conveyor #2. Optical detector OD-3 is located near the beginning of the conveyor in order to detect the trays entering the oven. When OD-3 triggers, the oven door will OPEN and it will remain open until 1 second after OD-3 clears, at which time the oven door will CLOSE again. Note that a set of plastic flaps hang down at the oven's exit, allowing the trays to automatically pass through the exit while minimizing any heat loss from the oven at that end. Optical detector OD-4 is located at the end of the conveyor #2 in order to deteet (count) the trays exiting the conveyor. M OPERATIONAL LOGIC - (Program Specific Requirements) - continued: Rev. A4 HUTDOWN: [From "Normal Operation"] Pressing and holding the STOP button for (at least) 2 seconds will cause the System Shutdown indicator to illuminate, the Normal Operation indicator to shut off, and the following set of ordered events to occur: a) The Safety Lights will begin flashing faster (ON 1/2sec OFF 1/2sec repeat). b) The Safety Horn will sound (ON) for 2 seconds. Once all of the trays on conveyor \#1 have been moved onto conveyor #2 (i.e. #1 is empty): c) Conveyor \#1 will stop. d) The Safety Horn will sound (ON) for 1 second. Once all of the remaining trays have been moved off of conveyor #2 (i.e. #2 is cmpty): e) The over door will OPEN, and the oven will de-energize. f) The Safety Horn will sound (ON) for 3 seconds. Once the 3-second Safety Horn finishes sounding, the Safety Lights will transition back to flashing slowly (ON 1sec OFF 1sec repeat) and will continue flashing for a total of 6 seconds, after which: g) Conveyor \$2 will stop. h) The Safety Horn will sound (ON) for 1 second. i) The Safety Lights will stop flashing (and will remain OFF) and the Sysfem Operational indicator will turn OFF. When steps a-i are complete, the system is considered to be fully de-energized and should be able to either be re-started normally or reverse-started as described below: REVERSE OPERATION: [from a fully de-energized state] If the system is fully de-energized and the REVERSE button is pressed and held-in for at least 2 seconds, then the system will go into REVERSE OPERATION mode as follows: a) The System Operational and System Starting indieators will both turn oN. b) The Safety Light will begin flashing ( ON1 sec - orF 1 sec - repeat). c) The Safety Horn will sound (ov) for 4 seconds, stop (oFp) for 1 second, and then sound again for 1 second. d) Both conveyors will begin moving in the reverse direction. The system will remain operating in the reverse direction until both conveyors have been empty for 10 seconds, at which time: e) The Safety Horn will sound ( ON ) for 2 seconds. f) The Safety Light will stop flashing (and it will remain off) g) The System Operational and System Starting indicators will both turn OFF. When steps a-g are complete, the system is considered to be fully de-energized. Note - while in REvERSE OPERATION, pressing either the Start or Stop button will have no effect. Improner Button Presses Care should be taken to ensure that any improper button presses will not cause improper system operation. 1.e. - the REverse button should have no effect unless the system is fully de-energized, and the START button should have no effect while the system is in NorMal OPERATION, SHUTDOWN, or REVERE Step by Step Solution
There are 3 Steps involved in it
1 Expert Approved Answer
Step: 1 Unlock

Question Has Been Solved by an Expert!
Get step-by-step solutions from verified subject matter experts
Step: 2 Unlock
Step: 3 Unlock