

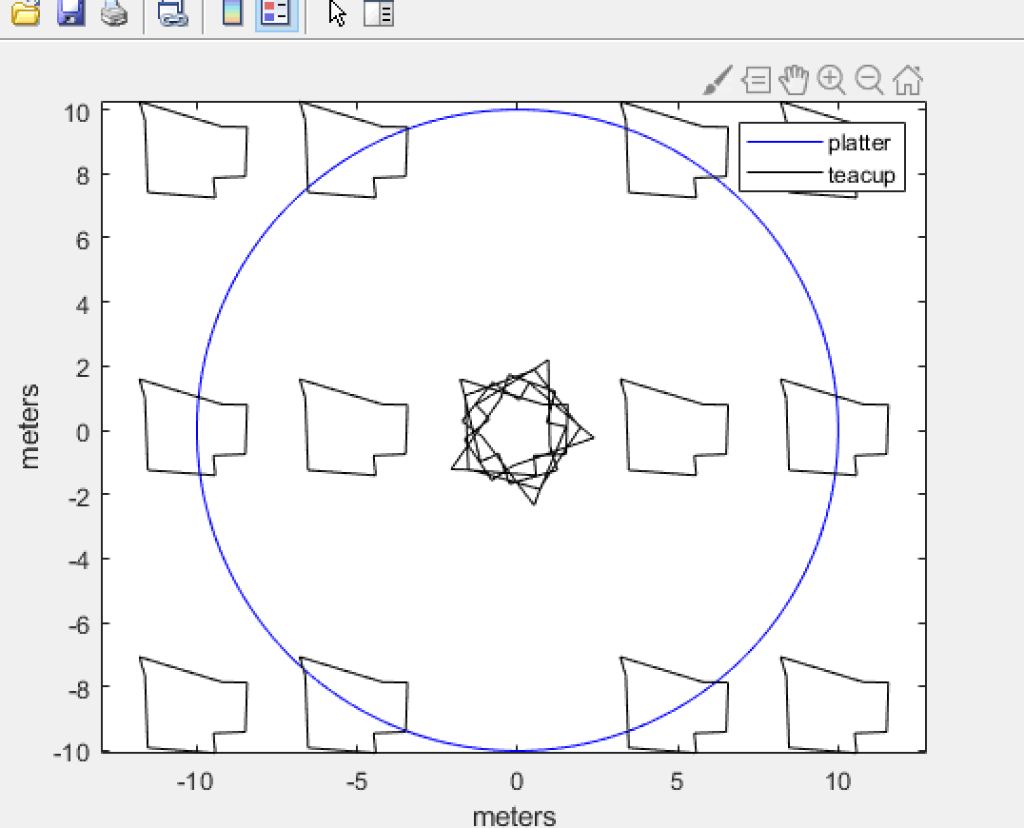
Question: The Matlab work I do not know how to move the 5 teacups (like the star) around the circle like the self - check This
The Matlab work
I do not know how to move the 5 teacups (like the star) around the circle like the self - check
This is my graph
clc
clear
close all
% Writes out points to directory
%%%%%%%%%%%%%%%%%%%%%%
% Read them back in again - put this in the top of your script
xsys = dlmread('TeacupPts.txt');
% Get x and y points back out
xs = xsys(1,:);
ys = xsys(2,:);
% Plot the points
%S2
% Get x and y points back out
xs = xsys(1,:);
ys = xsys(2,:);
% Plot the points
% The circle r=10
r=10;
O = linspace(0,2*pi,200);
x = r*cos(O);
y = r*sin(O);
plot(x,y,'b');%circle
hold on
xlabel('meters')
ylabel('meters')
%Rotation
xs = xsys(1,:);
ys = xsys(2,:);
for o=[72 144 216 288 360]; %degree rotate
hold on
xs1 = xs*cosd(o) - ys*sind(o);
ys1 = xs*sind(o) + ys*cosd(o);
plot(xs1,ys1,'-k')
end
%Translation
for dx=[-10 -5 -5 5 5 10]
for dy=[0 8.66 -8.66 8.66 -8.66 0];
xs2 = xs1 + dx;
ys2 = ys1 + dy;
plot(xs2,ys2, '-k'); %teacup
hold on
axis equal
legend('platter','teacup')
end
end
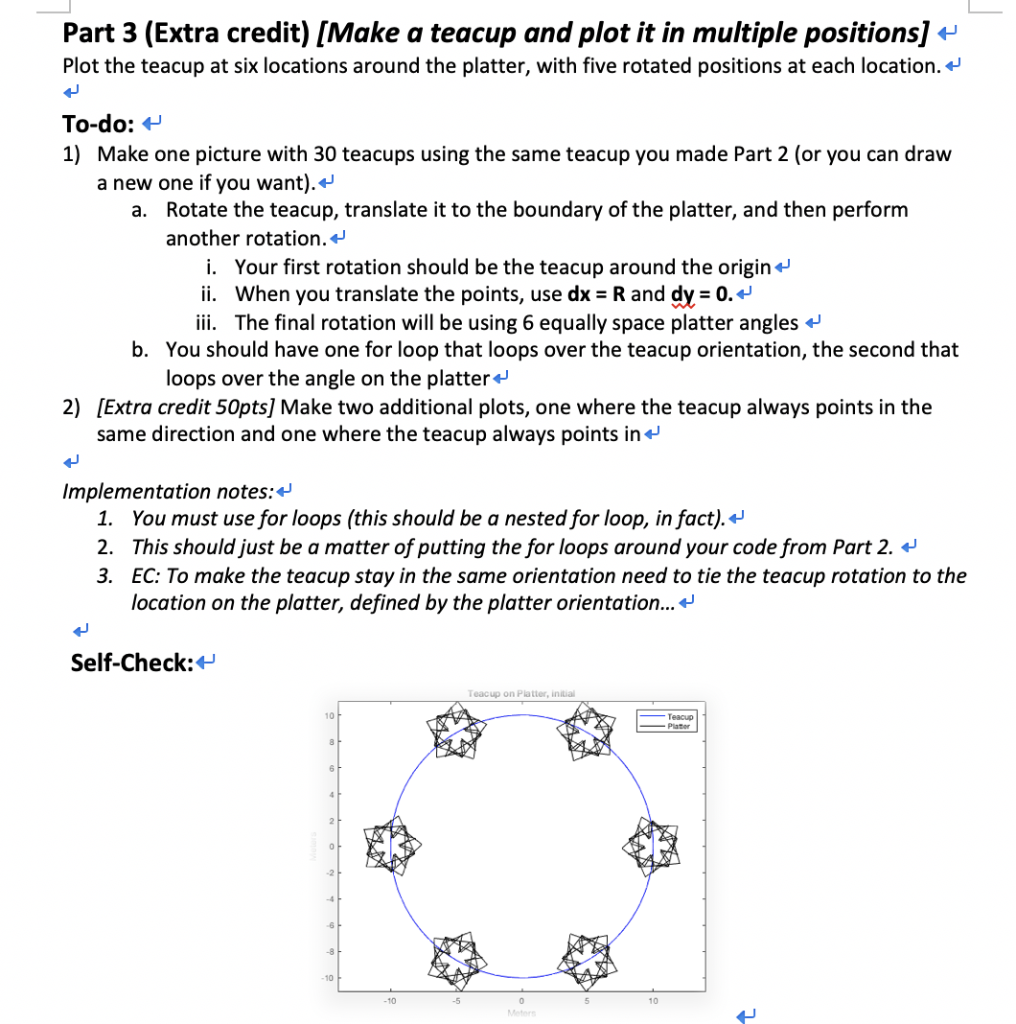
10 platter teacup 6 4 2 -6 -8 -10 -10 0 5 10 meters Part 3 (Extra credit) [Make a teacup and plot it in multiple positions] + Plot the teacup at six locations around the platter, with five rotated positions at each location.* To-do: H 1) Make one picture with 30 teacups using the same teacup you made Part 2 (or you can draw a new one if you want).+ a. Rotate the teacup, translate it to the boundary of the platter, and then perform another rotation. i. Your first rotation should be the teacup around the origin+ ii. When you translate the points, use dx - R and dv-0. iii. The final rotation will be using 6 equally space platter angles b. You should have one for loop that loops over the teacup orientation, the second that loops over the angle on the platter+ 2) [Extra credit 50pts] Make two additional plots, one where the teacup always points in the same direction and one where the teacup always points in Implementation notes:+ 1. You must use for loops (this should be a nested for loop, in fact).+' 2. This should just be a matter of putting the for loops around your code from Part 2. -' 3. EC: To make the teacup stay in the same orientation need to tie the teacup rotation to the location on the platter, defined by the platter orientation... + Self-Check: Teacup on Platter, initial 10 Teacup Plater .2 -8 10 10 -5 10 10 platter teacup 6 4 2 -6 -8 -10 -10 0 5 10 meters Part 3 (Extra credit) [Make a teacup and plot it in multiple positions] + Plot the teacup at six locations around the platter, with five rotated positions at each location.* To-do: H 1) Make one picture with 30 teacups using the same teacup you made Part 2 (or you can draw a new one if you want).+ a. Rotate the teacup, translate it to the boundary of the platter, and then perform another rotation. i. Your first rotation should be the teacup around the origin+ ii. When you translate the points, use dx - R and dv-0. iii. The final rotation will be using 6 equally space platter angles b. You should have one for loop that loops over the teacup orientation, the second that loops over the angle on the platter+ 2) [Extra credit 50pts] Make two additional plots, one where the teacup always points in the same direction and one where the teacup always points in Implementation notes:+ 1. You must use for loops (this should be a nested for loop, in fact).+' 2. This should just be a matter of putting the for loops around your code from Part 2. -' 3. EC: To make the teacup stay in the same orientation need to tie the teacup rotation to the location on the platter, defined by the platter orientation... + Self-Check: Teacup on Platter, initial 10 Teacup Plater .2 -8 10 10 -5 10
Step by Step Solution
There are 3 Steps involved in it

Get step-by-step solutions from verified subject matter experts