

Question: threadexample.py from threading import Thread import time import sys import fileinput # processRequest is the thread code # - pass the connection object here def
threadexample.py
from threading import Thread
import time
import sys
import fileinput
# processRequest is the thread code
# - pass the connection object here
def processRequest(arg1, arg2):
# this is just sample code
# - replace with web server code that retrieves file and sends it back
# - close connection after done sending back retrieved file
for i in range(5):
print arg1, arg2
time.sleep(3)
# main execution follows:
#
# write TCP server set up code here
#
threadcnt = 0
while True:
#
# write code to accept socket here
#
# sample code just reads a line and echoes 5 times in thread
line = raw_input('Input: ')
threadcnt += 1
# this is how a thread is created and started
t = Thread(target=processRequest, args=(threadcnt, line))
t.start()
Objective: maintaining multiple sockets
Using threading, first create a main thread in which your modified server listens for clients at a fixed port. When it receives a TCP connection request from a client, it will set up the TCP connection through another port and services the client request in a separate thread. There will be a separate TCP connection in a separate thread for each request/response pair.
Execution Information: At the top of your source file, add a comment describing enough information so that I can replicate how you executed your program, e.g., "I used Python 3.7.1 on my Mac to run my program.", "I used GCC 4.6.3 on loki to compile my program with the following parameters: gcc -Wall -o ...", "I used Java 11.0.2 on the Windows command line to compile and execute my program." "I used Eclipse 4.10 with Java 10.0.1 on my Windows PC to build and execute my program.", etc.
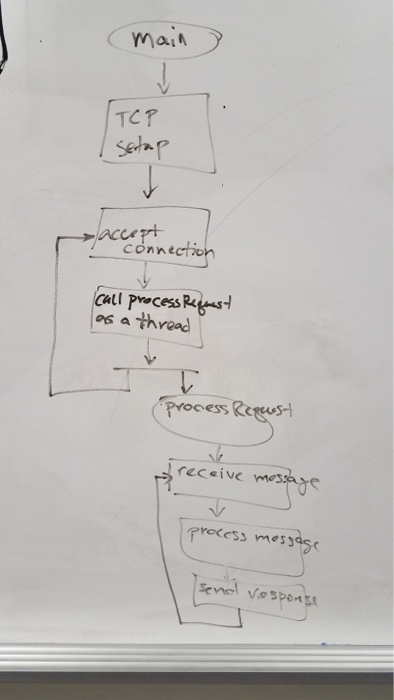
auu TCP Conn cTo catl precess Res os a thread Process R receive m eave
Step by Step Solution
There are 3 Steps involved in it
1 Expert Approved Answer
Step: 1 Unlock

Question Has Been Solved by an Expert!
Get step-by-step solutions from verified subject matter experts
Step: 2 Unlock
Step: 3 Unlock