Question: Android Studio: Instructions: Create an application containing 2 activities along with a custom adapter. Your application will allow a user to select an item from
Android Studio:
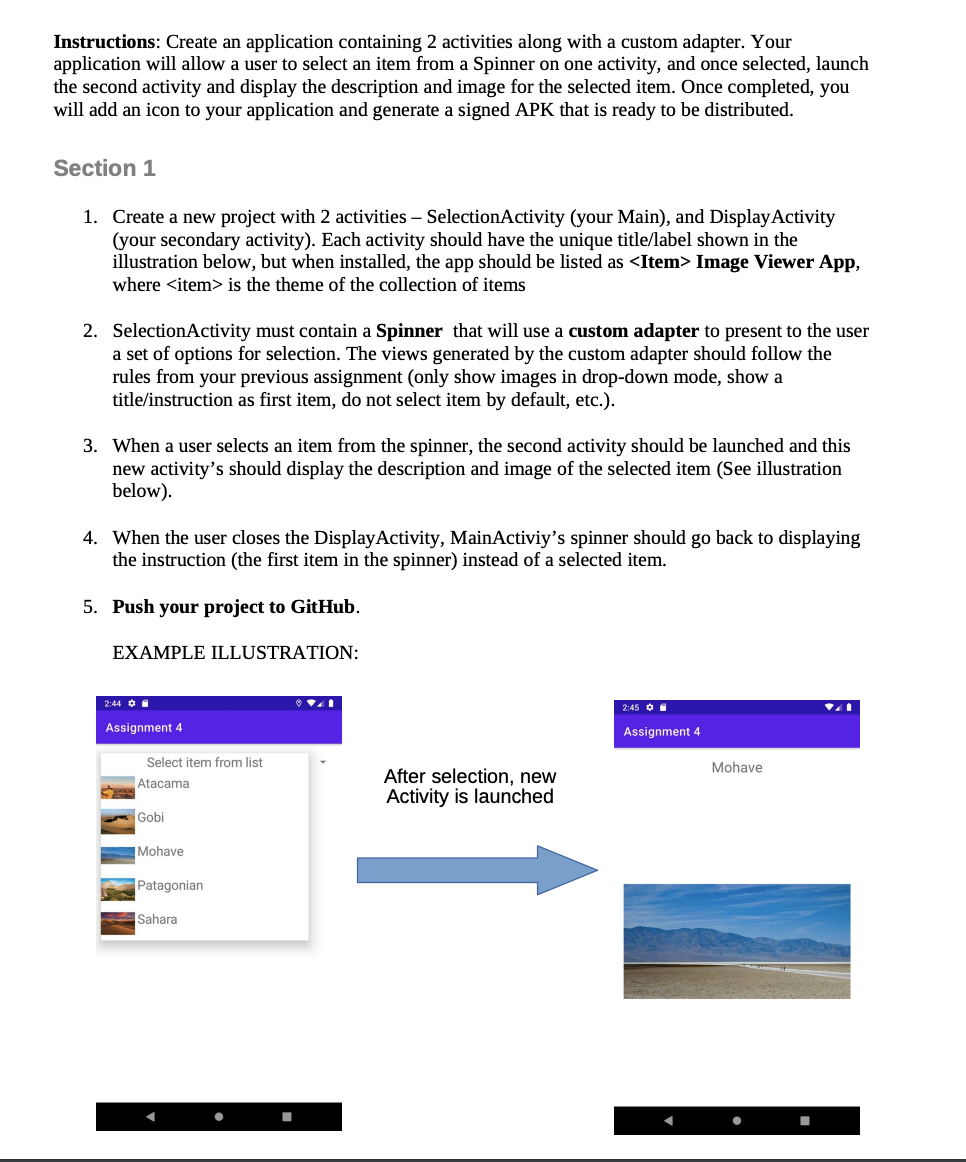
Instructions: Create an application containing 2 activities along with a custom adapter. Your application will allow a user to select an item from a Spinner on one activity, and once selected, launch the second activity and display the description and image for the selected item. Once completed, you will add an icon to your application and generate a signed APK that is ready to be distributed. Section 1 1. Create a new project with 2 activities - Selection Activity (your Main), and Display Activity (your secondary activity). Each activity should have the unique title/label shown in the illustration below, but when installed, the app should be listed as - Image Viewer App, where
- is the theme of the collection of items 2. Selection Activity must contain a Spinner that will use a custom adapter to present to the user a set of options for selection. The views generated by the custom adapter should follow the rules from your previous assignment (only show images in drop-down mode, show a title/instruction as first item, do not select item by default, etc.). 3. When a user selects an item from the spinner, the second activity should be launched and this new activity's should display the description and image of the selected item (See illustration below). 4. When the user closes the Display Activity, MainActiviy's spinner should go back to displaying the instruction (the first item in the spinner) instead of a selected item. 5. Push your project to GitHub. EXAMPLE ILLUSTRATION: 2:44 O. Assignment 4 Assignment 4 Select item from list Atacama Mohave After selection, new Activity is launched Gobi Mohave Patagonian Sahara Section 2 1. First, you'll need to find, borrow, or create an icon for the application you just built. There are many rules when it comes to designing icons (you can read about them here: https://www.google.com/design/spec/style/icons.html) however we are only concerned with having a basic icon. For simplicity we will use Android's Asset Studio as the final step to create our app icon. If you would like to create an icon from scratch you have many options: 1. Free vector tools such as GIMP (http://www.gimp.org/) or proprietary tools like Adobe Illustrator 2. Online tools such as Method Draw (http://editor.method.ac/) 3. Android Studio's very basic icon creator Asset Studio: right-click on the drawable or mipmap folder and select New - Image Asset Once you've created or downloaded the file you would like to use for your icon, use Android's Asset Studio to create the final product. Right-click on the drawable or mipmap folder and select New - Image Asset, then select your source image for Image File. Play around with the settings until you have the icon looking the way you want it. 2. Once you have created an icon for your app, it's time to create the APK 1. Click on Build and select Generate Signed Bundle/APK 2. On the presented dialog, select APK and click Next. 3. Click Create new... and fill in the requested information. You can (and should) use different passwords for the key store and the key. You will be asked for both each time you use the key to sign an application. Under Certificate, you only need to enter a single identifying item, such as your name. For more information, check the developer guide. 4. Once the key is created, click Next 5. Under Build Variants, select release, check V2 (Full APK Signature) under Signature Versions and click on Finish 6. Once completed, you'll find your finished Application Package in /app/release/app-release.apk 3. Upload your generated APK file (It will be called app-release.apk), along with your project GitHub link to Canvas. Instructions: Create an application containing 2 activities along with a custom adapter. Your application will allow a user to select an item from a Spinner on one activity, and once selected, launch the second activity and display the description and image for the selected item. Once completed, you will add an icon to your application and generate a signed APK that is ready to be distributed. Section 1 1. Create a new project with 2 activities - Selection Activity (your Main), and Display Activity (your secondary activity). Each activity should have the unique title/label shown in the illustration below, but when installed, the app should be listed as
- Image Viewer App, where
- is the theme of the collection of items 2. Selection Activity must contain a Spinner that will use a custom adapter to present to the user a set of options for selection. The views generated by the custom adapter should follow the rules from your previous assignment (only show images in drop-down mode, show a title/instruction as first item, do not select item by default, etc.). 3. When a user selects an item from the spinner, the second activity should be launched and this new activity's should display the description and image of the selected item (See illustration below). 4. When the user closes the Display Activity, MainActiviy's spinner should go back to displaying the instruction (the first item in the spinner) instead of a selected item. 5. Push your project to GitHub. EXAMPLE ILLUSTRATION: 2:44 O. Assignment 4 Assignment 4 Select item from list Atacama Mohave After selection, new Activity is launched Gobi Mohave Patagonian Sahara Section 2 1. First, you'll need to find, borrow, or create an icon for the application you just built. There are many rules when it comes to designing icons (you can read about them here: https://www.google.com/design/spec/style/icons.html) however we are only concerned with having a basic icon. For simplicity we will use Android's Asset Studio as the final step to create our app icon. If you would like to create an icon from scratch you have many options: 1. Free vector tools such as GIMP (http://www.gimp.org/) or proprietary tools like Adobe Illustrator 2. Online tools such as Method Draw (http://editor.method.ac/) 3. Android Studio's very basic icon creator Asset Studio: right-click on the drawable or mipmap folder and select New - Image Asset Once you've created or downloaded the file you would like to use for your icon, use Android's Asset Studio to create the final product. Right-click on the drawable or mipmap folder and select New - Image Asset, then select your source image for Image File. Play around with the settings until you have the icon looking the way you want it. 2. Once you have created an icon for your app, it's time to create the APK 1. Click on Build and select Generate Signed Bundle/APK 2. On the presented dialog, select APK and click Next. 3. Click Create new... and fill in the requested information. You can (and should) use different passwords for the key store and the key. You will be asked for both each time you use the key to sign an application. Under Certificate, you only need to enter a single identifying item, such as your name. For more information, check the developer guide. 4. Once the key is created, click Next 5. Under Build Variants, select release, check V2 (Full APK Signature) under Signature Versions and click on Finish 6. Once completed, you'll find your finished Application Package in /app/release/app-release.apk 3. Upload your generated APK file (It will be called app-release.apk), along with your project GitHub link to Canvas


