

Question: Donna wants you to create several forms, including a custom form that displays and updates companies and the products they offer. Complete the following steps:
Donna wants you to create several forms, including a custom form that displays and updates companies and the products they offer. Complete the following steps:
1. Open the Supplier database you worked with in the previous module.
2. In the tblProduct table, remove the lookup feature from the SupplierID field, and then resize the Supplier ID column in the datasheet to its best fit. Save and close the table.
3. Edit the relationship between the primary tblSupplier and related tblProduct tables to enforce referential integrity and to cascade-update related fields. Create the relationship report, save the report as rptRelationshipsForSupplier, and then close it.
4. Use the Documenter to document the qryCompanyContacts query. Select all query options; use the Names, Data Types, and Sizes option for fields; and use the Names and Fields option for indexes. Export the report produced by the Documenter as a PDF file with the filename NP_AC_6_SupplierDocumenter.pdf and without saving the export steps, and then close the report.
5. Use the Datasheet tool to create a form based on the tblProduct table, save the form as frmProductDatasheet, and then close it.
6. Use the Multiple Items tool to create a form based on the qryDuplicateProductTypes query, save the form as frmProductTypeMultipleItems, and then close it.
7. Use the Split Form tool to create a split form based on the tblProduct table, and then make the following changes to the form in Layout view:
a. Remove the two Units controls from the stacked layout and then reduce the width of the Units field value box by about half. Move the controls to the bottom left, and then anchor the two Units controls to the bottom left.
b. Remove the four control pairs in the right column from the stacked layout, and then anchor the group to the bottom right. You may see a dotted border outlining the location of the previously removed controls. This may be automatically selected as well.
c. Remove the ProductName control pair from the stacked layout, move them to the top right, and then anchor them to the top right.
d. Reduce the widths of the ProductID and SupplierID field value boxes to a reasonable size.
e. Change the title to Product, save the modified form as frmProductSplitForm, and then close it.
8. Use Figure 651 and the following steps to create a custom form named frmSuppliersWithProducts based on the tblSupplier and tblProduct tables.
Figure 651 Supplier database custom form design
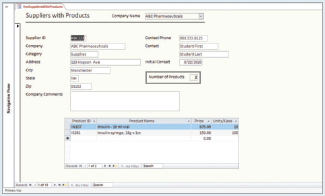
a. Place the 12 fields from the tblSupplier table shown in Figure 651 at the top of the Detail section. Delete the Contact Last Name label, and change the caption for the Contact First Name label to Contact.
b. Move the fields into two columns in the Detail section, as shown in Figure 651, resizing and aligning controls, as necessary, and increasing the width of the form.
c. Add the title in the Form Header section.
d. Make sure the forms Record Source property is set to tblSupplier, and then add a combo box in the Form Header section to find Company field values. In the Combo Box Wizard steps, select the Company and SupplierID fields, and hide the key column. Resize and move the control. Ensure the label displays the text Company Name. Make sure the size of the Company Name field value box can accommodate the largest company name.
e. Add a subform based on the tblProduct table, include only the fields shown in Figure 651, link with SupplierID, name the subform frmPartialProductSubform, delete the subform label, resize the columns in the subform to their best fit, and resize and position the subform.
f. Create a calculated control in the subform that totals the number of products displayed, and then add a control to the main form that displays this calculated value. Set the main form controls Tab Stop property to No, and specify the text Calculated number of products for the ControlTip Text property.
g. Add a line in the Form Header section, and add a rectangle around the calculated control and its label, setting the line thickness of both controls to 3 pt. Set the rectangles color the same as the lines color.
h. In the main form, use the Green 1 fill color (row 2, column 7 in the Standard Colors palette) for all form sections, and use the Black font color (row 1, column 2 in the Standard Colors palette) for all the label text, the calculated control, Company Name combo box, and the Title.
i. Make sure the tab order is top-to-bottom, left-to-right for the main form text boxes.
9. Make a backup copy of the database, compact and repair the database, and then close the database.
New Perspectives Microsoft Office 365 & Access 2019 Comprehensive
Step by Step Solution
There are 3 Steps involved in it

Get step-by-step solutions from verified subject matter experts