

Question: Kindly help me to CREATE THE GUI code in java application. Kindly keep the codes simple and basic. thanks in advance Part 2: Implement CyberPetSwing
Kindly help me to CREATE THE GUI code in java application. Kindly keep the codes simple and basic. thanks in advance 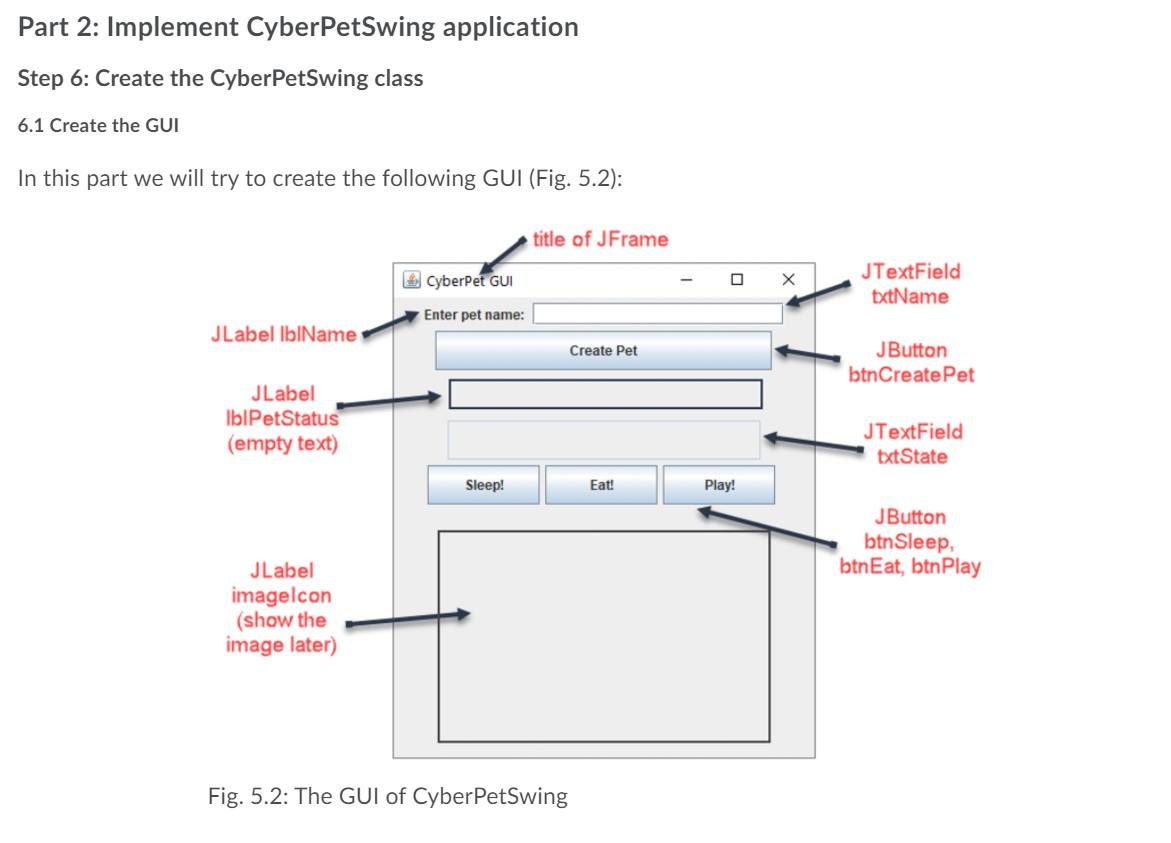
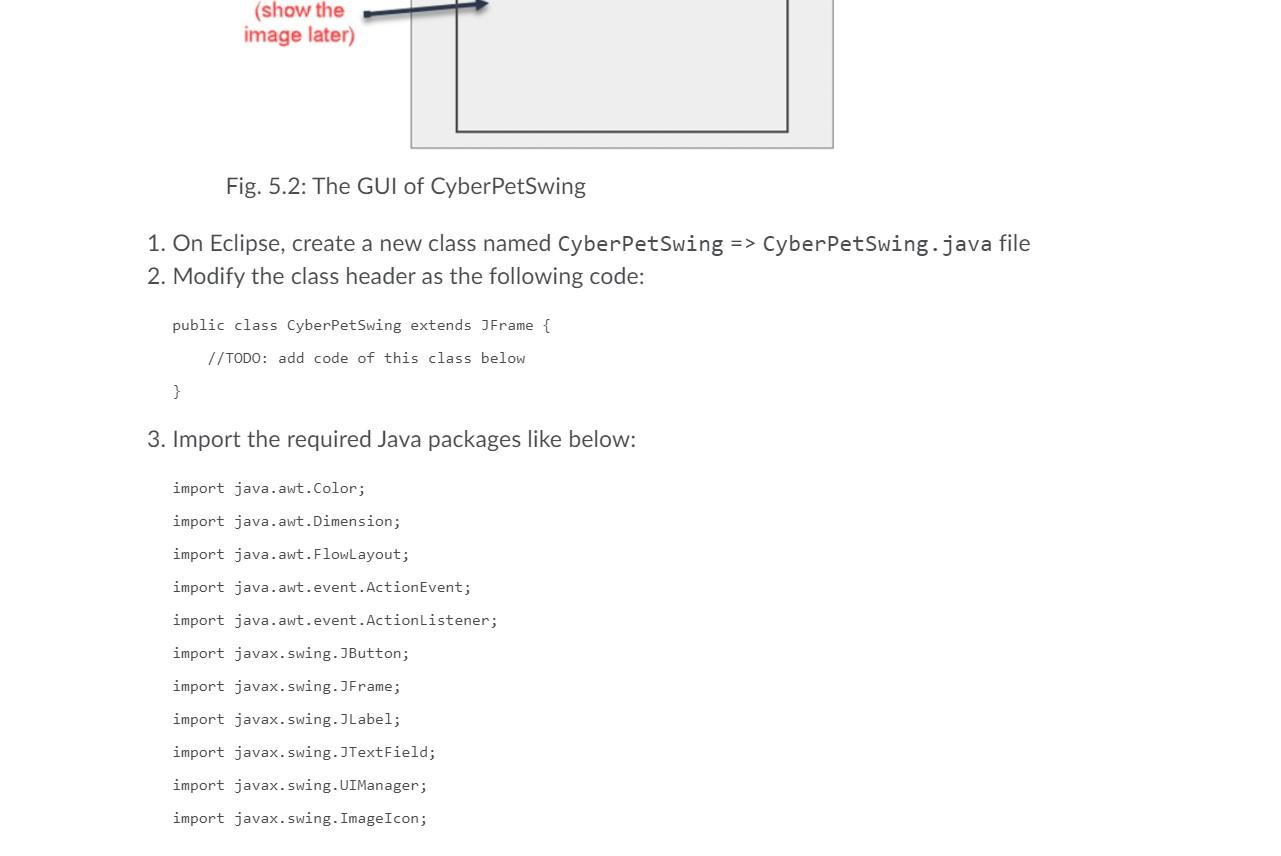
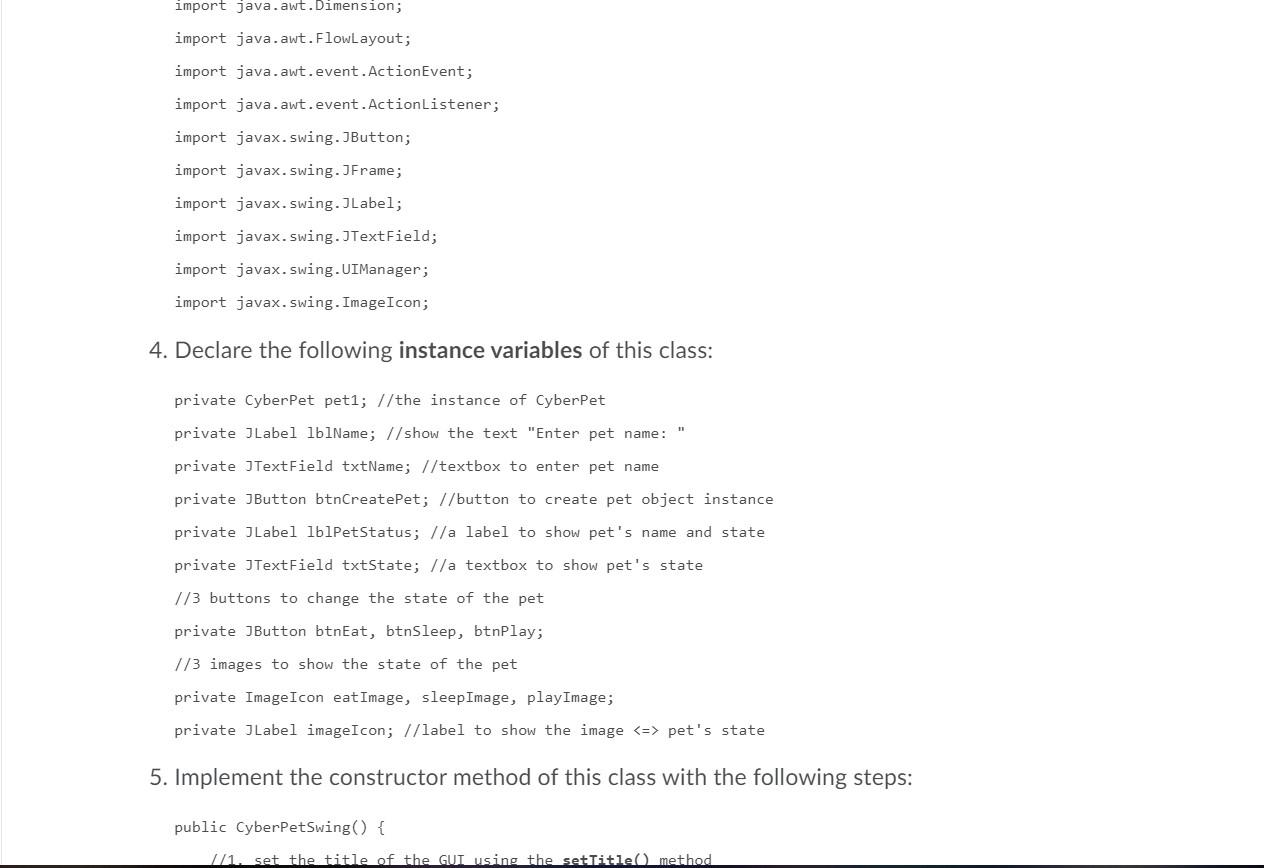
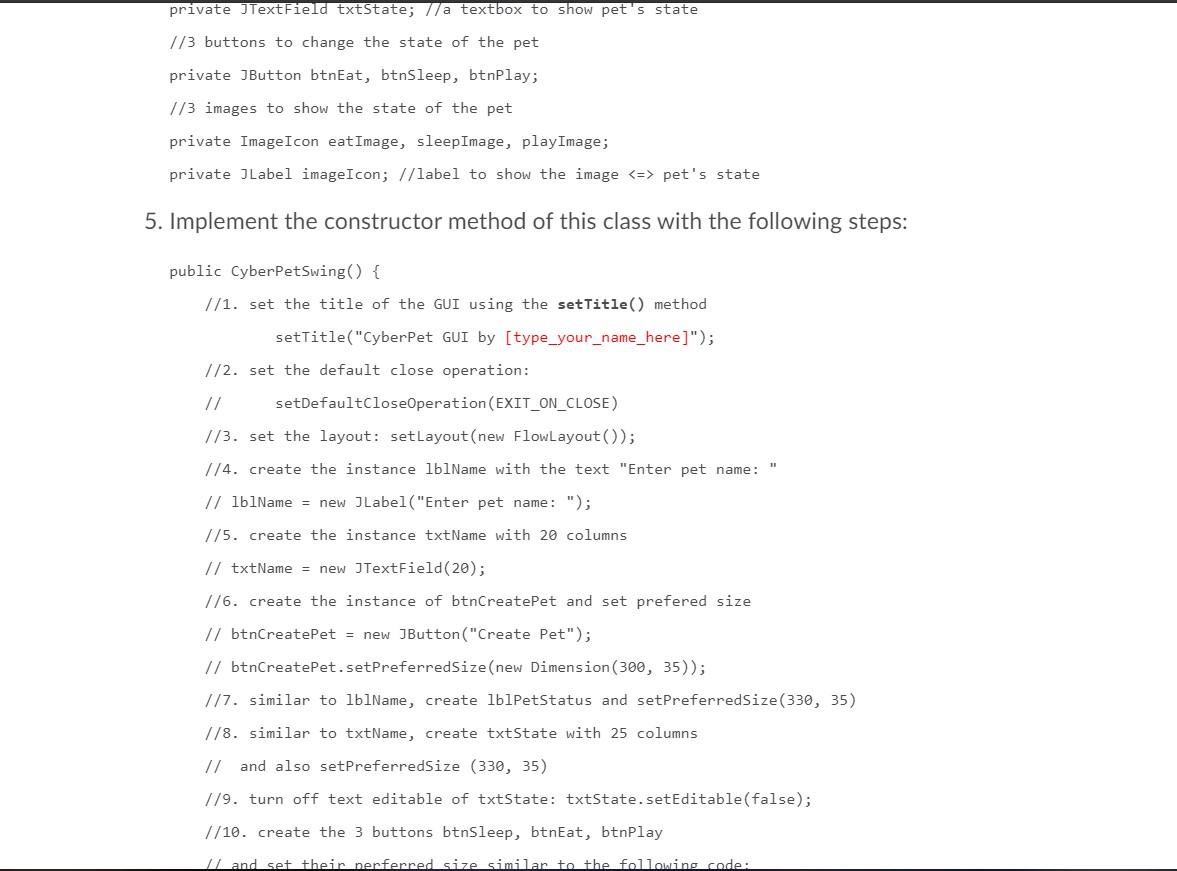
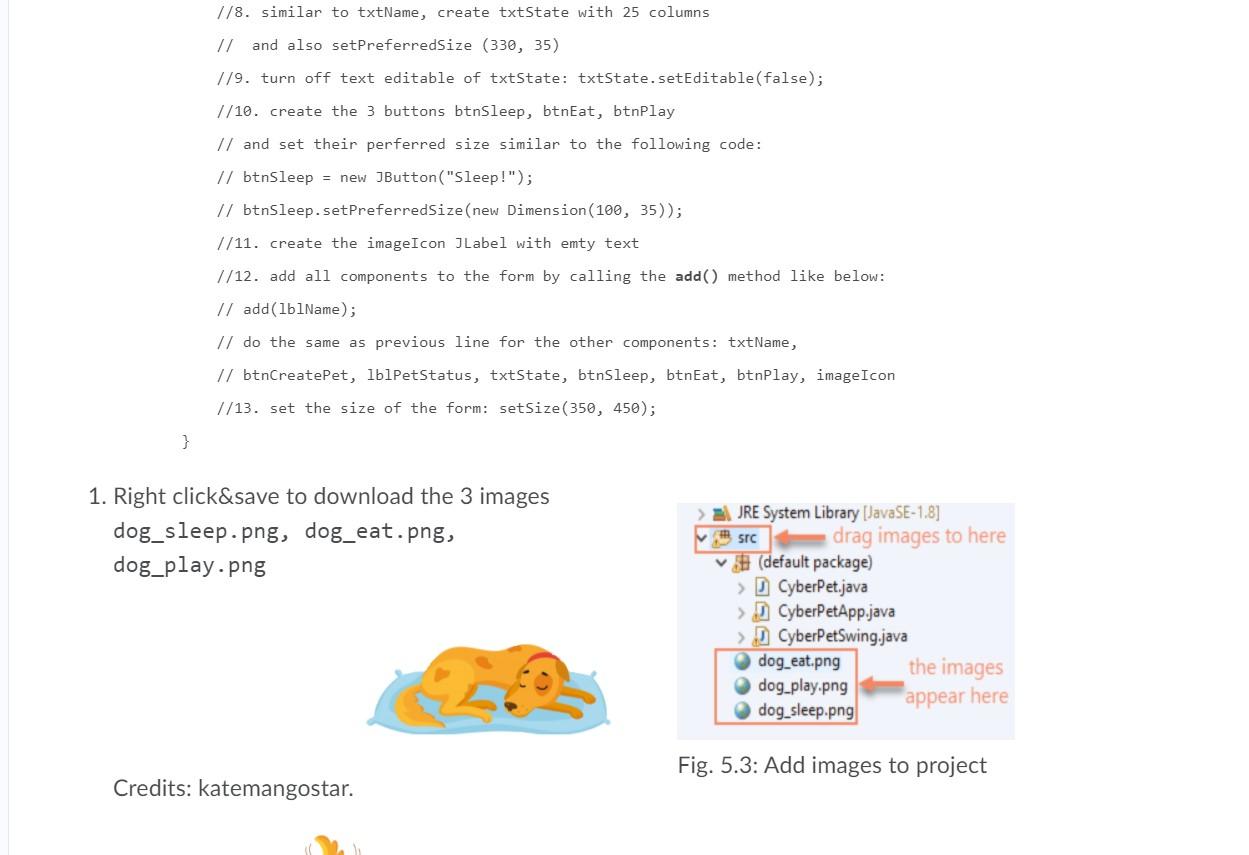
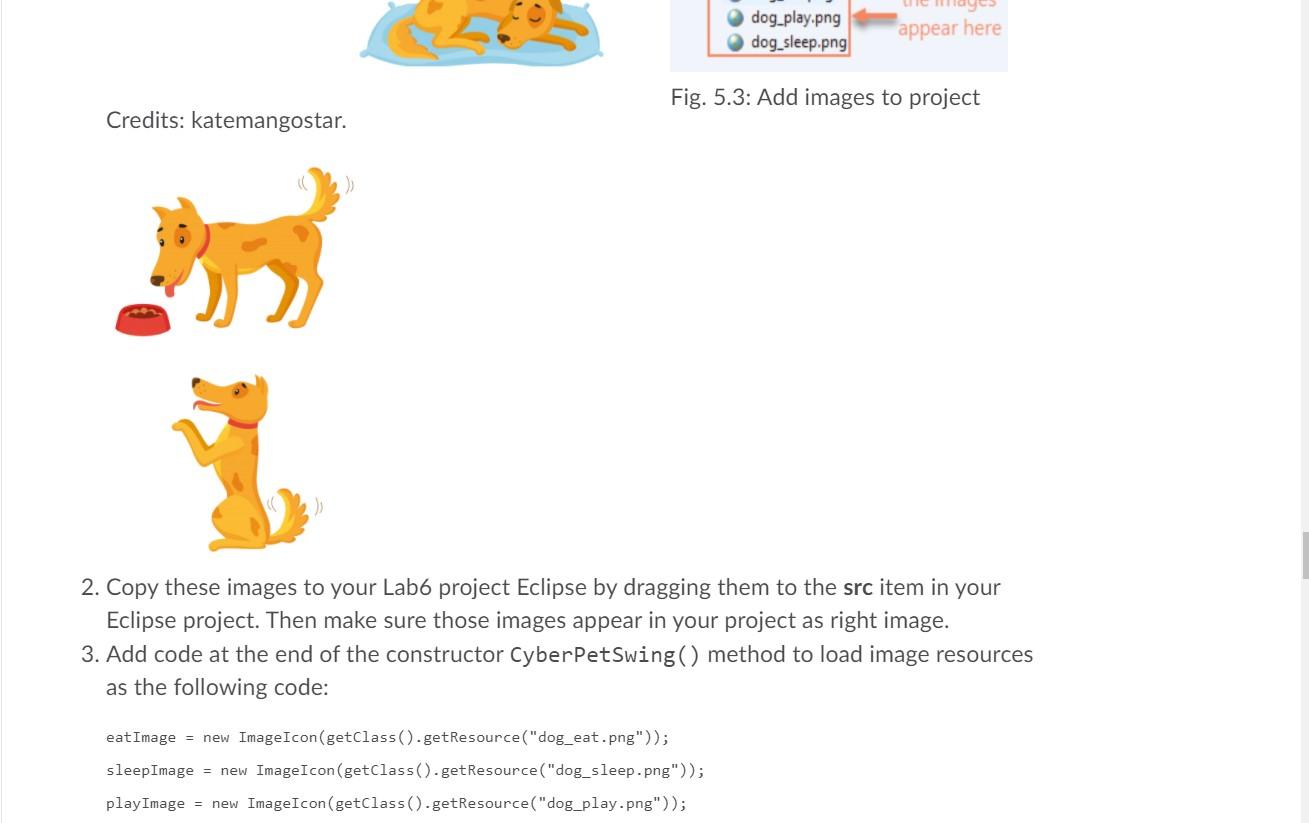
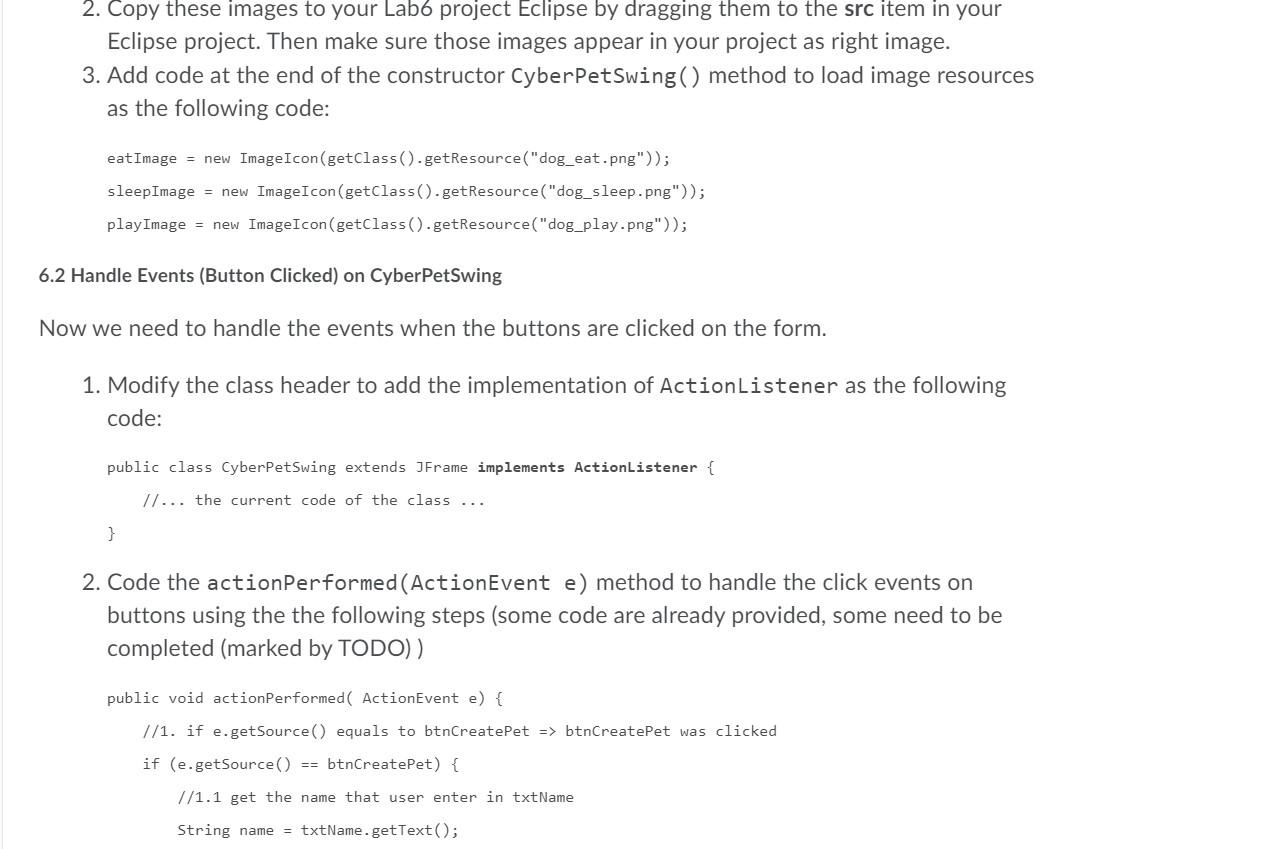
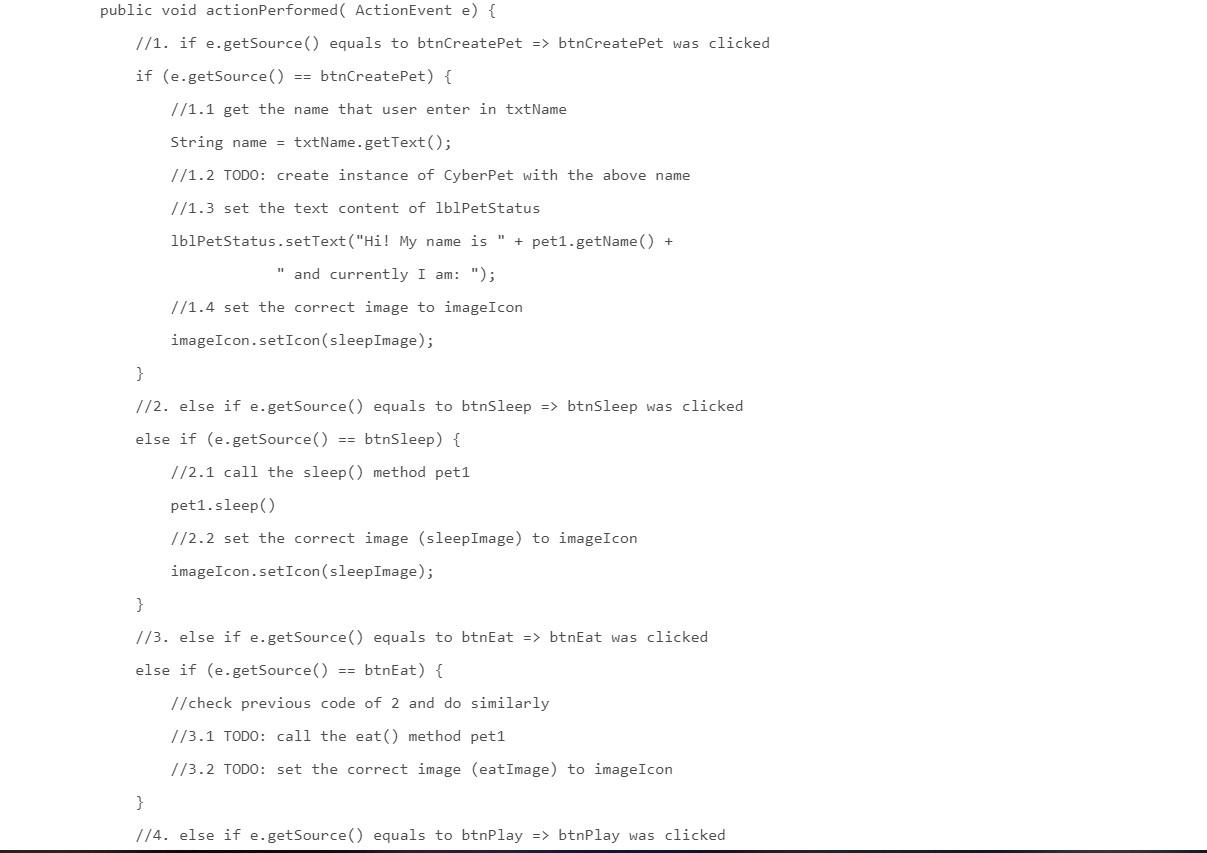

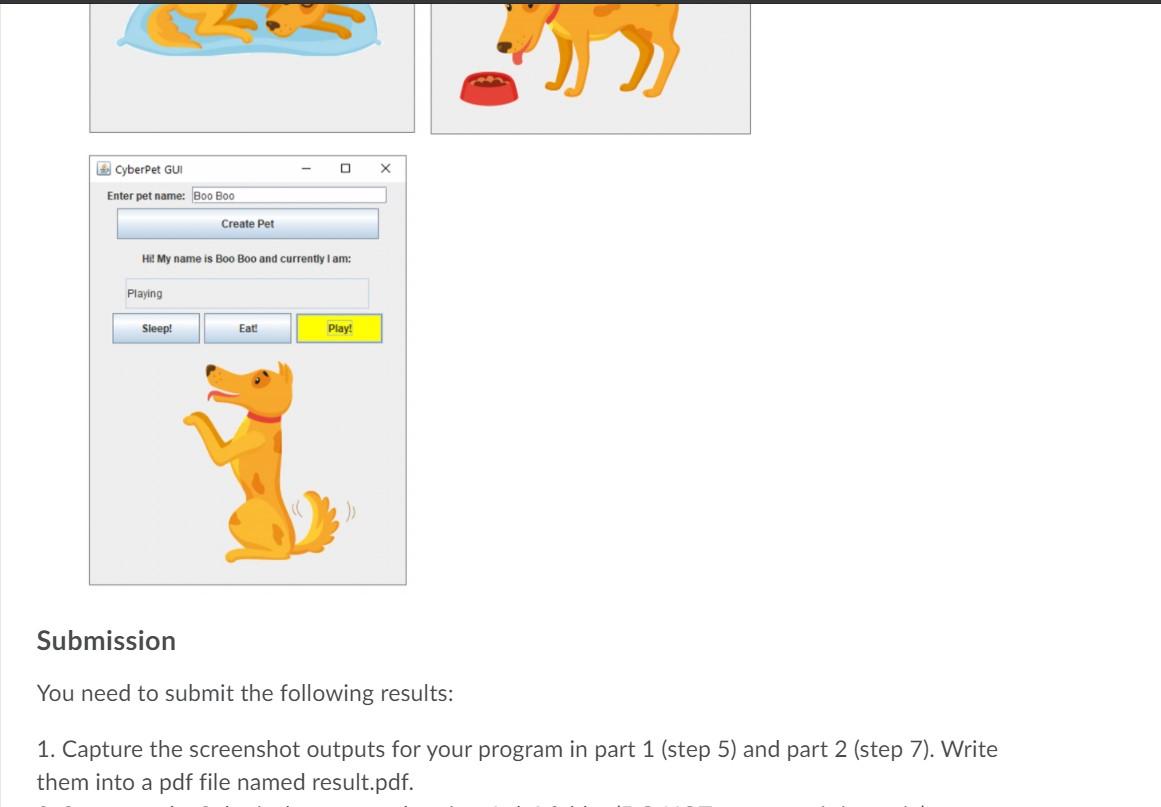
Part 2: Implement CyberPetSwing application Step 6: Create the Cyber PetSwing class 6.1 Create the GUI In this part we will try to create the following GUI (Fig. 5.2): title of JFrame CyberPet GUI JTextField txtName Enter pet name: JLabel lblName Create Pet JButton btn Create Pet JLabel IblPetStatus (empty text) JTextField txtState Sleep! Eat! Play! JButton btnSleep, btnEat, btnPlay JLabel imagelcon (show the image later) Fig. 5.2: The GUI of Cyber PetSwing (show the image later) Fig. 5.2: The GUI of Cyber PetSwing 1. On Eclipse, create a new class named CyberPetSwing => CyberPetSwing.java file 2. Modify the class header as the following code: public class CyberPet Swing extends JFrame { //TODO: add code of this class below + 3. Import the required Java packages like below: import java.awt.Color; import java.awt. Dimension; import java.awt. FlowLayout; import java.awt.event. ActionEvent; import java.awt.event. ActionListener; import javax.swing.JButton; import javax.swing. JFrame; import javax.swing. JLabel; import javax.swing. JTextField; import javax.swing.UIManager; import javax.swing.ImageIcon; import java.awt. Dimension; import java.awt. FlowLayout; import java.awt.event. ActionEvent; import java.awt.event. ActionListener; import javax.swing. JButton; import javax.swing. JFrame; import javax.swing. JLabel; import javax.swing. JTextField; import javax.swing.UIManager; import javax.swing.ImageIcon; 4. Declare the following instance variables of this class: private CyberPet pet1; //the instance of CyberPet private JLabel lblName; // show the text "Enter pet name: private JTextField txtName; //textbox to enter pet name private JButton btnCreatePet; //button to create pet object instance private JLabel lblPetStatus; //a label to show pet's name and state private JTextField txtState; //a textbox to show pet's state 1/3 buttons to change the state of the pet private JButton btnEat, btnSleep, btnPlay; 1/3 images to show the state of the pet private ImageIcon eat Image, sleep Image, playImage; private JLabel imageIcon; //label to show the image pet's state 5. Implement the constructor method of this class with the following steps: public CyberPetSwing() { //1. set the title of the GUI using the setTitle() method private JTextField txtState; //a textbox to show pet's state 1/3 buttons to change the state of the pet private JButton btnEat, btnSleep, btnPlay; 1/3 images to show the state of the pet private ImageIcon eat Image, sleepImage, playImage; private JLabel imageIcon; //label to show the image pet's state 5. Implement the constructor method of this class with the following steps: public CyberPetSwing() { //1. set the title of the GUI using the setTitle() method setTitle("CyberPet GUI by [type_your_name_here]"); 1/2. set the default close operation: setDefaultCloseOperation (EXIT_ON_CLOSE) //3. set the layout: set Layout(new FlowLayout(); //4. create the instance lblName with the text "Enter pet name: // lblName = new JLabel("Enter pet name: "); //5. create the instance txtName with 20 columns // txtName = new JTextField(20); //6. create the instance of btnCreatePet and set prefered size // btnCreatePet = new JButton("Create Pet"); // btnCreatePet.setPreferredSize(new Dimension (300, 35)); //7. similar to lblName, create lblPetStatus and setPreferredSize(330, 35) 1/8. similar to txtName, create txtState with 25 columns Il and also setPreferredSize (330, 35) 119. turn off text editable of txtState: txtState.setEditable(false); //10. create the 3 buttons btnSleep, btnEat, btnPlay Il and set their perferred size similar to the following code: //8. similar to txtName, create txtState with 25 columns // and also setPreferredSize (330, 35) 7/9. turn off text editable of txtState: txtState.setEditable(false); 7/10. create the 3 buttons btnSleep, btnEat, btnPlay // and set their perferred size similar to the following code: // btnSleep = new JButton("Sleep!"); // btnSleep.setPreferredSize(new Dimension (100, 35)); //11. create the imageIcon JLabel with emty text 1/12. add all components to the form by calling the add() method like below: // add(lblName); // do the same as previous line for the other components: txtName, // btnCreatePet, lblPetStatus, txtState, btnSleep, btnEat, btnPlay, imageIcon //13. set the size of the form: setSize(350, 450); } 1. Right click&save to download the 3 images dog_sleep.png, dog_eat.png, dog_play.png > JRE System Library (JavaSE-1.8] src drag images to here v (default package) > CyberPet.java > CyberPetApp.java CyberPetSwing.java dog eat.png the images dog_play.png dog_sleep.png appear here Fig. 5.3: Add images to project Credits: katemangostar. dog_play.png dog_sleep.png appear here Fig. 5.3: Add images to project Credits: katemangostar. 2. Copy these images to your Lab6 project Eclipse by dragging them to the src item in your Eclipse project. Then make sure those images appear in your project as right image. 3. Add code at the end of the constructor CyberPetswing() method to load image resources as the following code: eat Image = new ImageIcon(getClass().getResource("dog_eat.png")); sleepImage = new ImageIcon(getClass().getResource("dog_sleep.png")); play Image = new ImageIcon(getClass().getResource("dog_play.png")); 2. Copy these images to your Lab6 project Eclipse by dragging them to the src item in your Eclipse project. Then make sure those images appear in your project as right image. 3. Add code at the end of the constructor CyberPetSwing() method to load image resources as the following code: eat Image = new ImageIcon(getClass().getResource("dog_eat.png")); sleepImage = new ImageIcon(getClass().getResource("dog_sleep.png")); play Image = new ImageIcon(getClass().getResource("dog_play.png")); 6.2 Handle Events (Button Clicked) on Cyber PetSwing Now we need to handle the events when the buttons are clicked on the form. 1. Modify the class header to add the implementation of ActionListener as the following code: public class CyberPetSwing extends JFrame implements ActionListener { //... the current code of the class ... } 2. Code the actionPerformed(ActionEvent e) method to handle the click events on buttons using the the following steps (some code are already provided, some need to be completed (marked by TODO)) public void actionPerformed ActionEvent e) { //1. if e.getSource() equals to btnCreatePet => btnCreatePet was clicked if (e.getSource() == btnCreatePet) { //1.1 get the name that user enter in txtName String name = txtName.getText(); public void actionPerformed ActionEvent e) { //1. if e.getSource() equals to btnCreatePet => btnCreatePet was clicked if (e.getSource() == btnCreatePet) { //1.1 get the name that user enter in txtName String name = txtName.getText(); //1.2 TODO: create instance of CyberPet with the above name //1.3 set the text content of lblPetStatus 1blPetStatus.setText("Hi! My name is " + pet1.getName() + " and currently I am: "); //1.4 set the correct image to imageIcon imageIcon.setIcon(sleepImage); } 1/2. else if e.getSource() equals to btnSleep => btnSleep was clicked else if (e.getSource() == btnSleep) { 1/2.1 call the sleep() method pet1 pet1.sleep) //2.2 set the correct image (sleep Image) to imageIcon imageIcon.setIcon(sleepImage); } 1/3. else if e.getSource() equals to btnEat => btnEat was clicked else if (e.getSource) btnEat) { //check previous code of 2 and do similarly //3.1 TODO: call the eat() method pet1 //3.2 TODO: set the correct image (eatImage) to imageIcon } //4. else if e.getSource() equals to btnPlay => btnPlay was clicked 1/2.1 call the sleep() method pet1 pet1.sleep) //2.2 set the correct image (sleepImage) to imageIcon imageIcon.setIcon(sleepImage); } //3. else if e.getSource() equals to btnEat => btnEat was clicked else if (e.getSource) btnEat) { //check previous code of 2 and do similarly //3.1 TODO: call the eat() method pet1 1/3.2 TODO: set the correct image (eat Image) to imageIcon } //4. else if e.getSource() equals to btnPlay => btnPlay was clicked else if (e.getSource() == btnPlay) { // check previous code of 2 & 3 and do similarly //4.1 TODO: call the play() method pet1 //4.2 TODO: set the correct image (playImage) to imageIcon } 7/5. update the text of txtState using the result of pet1.getState) txtState.setText(pet1.getState()); 116. call the repaint() method to repaint the form repaint(); } 3. Add code at the end of the constructor CyberPetSwing() method to register the event handler (ActionListener) to four buttons: btnCreatePet, btnSleep, btnEat, btnPlay: 774.1 TODO: call the play method pet1 1/4.2 TODO: set the correct image (play Image) to imageIcon } 1/5. update the text of txtState using the result of pet1.getState() txtState.setText (pet1.getState(); 1/6. call the repaint() method to repaint the form repaint(); } 3. Add code at the end of the constructor CyberPetSwing() method to register the event handler (ActionListener) to four buttons: btnCreatePet, btnSleep, btnEat, btnPlay: //add this class as the action listener of btnCreatePet btnCreatePet.addActionListener(this); //TODO: do the same for the rest three buttons: btnSleep, btnEat, btnPlay 4. Insert additional useful code comments to CyberPetSwing.java 5. Add code to the main method of CyberPetApp to create the instance of CyberPetSwing and display the GUI form. Below are the intructions to modify the main method: public static void main(String[] args) { I/Other existing code //TODO: add the following code at the end of this main method below //1. create an instance of the CyberPetSwing named app 1/2. call the setVisible method of the above instance with input argument true } Step 7: Test the GUI of the CyberPetSwing application CyberPet GUI X Enter pet name: Boo Boo Create Pet Hi! My name is Boo Boo and currently I am: Playing Sleep! Eat Play! Submission You need to submit the following results: 1. Capture the screenshot outputs for your program in part 1 (step 5) and part 2 (step 7). Write them into a pdf file named result.pdf. Part 2: Implement CyberPetSwing application Step 6: Create the Cyber PetSwing class 6.1 Create the GUI In this part we will try to create the following GUI (Fig. 5.2): title of JFrame CyberPet GUI JTextField txtName Enter pet name: JLabel lblName Create Pet JButton btn Create Pet JLabel IblPetStatus (empty text) JTextField txtState Sleep! Eat! Play! JButton btnSleep, btnEat, btnPlay JLabel imagelcon (show the image later) Fig. 5.2: The GUI of Cyber PetSwing (show the image later) Fig. 5.2: The GUI of Cyber PetSwing 1. On Eclipse, create a new class named CyberPetSwing => CyberPetSwing.java file 2. Modify the class header as the following code: public class CyberPet Swing extends JFrame { //TODO: add code of this class below + 3. Import the required Java packages like below: import java.awt.Color; import java.awt. Dimension; import java.awt. FlowLayout; import java.awt.event. ActionEvent; import java.awt.event. ActionListener; import javax.swing.JButton; import javax.swing. JFrame; import javax.swing. JLabel; import javax.swing. JTextField; import javax.swing.UIManager; import javax.swing.ImageIcon; import java.awt. Dimension; import java.awt. FlowLayout; import java.awt.event. ActionEvent; import java.awt.event. ActionListener; import javax.swing. JButton; import javax.swing. JFrame; import javax.swing. JLabel; import javax.swing. JTextField; import javax.swing.UIManager; import javax.swing.ImageIcon; 4. Declare the following instance variables of this class: private CyberPet pet1; //the instance of CyberPet private JLabel lblName; // show the text "Enter pet name: private JTextField txtName; //textbox to enter pet name private JButton btnCreatePet; //button to create pet object instance private JLabel lblPetStatus; //a label to show pet's name and state private JTextField txtState; //a textbox to show pet's state 1/3 buttons to change the state of the pet private JButton btnEat, btnSleep, btnPlay; 1/3 images to show the state of the pet private ImageIcon eat Image, sleep Image, playImage; private JLabel imageIcon; //label to show the image pet's state 5. Implement the constructor method of this class with the following steps: public CyberPetSwing() { //1. set the title of the GUI using the setTitle() method private JTextField txtState; //a textbox to show pet's state 1/3 buttons to change the state of the pet private JButton btnEat, btnSleep, btnPlay; 1/3 images to show the state of the pet private ImageIcon eat Image, sleepImage, playImage; private JLabel imageIcon; //label to show the image pet's state 5. Implement the constructor method of this class with the following steps: public CyberPetSwing() { //1. set the title of the GUI using the setTitle() method setTitle("CyberPet GUI by [type_your_name_here]"); 1/2. set the default close operation: setDefaultCloseOperation (EXIT_ON_CLOSE) //3. set the layout: set Layout(new FlowLayout(); //4. create the instance lblName with the text "Enter pet name: // lblName = new JLabel("Enter pet name: "); //5. create the instance txtName with 20 columns // txtName = new JTextField(20); //6. create the instance of btnCreatePet and set prefered size // btnCreatePet = new JButton("Create Pet"); // btnCreatePet.setPreferredSize(new Dimension (300, 35)); //7. similar to lblName, create lblPetStatus and setPreferredSize(330, 35) 1/8. similar to txtName, create txtState with 25 columns Il and also setPreferredSize (330, 35) 119. turn off text editable of txtState: txtState.setEditable(false); //10. create the 3 buttons btnSleep, btnEat, btnPlay Il and set their perferred size similar to the following code: //8. similar to txtName, create txtState with 25 columns // and also setPreferredSize (330, 35) 7/9. turn off text editable of txtState: txtState.setEditable(false); 7/10. create the 3 buttons btnSleep, btnEat, btnPlay // and set their perferred size similar to the following code: // btnSleep = new JButton("Sleep!"); // btnSleep.setPreferredSize(new Dimension (100, 35)); //11. create the imageIcon JLabel with emty text 1/12. add all components to the form by calling the add() method like below: // add(lblName); // do the same as previous line for the other components: txtName, // btnCreatePet, lblPetStatus, txtState, btnSleep, btnEat, btnPlay, imageIcon //13. set the size of the form: setSize(350, 450); } 1. Right click&save to download the 3 images dog_sleep.png, dog_eat.png, dog_play.png > JRE System Library (JavaSE-1.8] src drag images to here v (default package) > CyberPet.java > CyberPetApp.java CyberPetSwing.java dog eat.png the images dog_play.png dog_sleep.png appear here Fig. 5.3: Add images to project Credits: katemangostar. dog_play.png dog_sleep.png appear here Fig. 5.3: Add images to project Credits: katemangostar. 2. Copy these images to your Lab6 project Eclipse by dragging them to the src item in your Eclipse project. Then make sure those images appear in your project as right image. 3. Add code at the end of the constructor CyberPetswing() method to load image resources as the following code: eat Image = new ImageIcon(getClass().getResource("dog_eat.png")); sleepImage = new ImageIcon(getClass().getResource("dog_sleep.png")); play Image = new ImageIcon(getClass().getResource("dog_play.png")); 2. Copy these images to your Lab6 project Eclipse by dragging them to the src item in your Eclipse project. Then make sure those images appear in your project as right image. 3. Add code at the end of the constructor CyberPetSwing() method to load image resources as the following code: eat Image = new ImageIcon(getClass().getResource("dog_eat.png")); sleepImage = new ImageIcon(getClass().getResource("dog_sleep.png")); play Image = new ImageIcon(getClass().getResource("dog_play.png")); 6.2 Handle Events (Button Clicked) on Cyber PetSwing Now we need to handle the events when the buttons are clicked on the form. 1. Modify the class header to add the implementation of ActionListener as the following code: public class CyberPetSwing extends JFrame implements ActionListener { //... the current code of the class ... } 2. Code the actionPerformed(ActionEvent e) method to handle the click events on buttons using the the following steps (some code are already provided, some need to be completed (marked by TODO)) public void actionPerformed ActionEvent e) { //1. if e.getSource() equals to btnCreatePet => btnCreatePet was clicked if (e.getSource() == btnCreatePet) { //1.1 get the name that user enter in txtName String name = txtName.getText(); public void actionPerformed ActionEvent e) { //1. if e.getSource() equals to btnCreatePet => btnCreatePet was clicked if (e.getSource() == btnCreatePet) { //1.1 get the name that user enter in txtName String name = txtName.getText(); //1.2 TODO: create instance of CyberPet with the above name //1.3 set the text content of lblPetStatus 1blPetStatus.setText("Hi! My name is " + pet1.getName() + " and currently I am: "); //1.4 set the correct image to imageIcon imageIcon.setIcon(sleepImage); } 1/2. else if e.getSource() equals to btnSleep => btnSleep was clicked else if (e.getSource() == btnSleep) { 1/2.1 call the sleep() method pet1 pet1.sleep) //2.2 set the correct image (sleep Image) to imageIcon imageIcon.setIcon(sleepImage); } 1/3. else if e.getSource() equals to btnEat => btnEat was clicked else if (e.getSource) btnEat) { //check previous code of 2 and do similarly //3.1 TODO: call the eat() method pet1 //3.2 TODO: set the correct image (eatImage) to imageIcon } //4. else if e.getSource() equals to btnPlay => btnPlay was clicked 1/2.1 call the sleep() method pet1 pet1.sleep) //2.2 set the correct image (sleepImage) to imageIcon imageIcon.setIcon(sleepImage); } //3. else if e.getSource() equals to btnEat => btnEat was clicked else if (e.getSource) btnEat) { //check previous code of 2 and do similarly //3.1 TODO: call the eat() method pet1 1/3.2 TODO: set the correct image (eat Image) to imageIcon } //4. else if e.getSource() equals to btnPlay => btnPlay was clicked else if (e.getSource() == btnPlay) { // check previous code of 2 & 3 and do similarly //4.1 TODO: call the play() method pet1 //4.2 TODO: set the correct image (playImage) to imageIcon } 7/5. update the text of txtState using the result of pet1.getState) txtState.setText(pet1.getState()); 116. call the repaint() method to repaint the form repaint(); } 3. Add code at the end of the constructor CyberPetSwing() method to register the event handler (ActionListener) to four buttons: btnCreatePet, btnSleep, btnEat, btnPlay: 774.1 TODO: call the play method pet1 1/4.2 TODO: set the correct image (play Image) to imageIcon } 1/5. update the text of txtState using the result of pet1.getState() txtState.setText (pet1.getState(); 1/6. call the repaint() method to repaint the form repaint(); } 3. Add code at the end of the constructor CyberPetSwing() method to register the event handler (ActionListener) to four buttons: btnCreatePet, btnSleep, btnEat, btnPlay: //add this class as the action listener of btnCreatePet btnCreatePet.addActionListener(this); //TODO: do the same for the rest three buttons: btnSleep, btnEat, btnPlay 4. Insert additional useful code comments to CyberPetSwing.java 5. Add code to the main method of CyberPetApp to create the instance of CyberPetSwing and display the GUI form. Below are the intructions to modify the main method: public static void main(String[] args) { I/Other existing code //TODO: add the following code at the end of this main method below //1. create an instance of the CyberPetSwing named app 1/2. call the setVisible method of the above instance with input argument true } Step 7: Test the GUI of the CyberPetSwing application CyberPet GUI X Enter pet name: Boo Boo Create Pet Hi! My name is Boo Boo and currently I am: Playing Sleep! Eat Play! Submission You need to submit the following results: 1. Capture the screenshot outputs for your program in part 1 (step 5) and part 2 (step 7). Write them into a pdf file named result.pdf
Step by Step Solution
There are 3 Steps involved in it
Sure Ill help you create the basic CyberPetSwing Java application with a simple GUI using Swing Heres a stepbystep guide to setting it up Step 1 Import Necessary Packages javaimport javaawtimport java... View full answer

Get step-by-step solutions from verified subject matter experts