

Question: Overview and Objectives This case study allows students fully Design a complex network using skills gained throughout the course but build and configure only
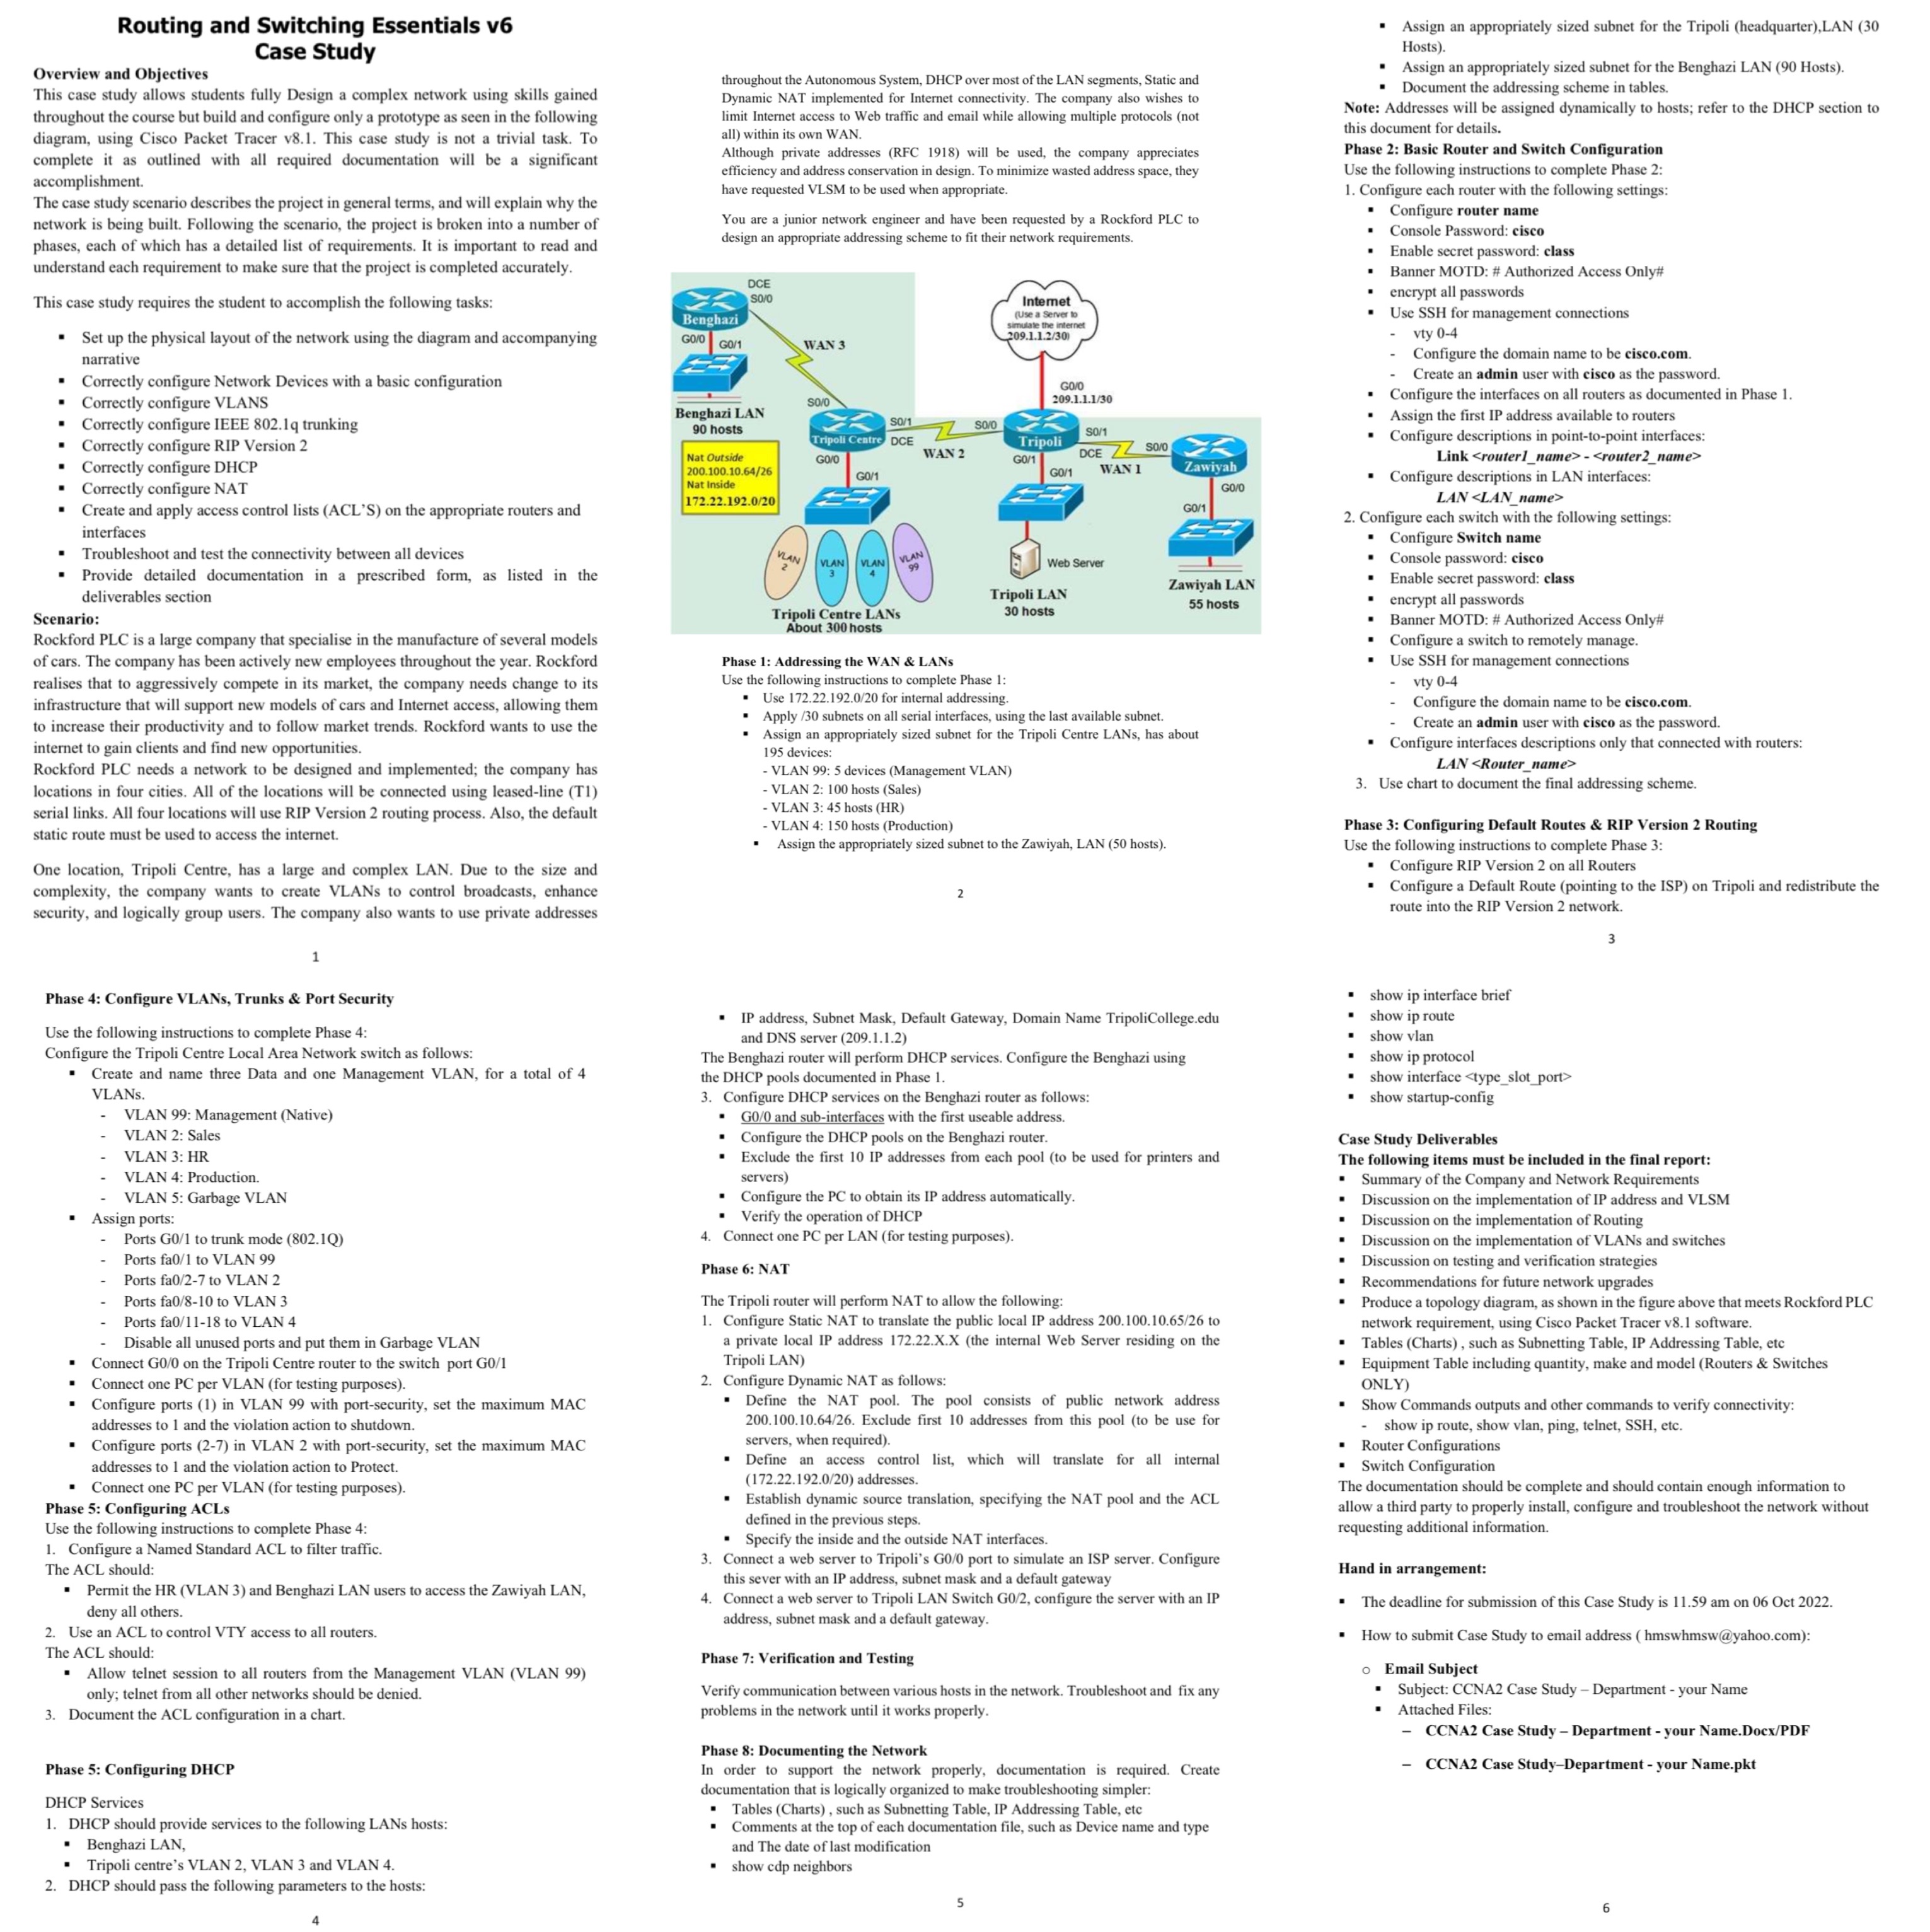
Overview and Objectives This case study allows students fully Design a complex network using skills gained throughout the course but build and configure only a prototype as seen in the following diagram, using Cisco Packet Tracer v8.1. This case study is not a trivial task. To complete it as outlined with all required documentation will be a significant accomplishment. The case study scenario describes the project in general terms, and will explain why the network is being built. Following the scenario, the project is broken into a number of phases, each of which has a detailed list of requirements. It is important to read and understand each requirement to make sure that the project is completed accurately. This case study requires the student to accomplish the following tasks: Set up the physical layout of the network using the diagram and accompanying narrative Routing and Switching Essentials v6 Case Study Correctly configure Network Devices with a basic configuration . Correctly configure VLANS Correctly configure IEEE 802.1q trunking Correctly configure RIP Version 2 . Correctly configure DHCP Correctly configure NAT Create and apply access control lists (ACL'S) on the appropriate routers and interfaces Troubleshoot and test the connectivity between all devices Provide detailed documentation in a prescribed form, as listed in the deliverables section Scenario: Rockford PLC is a large company that specialise in the manufacture of several models of cars. The company has been actively new employees throughout the year. Rockford realises that to aggressively compete in its market, the company needs change to its infrastructure that will support new models of cars and Internet access, allowing them to increase their productivity and to follow market trends. Rockford wants to use the internet to gain clients and find new opportunities. Rockford PLC needs a network to be designed and implemented; the company has locations in four cities. All of the locations will be connected using leased-line (T1) serial links. All four locations will use RIP Version 2 routing process. Also, the default static route must be used to access the internet. One location, Tripoli Centre, has a large and complex LAN. Due to the size and complexity, the company wants to create VLANs to control broadcasts, enhance security, and logically group users. The company also wants to use private addresses Phase 4: Configure VLANs, Trunks & Port Security Use the following instructions to complete Phase 4: Configure the Tripoli Centre Local Area Network switch as follows: Create and name three Data and one Management VLAN, for a total of 4 VLANs. . 1 . VLAN 99: Management (Native) VLAN 2: Sales VLAN 3: HR VLAN 4: Production. VLAN 5: Garbage VLAN Assign ports: Ports G0/1 to trunk mode (802.1Q) Ports fa0/1 to VLAN 99 Ports fa0/2-7 to VLAN 2 Ports fa0/8-10 to VLAN 3 Ports fa0/11-18 to VLAN 4 Disable all unused ports and put them in Garbage VLAN Connect G0/0 on the Tripoli Centre router to the switch port G0/1 Connect one PC per VLAN (for testing purposes). Configure ports (1) in VLAN 99 with port-security, set the maximum MAC addresses to 1 and the violation action to shutdown. Configure ports (2-7) in VLAN 2 with port-security, set the maximum MAC addresses to 1 and the violation action to Protect. . Connect one PC per VLAN (for testing purposes). Phase 5: Configuring ACLS Use the following instructions to complete Phase 4: 1. Configure a Named Standard ACL to filter traffic. The ACL should: Permit the HR (VLAN 3) and Benghazi LAN users to access t Zawiyah LAN, deny all others. 2. Use an ACL to control VTY access to all routers. The ACL should: Allow telnet session to all routers from the Management VLAN (VLAN 99) only; telnet from all other networks should be denied. 3. Document the ACL configuration in a chart. Phase 5: Configuring DHCP DHCP Services 1. DHCP should provide services to the following LANs hosts: Benghazi LAN, . Tripoli centre's VLAN 2, VLAN 3 and VLAN 4. 2. DHCP should pass the following parameters to the hosts: throughout the Autonomous System, DHCP over most of the LAN segments, Static and Dynamic NAT implemented for Internet connectivity. The company also wishes to limit Internet access to Web traffic and email while allowing multiple protocols (not all) within its own WAN. Although private addresses (RFC 1918) will be used, the company appreciates efficiency and address conservation in design. To minimize wasted address space, they have requested VLSM to be used when appropriate. You are a junior network engineer and have been requested by a Rockford PLC to design an appropriate addressing scheme to fit their network requirements. Benghazi GO/O GO/1 DCE S0/0 Benghazi LAN 90 hosts Nat Outside 200.100.10.64/26 Nat Inside 172.22.192.0/20 VLAN WAN 3 SO/0 . SO/1 Tripoli Centre DCE GO/O G0/1 WAN 2 VLAN VLAN VLAN 99 Tripoli Centre LANS About 300 hosts $0/0 Internet (Use a Server to simulate the internet 209.1.1.2/30) 2 - VLAN 99: 5 devices (Management VLAN) - VLAN 2: 100 hosts (Sales) GO/0 209.1.1.1/30 Tripoli G0/1 G0/1 Tripoli LAN 30 hosts Web Server S0/1 DCE ZZSO/0 WAN 1 - VLAN 3:45 hosts (HR) - VLAN 4: 150 hosts (Production) Assign the appropriately sized subnet to the Zawiyah, LAN (50 hosts). Phase 1: Addressing the WAN & LANS Use the following instructions to complete Phase 1: Use 172.22.192.0/20 for internal addressing. Apply /30 subnets on all serial interfaces, using the last available subnet. Assign an appropriately sized subnet for the Tripoli Centre LANs, has about 195 devices: Zawiyah Configure the PC to obtain its IP address automatically. Verify the operation of DHCP 4. Connect one PC per LAN (for testing purposes). Phase 6: NAT 5 GO/1 IP address, Subnet Mask, Default Gateway, Domain Name TripoliCollege.edu and DNS server (209.1.1.2) The Benghazi router will perform DHCP services. Configure the Benghazi using the DHCP pools documented in Phase 1. 3. Configure DHCP services on the Benghazi router as follows: GO/O and sub-interfaces with the first useable address. Zawiyah LAN 55 hosts Configure the DHCP pools on the Benghazi router. Exclude the first 10 IP addresses from each pool (to be used for printers and servers) The Tripoli router will perform NAT to allow the following: 1. Configure Static NAT to translate the public local IP address 200.100.10.65/26 to a private local IP address 172.22.X.X (the internal Web Server residing on the Tripoli LAN) 2. Configure Dynamic NAT as follows: Define the NAT pool. The pool consists of public network address 200.100.10.64/26. Exclude first 10 addresses from this pool (to be use for servers, when required). Define an access control list, which will translate for all internal (172.22.192.0/20) addresses. Establish dynamic source translation, specifying the NAT pool and the ACL defined in the previous steps. Specify the inside and the outside NAT interfaces. 3. Connect a web server to Tripoli's G0/0 port to simulate an ISP server. Configure this sever with an IP address, subnet mask and a default gateway 4. Connect a web server to Tripoli LAN Switch G0/2, configure the server with an IP address, subnet mask and a default gateway. Phase 7: Verification and Testing Verify communication between various hosts in the network. Troubleshoot and fix any problems in the network until it works properly. Phase 8: Documenting the Network In order to support the network properly, documentation is required. Create documentation that is logically organized to make troubleshooting simpler: Tables (Charts), such as Subnetting Table, IP Addressing Table, etc Comments at the top of each documentation file, such as Device name and type and the date of last modification show cdp neighbors GO/0 Assign an appropriately sized subnet for the Tripoli (headquarter), LAN (30 Hosts). Assign an appropriately sized subnet for the Benghazi LAN (90 Hosts). Document the addressing scheme in tables. . Note: Addresses will be assigned dynamically to hosts; refer to the DHCP section to this document for details. Phase 2: Basic Router and Switch Configuration Use the following instructions to complete Phase 2: 1. Configure each router with the following settings: Configure router name Console Password: cisco . . . 2. Configure each switch with the following settings: Configure Switch name Console password: cisco . . Phase 3: Configuring Default Routes & RIP Version 2 Routing Use the following instructions to complete Phase 3: Configure RIP Version 2 on all Routers Configure a Default Route (pointing to the ISP) on Tripoli and redistribute the route into the RIP Version 2 network. . I . . . . Assign the first IP address available to routers Configure descriptions in point-to-point interfaces: Link - Configure descriptions in LAN interfaces: LAN encrypt all passwords Banner MOTD: # Authorized Access Only# Configure a switch to remotely manage. . Use SSH for management connections vty 0-4 Configure the domain name to be cisco.com. Create an admin user with cisco as the password. Configure interfaces descriptions only that connected with routers: LAN 3. Use chart to document the final addressing scheme. Enable secret password: class Banner MOTD: # Authorized Access Only# encrypt all passwords Use SSH for management connections vty 0-4 Configure the domain name to be cisco.com. Create an admin user with cisco as the password. Configure the interfaces on all routers as documented in Phase 1. Case Study Deliverables The following items must be included in the final report: Summary of the Company and Network Requirements Discussion on the implementation of IP address and VLSM Discussion on the implementation of Routing Discussion on the implementation of VLANs and switches Discussion on testing and verification strategies . Recommendations for future network upgrades Produce a topology diagram, as shown in the figure above that meets Rockford PLC network requirement, using Cisco Packet Tracer v8.1 software. Tables (Charts), such as Subnetting Table, IP Addressing Table, etc Equipment Table including quantity, make and model (Routers & Switches ONLY) Show Commands outputs and other commands to verify connectivity: show ip route, show vlan, ping, telnet, SSH, etc. Router Configurations Switch Configuration show ip protocol . Enable secret password: class show ip interface brief show ip route show vlan show interface show startup-config The documentation should be complete and should contain enough information to allow a third party to properly install, configure and troubleshoot the network without requesting additional information. O Hand in arrangement: The deadline for submission of this Case Study is 11.59 am on 06 Oct 2022. How to submit Case Study to email address (hmswhmsw@yahoo.com): Email Subject Subject: CCNA2 Case Study - Department - your Name Attached Files: CCNA2 Case Study - Department - your Name.Docx/PDF CCNA2 Case Study-Department - your Name.pkt 3 6
Step by Step Solution
There are 3 Steps involved in it

Get step-by-step solutions from verified subject matter experts