

Question: Part IV Perform the following steps: Write Verilog code for your 7 - segment decoder. Connect the c 1 c 0 inputs to switches S
Part IV Perform the following steps:
Write Verilog code for your segment decoder. Connect the inputs to switches and connect
the outputs of the decoder to the HEXO display on the DESoC board. The segments in this display are
called dots, corresponding to Figure
A top.v file is provided as part of the design files for this exercise, for use with the DESim tool. Compiling
and simulating your segment decoder with DESim is a good way to see how the segment displays will
look when your circuit is implemented in a DESoC board. To use the top.v file directly, declare your
Verilog module as:
module partSW LEDR, HEX;
input : SW; toggle switches
output : LEDR; red LEDs
output : HEX; seg display
endmodule
After you have finished testing your Verilog code using simulation, create a Quartus project for your circuit.
Make sure to include all required pin assignments in the project.
Compile your project and then download the resulting circuit into the FPGA chip. Test the functionality of
the circuit by toggling the switches and observing the segment display.
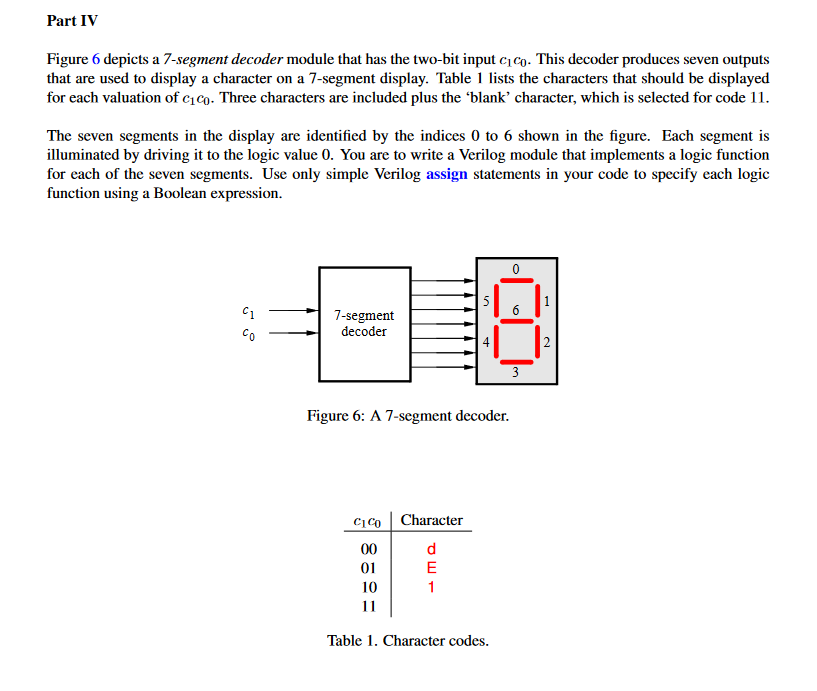
Figure depicts a segment decoder module that has the twobit input This decoder produces seven outputs
that are used to display a character on a segment display. Table lists the characters that should be displayed
for each valuation of Three characters are included plus the 'blank' character, which is selected for code
The seven segments in the display are identified by the indices to shown in the figure. Each segment is
illuminated by driving it to the logic value You are to write a Verilog module that implements a logic function
for each of the seven segments. Use only simple Verilog assign statements in your code to specify each logic
function using a Boolean expression.
Figure : A segment decoder.
Table Character codes.
Step by Step Solution
There are 3 Steps involved in it
1 Expert Approved Answer
Step: 1 Unlock

Question Has Been Solved by an Expert!
Get step-by-step solutions from verified subject matter experts
Step: 2 Unlock
Step: 3 Unlock