

Question: Please povide specific commands to complete configuration for An organization is centralizing control of their wireless LAN by replacing their standalone access points with lightweight
Please povide specific commands to complete configuration for An organization is centralizing control of their wireless LAN by replacing their standalone access points with lightweight access points LAP and a wireless LAN controller WLC You will be leading this project and you want to become familiar with the WLC and any challenges that may occur during the project. Youll configure a WLC by adding a new wireless network, securing it with WPA PSK security and providing a guest network. To test the configuration, you will connect laptops to the WLAN and ping devices on the network.
Procedure
Part A: Configuring the Network
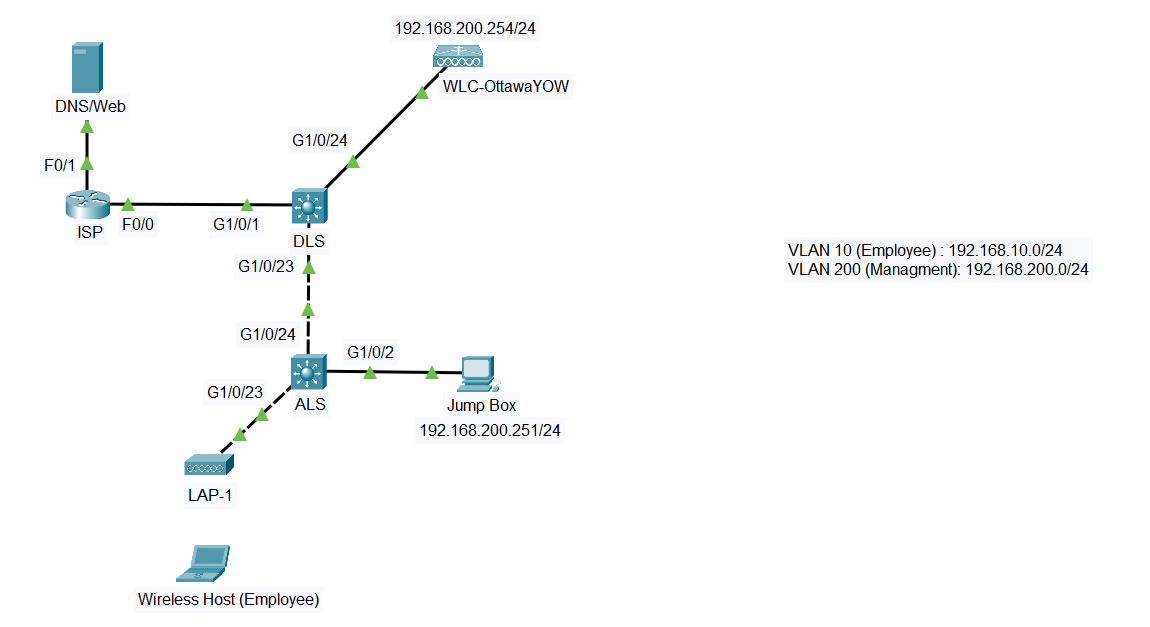
Before configuring wireless LAN on a WLC you need to configure the underlying infrastructure. The ISP router and DNSWeb server are already fully configured.
Configure DLS and ALS.
a Configure DLS according to the IP Addressing Table above, as well as with the following additional information.
G is an L port connected to ISP.
G are trunk ports native VLAN Allow only the VLANs used in this lab.
VLAN name: Employee
VLAN name: Management
Configure the VLAN and VLAN interfaces as shown in the IP Addressing Table.
The default route is already configured.
Note: Packet Tracer doesnt check your trunk configuration, so ensure youve configured it correctly.
b Configure ALS according to the IP Addressing Table above, as well as with the following additional information.
G is an access port in VLAN
G are trunk ports native VLAN Allow only VLANs used in this lab.
Configure VLAN interface as shown in IP addressing table to remotely manage the switch.
VLAN name: Employee
VLAN name: Management.
Connect to the wireless LAN controller.
a Configure the jump box PC according to the IP Addressing Table.
b Access and configure WLCOttawaYOW from the jump box web browser: https:
Note: Ensure that you use HTTPS to connect to the WLC web interface.
c Click Login and enter these credentials:
Username: admin
Password: Cisco
After a short delay, the WLC Monitor Summary screen appears.
d Under the WLC Monitor Access Point Summary screen, you should see the AP already joined the WLC
If no AP is registered yet, disconnect the APs from the network and reconnect to force the APs to go through the WLC discovery process. Otherwise, double check your switch configuration.
At this point, the AP only broadcasts the Management SSID because the client wireless network SSID hasnt been configured yet.
Part B: Creating a Wireless LAN
Now you will create a new wireless LAN on the WLC beginning with creating DHCP pools. Youll configure the settings required for hosts to join the WLAN later in the lab.
Create a DHCP pool in the WLC
a Navigate to Controller Internal DHCP Server DHCP scope and click New.
b Enter the scope name: Employee
c Open the Employee scope and update it as follows:
Start address:
End address:
Network:
Netmask:
Default Routers:
DNS Servers:
Status: Enabled
d Click Apply to save your configuration.
Create and enable the WLAN on WLC
For this lab, the WLAN VLAN interfaces are already created check the VLAN interfaces under Controller Interfaces Youll learn how to create those interfaces later in the course. In this lab, youll simply use these existing interfaces to configure your WLANs.
a In the WLC menu, click WLANs and click Create New in the dropdown in the upper right corner.
b Click Go to create a new WLAN.
c Enter the Profile Name of the new WLAN as Employee and assign an SSID of to the WLAN.
Note: Hosts need to use this SSID to join the network.
d The ID for the WLAN is a label that will be used to identify the WLAN. Select a value of to keep it consistent with the VLAN number and SSID.
Note: This is not a requirement, but it helps to understand the topology.
e Click Apply so that the settings go into effect.
Now the WLAN has been created, you can configure features of the network.
f Click Enable to make the WLAN functional. It is a common mistake to accidentally skip this step.
g Choose the VLAN interface that youll use for the WLAN by clicking the InterfaceInterface Group G dropdown and selecting the VLAN interface.
Note: The WLC will use this interface for user traffic on the network.
h Click the Advanced tab and scroll to the FlexConnect section and enable FlexConnect Local Switching and FlexConnect Localeach step of the requirements
Step by Step Solution
There are 3 Steps involved in it
1 Expert Approved Answer
Step: 1 Unlock

Question Has Been Solved by an Expert!
Get step-by-step solutions from verified subject matter experts
Step: 2 Unlock
Step: 3 Unlock