

Question: Project/Change Working Time Press the Create New Calendar button. Enter WeRCandy as the name of your company's calendar on the top line of
Project/Change Working Time
Press the "Create New Calendar" button. Enter WeRCandy as the name of your company's calendar on the top line of the dialog box, and press Ok (you will copy the Standard Calander).
To change working days to non-working days, select one or more days on the calendar. In the Exceptions tab type the name of the holiday and make sure the start and finish dates are correct. (You will need to look up the actual dates for the vacations above depending upon the current year and next year).
Now you must "connect" the calendar you created and the project you are about to plan, otherwise the software will schedule tasks according to the default calendar. To do this, click Project/ Project Information. Select WeRCandy from the 'Calendar' combo box and click Ok.
Specify a Project Start Date
The next step is to specify a project start date. Normally, projects will start sometime after you develop the schedule. However, because you need to play around with time in order to see the features of MS Project, you should set the Start date to approximately one month prior to today's date (for example, if today's date is October 1, start the project on September 1). The project start date is specified in the Project Information window. Click Ok.
Enter Resources
In the menu, click Resources/Team Planner arrow, Resourece Sheet. The Resource Sheet will appear
Enter the resourses as documented in the above table (note: the cost of the warehouse resource represents the hourly cost of using the warehouse for testing. Since it is a material, MS Project lists the cost as $50 instead of $50/hr. We will adjust for this later).
If it is not already done, change the Base Calendar for each resource to WeRCandy in the Base calendar column. This makes sure that each resource operates off of the calendar we created.
Enter the Schedule
Next you need to enter the schedule. You should refer to your book or online tutorials to get more information on any of these steps. A brief summary of one way to enter the schedule is provided below. Resources will be assigned to the steps later in the exercise.
Click Task/Gantt Chart arrow/Gantt Chart in the Menu
Enter the Task Name, Duration, and Predecessor tasks as displayed in the table above. All predecessors are Finish to Start relationships (the default). The simplest way to enter the predecessors is to simply type the index number in the Predecessors column (you can also use the Link Tasks icon or double click the Task Name to enter predecessors). Do not enter the Start date or Finish date (MS Project will determine these automatically). Do not enter the Resource Names (we will do this later). Use the indent and outdent arrow keys to create subtasks (note: do not specify a duration for the group task, MS Project will do this automatically once you start creating the subtasks). Milestones are signaled by specifying 0 days in the duration. The Task Mode column for all tasks should be specified as Automatically Scheduled, except for Visit Warehouse, which is Manually Scheduled.
Allocate Resources to Tasks
Before you assign resources to a task it is important to understand effort-driven scheduling. If a task is effort-driven, MS Project will attempt to balance the equation units x duration = work. This equation is enforced after you enter your resource assignments on a task for the first time. You will notice changes in your schedule when you change resource assignments. Normally, with effort driven scheduling, MS Project trys to keep the work value constant so that changes in the resources (units) automatically trigger changes in the duration. In some cases this is fine. However, in cases such as visiting warehouses, where all team members visit the warehouses at the same time, increasing the number of participants should not decrease the duration. In this case, it is best not to use effort driven scheduling. Using a Task Mode of Manually Scheduled for the Visit Warehouse task as mentioned above, prevents you from selecting effort driven. Note that if you do make a change to the resources or duration, MS Project will signal that the duration or resource allocations have changed. The signal will appear in the Task Mode column. Clicking on the column will allow you to change MS Project's assumptions.
Make sure you are in Gantt Chart view.
Double click Visit Warehouse and click the Advanced tab. Note that you cannot select Effort driven. Add the resource allocations as specified in the Assigned Resource column above. (Double click the task, click the Resources tab, select the resources from the dropdown box. Unless otherwise indicated, assume that the units for each resource is 100%. The units for the Warehouse resource should be entered as 1/h. The warehouse rate entered in the resource sheet is per hour. Entering 1/h states that the warehouse rate should be allocated each hour.) When you are done specifying the resources for the other tasks, click the effort driven box for each task.
Analyze the Schedule and Resources
The next step is to review the schedule and resources. Please perform the following steps:
Click Resources/Resource Sheet. Notice that Chuck Hertz is displayed in red. Clicking on the i icon states that he is overallocated. That is, Chuck is working more than 8 hours/day on some days.
Click Resources/Resource Usage. If necessary, scroll to the left or right to identify the dates and tasks for Chuck Hertz that are causing the overallocation.
Click Project/Project Information and then click the Statisticsbutton. This provides a quick overview of the work and total cost of the project. In my version, the project requires 2,104 hours of work and costs $227,600.
Click Task/Tracking Gantt. This Gantt charts shows the percentage of completion for each task. The red colored bars indicate the tasks on the critical path. Alternatively, some of the available reports identify the critical path.
To see the slack days, the late start, and late finish for the tasks, click View/Table and then select Schedule. You should note that only two items are not on the critical path.
To see an Activity on Node diagram, click Task/Network Diagram. Use the scroll bars to see the diagram. You can change the contents of a node by right clicking on the box and selecting Format Box. You do not need to do this for this exercise, but you could add slack time, late start, and late finish to the box if desired.
Click Resource/Team Planner down arrow/Resource Sheet. Next click the Group column header arrow and select Group on this field.. The resources will be grouped into the Consultant and WeRCandy types. Finally, click View/Tables/Cost. The cost of the project is subtotaled by resource group. (You can switch back to the standard view by clicking View/Tables/Entry and then deselecting Group on this field in the Group column heading ). MS Project has numerous other views, tables, and reports. You should browse through many of these items to determine the variety of information that can be displayed.
Adjust the Schedule
Finally, we would like to adjust the schedule to reduce the work load of Chuck Hertz and determine a way to shorten the project. After evaluating the situation, we realized the Chuck does not need to work 100% on Develop Tags and Placement and on Install Software. We believe the tasks can be accomplished in the same amount of time with 50% of Chuck's time allocated to each. We also decided that the employees could work overtime on the Develop Warehouse task to speed the development.
Select Tast/Gantt Chart from the menu. Double click Develop Tags and Placement and press the Resources tab. Change Chuck Hertz Units to 50%. Note that the duration increased (this is effort driven scheduling at work). Click the i icon and select Change the tasks total work... The duration will go back to 5 days. Repeat this process for Install Software.
In the Resource Usage view, select View/Tables/Work. Scroll down to Warehouse Employee/Develop Warehouse. If you do not see the Overtime column, move the dividing line between the summary information and the calander so that you can see the Overtime column. If you do not see the Overtime column, right click on a column heading and select Insert Column and then select Overtime work from the dropdown box. The Develop Warehouse task takes 15 days. We would like to reduce the time to 13 days. Three employee types work on the task. We will begin with the generic Warehouse Employee. Note that Warehouse Employees work 32 hours per day on the task (4 employees x 8 hrs). To reduce their work time on the task to 13 days we will allow 64 hours of overtime (32x2). Type 64 hrs in the Overtime cell for Warehouse Employees/Develop Warehouse. Unfortunately, by itself, this will not reduce the time of the task. Henry Oh and Ann Tena. so far, are not working overtime. So, their 8 hrs per day are still causing the task to take 15 days. Type 16 hrs in the Overtime cell for Henry Oh's Develop Warehouse assignment. Do the same thing for Ann Tena. Because the Warehouse resource is classified as a material, you do not need to do this for the Warehouse resource assigned to the task.
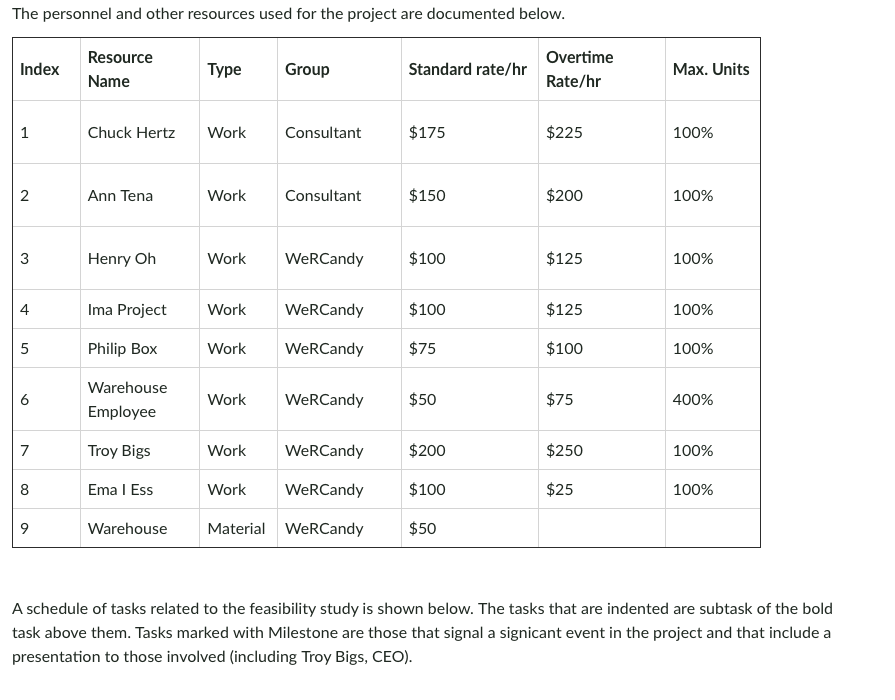
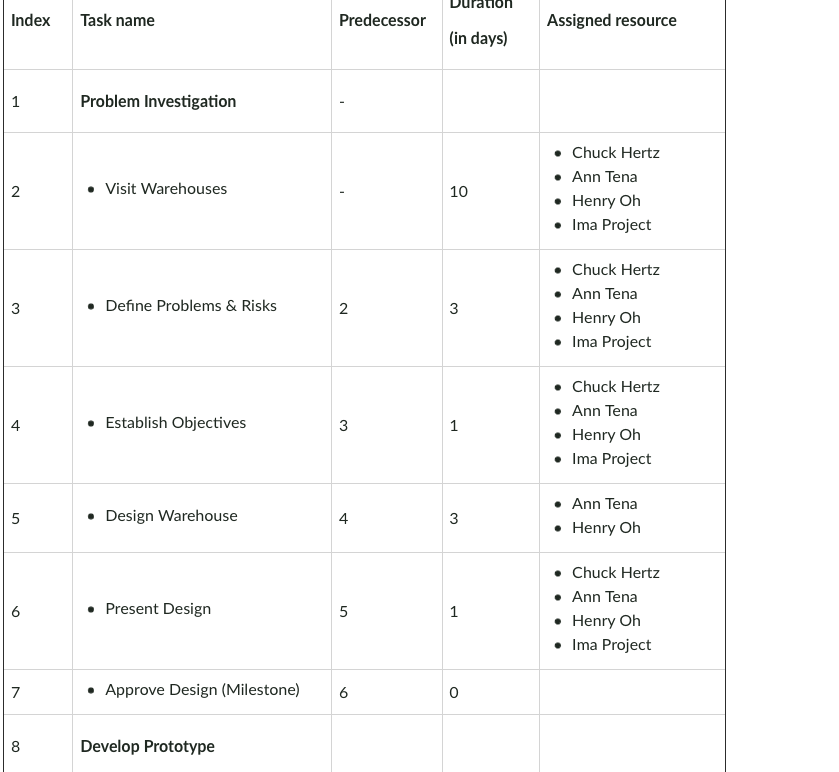
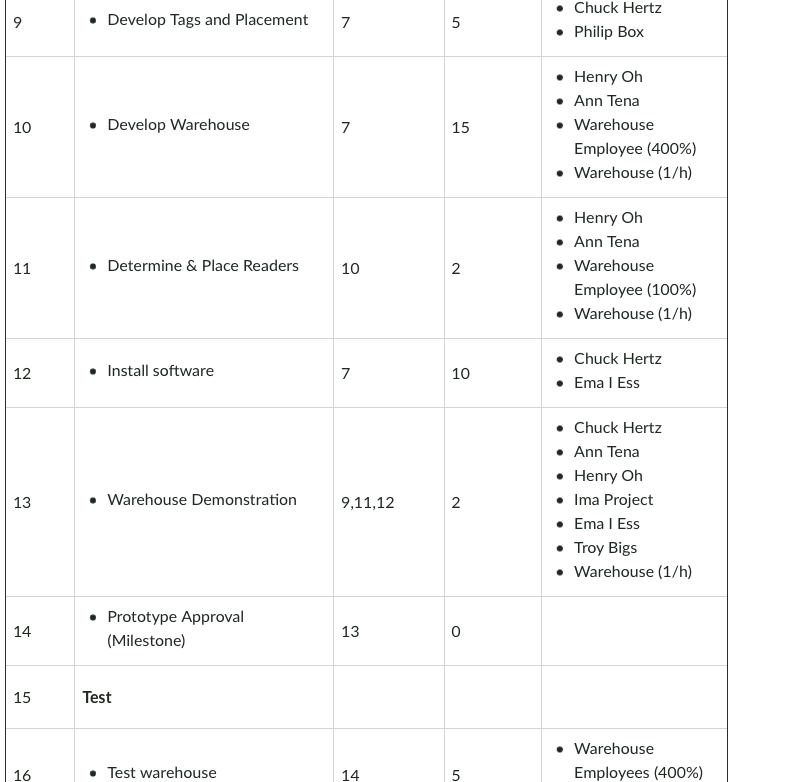
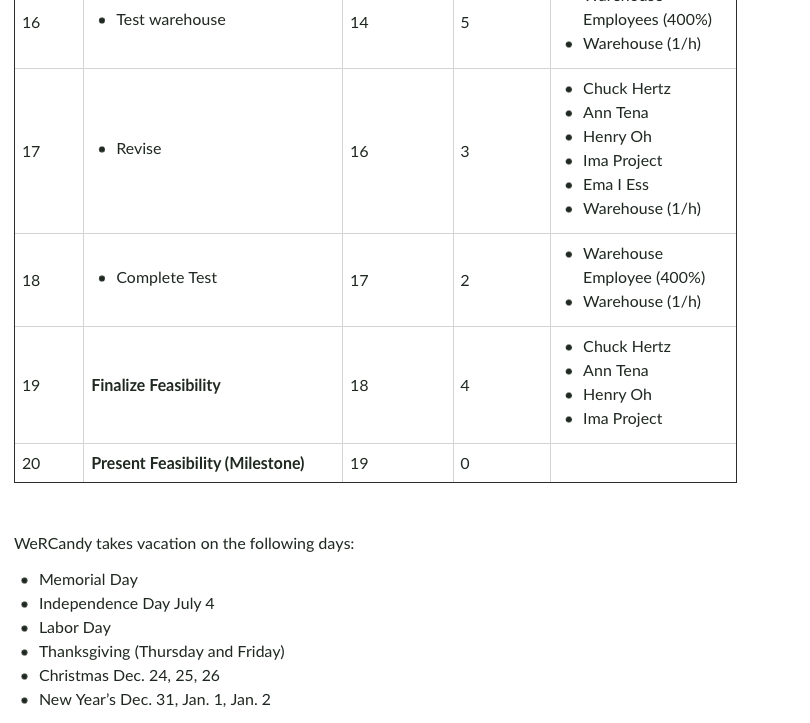
The personnel and other resources used for the project are documented below. A schedule of tasks related to the feasibility study is shown below. The tasks that are indented are subtask of the bold task above them. Tasks marked with Milestone are those that signal a signicant event in the project and that include a presentation to those involved (including Troy Bigs, CEO). WeRCandy takes vacation on the following days: - Memorial Day - Independence Day July 4 - Labor Day - Thanksgiving (Thursday and Friday) - Christmas Dec. 24, 25, 26 - New Year's Dec. 31, Jan. 1, Jan. 2 The personnel and other resources used for the project are documented below. A schedule of tasks related to the feasibility study is shown below. The tasks that are indented are subtask of the bold task above them. Tasks marked with Milestone are those that signal a signicant event in the project and that include a presentation to those involved (including Troy Bigs, CEO). WeRCandy takes vacation on the following days: - Memorial Day - Independence Day July 4 - Labor Day - Thanksgiving (Thursday and Friday) - Christmas Dec. 24, 25, 26 - New Year's Dec. 31, Jan. 1, Jan. 2
Step by Step Solution
There are 3 Steps involved in it

Get step-by-step solutions from verified subject matter experts